Mackie Onyx 1640i Quick Start Guide - Page 19
Firewire, Installation On A Pc, Firewire Connections - firewire cable
 |
View all Mackie Onyx 1640i manuals
Add to My Manuals
Save this manual to your list of manuals |
Page 19 highlights
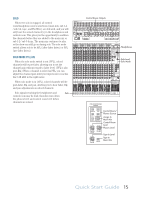
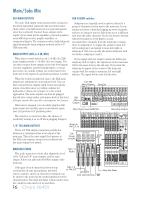
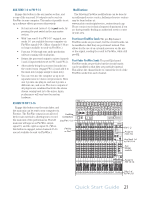
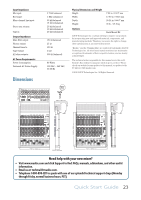
FireWire The mixer comes with a CD containing the PC driver software needed to use your mixer's internal FireWire interface. Macintosh OS X contains built-in drivers, and no software installation is required. Please check our website (www.mackie.com) for any updated PC drivers that may exist. If one does, download this installer and follow the instructions that accompany the download. Otherwise continue on with the CD installation instructions listed below. INSTALLATION ON A PC: 1. Connect a FireWire cable from your mixer to a FireWire port on your computer. 2. Turn on your mixer. 3. The Windows application (XP or Vista) will start its "Found New Hardware" wizard. 4. In the details that follow, ignore any attempt to connect to Windows Update to find the software. Also ignore any warnings about the software not having passed Windows testing. Trust software from LOUD Technologies, Inc. 5. Select "Locate and install driver software that came with your device." 6. You will be prompted to insert the CD that came with your mixer. Do so. 7. Select "Install," and the driver software should be installed. 8. For Windows XP users, depending upon your configuration, repeat steps 1-7 if prompted to install a second driver. 9. In your audio software application, select and activate all the inputs from the mixer and the outputs to the mixer. INSTALLATION ON A MAC: 1. Connect a FireWire cable from your mixer to a FireWire port on your Mac. 2. Turn on your mixer. 3. Go to the applications folder, open the utilities folder, and double-click "Audio MIDI Setup." 4. Click the Audio Devices tab, and select Onyx-i in the "Properties For" drop-down box. 5. Here you can see the settings for the mixer. You can also choose it as your default input or output, as well as designate it to be used for system sound output. 6. You're ready to go with any Mac OS X Core Audio host application (i.e., Tracktion, Logic, Cubase, Nuendo, Live, Digital Performer, etc.). 7. In your audio software applications, select and activate the inputs from the mixer and outputs to the mixer. FIREWIRE CONNECTIONS Two FireWire connectors allow the transfer of digital audio to and from your computer or digital audio workstation (DAW). There are two identical connectors, but you only need one. The other is used for connecting additional devices if your mixer is using up your computer's only FireWire connector. For example, you could daisy-chain multiple Onyx 1640i mixers or add an external hard drive since the FireWire connectors are run in serial. Performance will vary based on system hardware. The FireWire interface provides the following outputs to your computer: • Individual channels, tapped pre-fader, and either pre-EQ, or post-EQ (your choice). • Aux sends 1-6 for effects plug-in routing or alternate mix recording. • Subgroups 1-4 for subgroup or alternate mix recording. • Left/right main mix. The left/right main mix at the FireWire output is not affected by the main mix fader (important for recording live). FireWire allows you to turn your Onyx mixer into a high-quality computer audio interface for your DAW. Use FireWire to record a live performance directly to your computer, then mixdown to a stereo mix or add overdubs later. The FireWire interface also provides 16 channels of audio from your computer. The first two channels can be routed to either channels 1-2 or the control room for convenient monitoring of a wide range of applications (iTunes®, for example): • These can be routed through the control room/phones via the FW 1-2 button, to monitor the computer audio through your control room speakers or headphones (or through the main speakers if assign to main mix is selected). • Alternatively, these same two channels can be routed through channels 1 and 2, and treated just like any other channel, with adjustment for EQ, level, and pan, as well as to solo, and add to the main mix and aux sends 1-6. In this way, your stereo computer source can be used alongside the other channels as "just another source" in the band, such as a virtual instrument, or the output of a guitar going through amp-modelling software. This routing is done using the FW/line input selector switches on channels 1 and 2. Quick Start Guide 19
-
 1
1 -
2
-
3
-
4
-
5
-
6
-
7
-
8
-
9
-
10
-
11
-
12
-
13
-
 14
14 -
 15
15 -
 16
16 -
 17
17 -
 18
18 -
 19
19 -
 20
20 -
 21
21 -
 22
22 -
 23
23 -
 24
24 -
25
-
26
-
27
-
28
 |
 |
