Magellan RoadMate 1440 Manual - English - Page 37
Multi Destination Routes - won t turn on
 |
UPC - 763357122961
View all Magellan RoadMate 1440 manuals
Add to My Manuals
Save this manual to your list of manuals |
Page 37 highlights
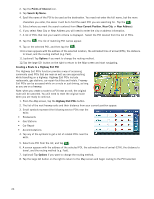
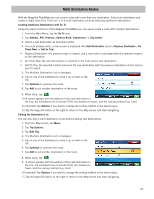
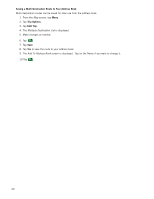
Multi Destination Routes With the Magellan RoadMate you can create routes with more than one destination. Select one destination and create a single route first. Then turn it to a multi destination route by selecting additional destinations. Creating Additional Destinations with Go To Using the search functions of the Magellan RoadMate you can easily create a route with multiple destinations. 1. From the Main Menu, tap the Go To icon. 2. Tap Address, POI, Previous, Address Book, Intersection, or City Center. 3. Select a new destination as described earlier. 4. If a route already exists, a new screen is displayed with Add Destination options (Replace Destination, Go There Now, or Add to Trip). • Replace Destination: the previous route is cleared, and a new route is calculated with the selected location as the destination. • Go There Now: the selected location is inserted in the route as the next destination. • Add To Trip: the selected location becomes the new destination with the previous destination as the last via point to reach. 5. The Multiple Destination List is displayed. 6. Tap on one of the addresses to move it up or down in the list. 7. Tap Optimize to optimize the route. 8. Tap Add to put another destination in the route. 9. When done, tap . 10.A screen appears with the address of the next destination in the trip, the estimated time of arrival (ETA), the distance to travel, and the routing method (e.g. Fast). 11.(optional) Tap Options if you want to change the routing method or the vehicle type. 12.Tap the large GO button on the right to return to the Map screen and start navigating. Editing the Destination List You can also edit a multi destination route without adding new destinations. 1. From the Map screen, tap Menu. 2. Tap Trip Options. 3. Tap Edit Trip. 4. The Multiple Destination List is displayed. 5. Tap on one of the addresses to move it up or down in the list. 6. Tap Optimize to optimize the route. 7. Tap Add to put another destination in the route. 8. When done, tap . 9. A screen appears with the address of the next destination in the trip, the estimated time of arrival (ETA), the distance to travel, and the routing method (e.g. Fast). 10.(optional) Tap Options if you want to change the routing method or the vehicle type. 11.Tap the large GO button on the right to return to the Map screen and start navigating. 29
-
 1
1 -
2
-
3
-
4
-
5
-
6
-
7
-
8
-
9
-
10
-
11
-
12
-
13
-
14
-
15
-
16
-
17
-
18
-
19
-
20
-
21
-
22
-
23
-
24
-
25
-
26
-
27
-
28
-
29
-
30
-
31
-
 32
32 -
 33
33 -
 34
34 -
 35
35 -
 36
36 -
 37
37 -
 38
38 -
 39
39 -
 40
40 -
 41
41 -
 42
42 -
43
-
44
-
45
-
46
-
47
-
48
 |
 |
