Magic Chef MCSDRY35W User Manual - Page 10
Wall-mounting Instructions
 |
View all Magic Chef MCSDRY35W manuals
Add to My Manuals
Save this manual to your list of manuals |
Page 10 highlights
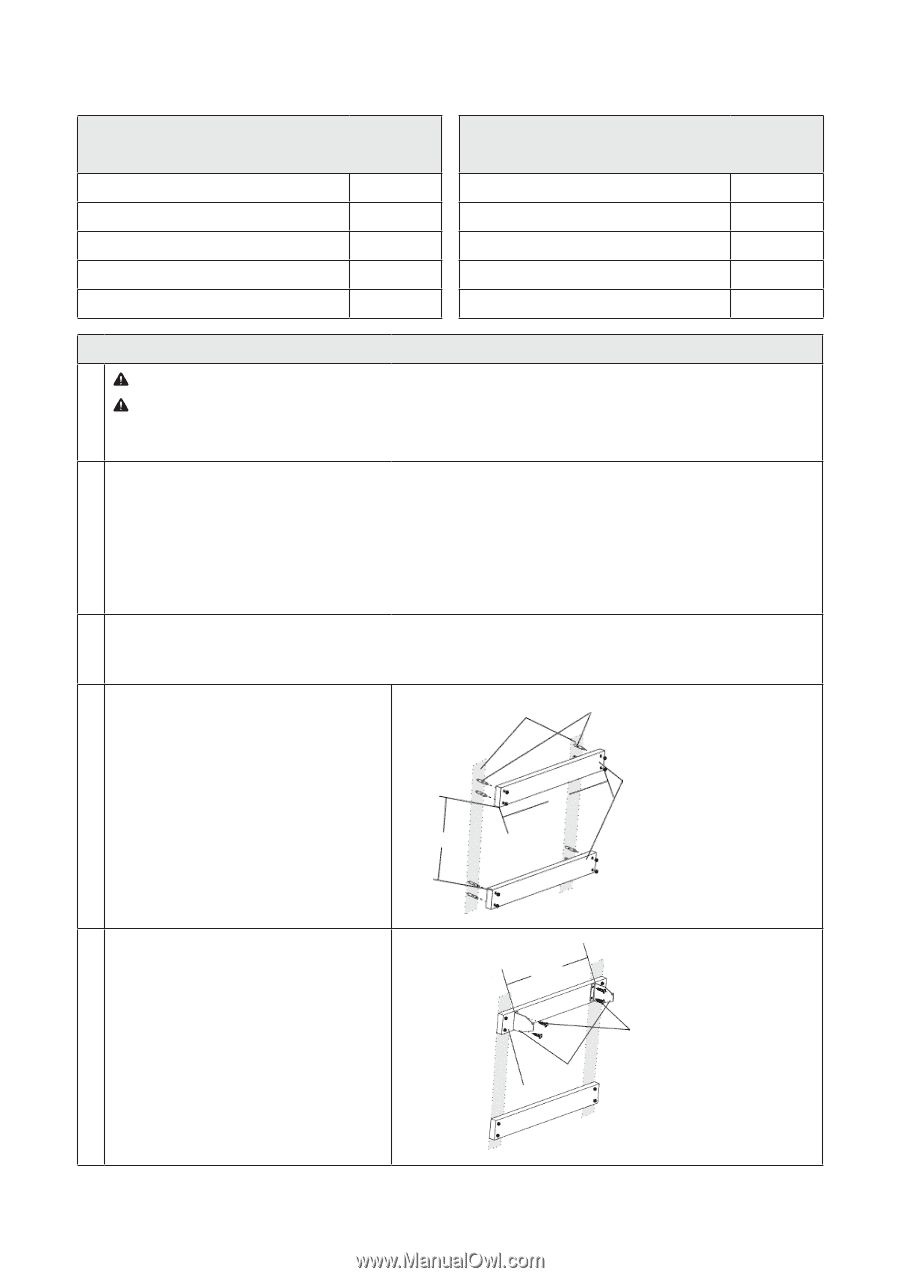
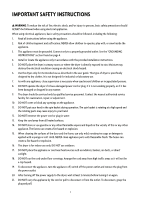
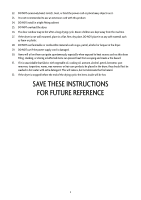
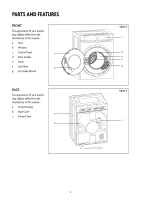
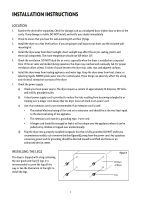
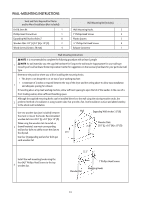
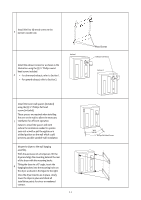
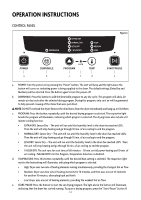
WALL-MOUNTING INSTRUCTIONS Tools and Parts Required for Plaster and/or Wood Installation (Not Included) Drill & 3mm Bit 1 Phillips Head Screwdriver 1 Expanding Wall Anchor Bolts 2" 8 Wooden Slats 22.3" (L) 3.0" (H) x 1.0" (D) 2 Wood Screws (12 mm x 50 mm) 4 Wall-Mounting Kit (Includes) Wall-Mounting Hooks 2 1" Phillips Head Screws 4 Plastic Spacers 2 ½" Phillips Flat Head Screws 4 Exhaust Connector 1 Wall-Mounting Instructions NOTE: It is recommended to complete the following procedure with at least 2 people. NOTE: As wall materials vary, the supplied hardware for fixing to the wall may be inappropriate for your wall type. * Consult your local hardware/home improvement center for suggestions on the necessary hardware for your particular wall type. Determine the position where you will be installing the mounting hooks. • This dryer is not designed to sit on top of your washing machine. • A minimum of 2 inches is required between the top of the dryer and the ceiling above to allow easy installation 1 and adequate spacing for exhaust. If mounting above a top load washing machine, allow sufficient spacing to open the lid of the washer. In the case of a front loading washer, allow sufficient breathing space. Although the supplied mounting hooks can be installed directly to the wall using the existing wooden studs, the 2 preferred method of installation is using wooden slats that provide a flat, level installation surface and added stability to the whole wall installation. Use two wooden slats (not included) between the studs to mount the hooks. Recommended wooden slat size is 23.0" (L) x 3.0" (H) x 1.0" (D). When using the wooden slats to install on 3 drywall material, you must use expanding wall anchor bolts to safely secure the slats to the drywall. 21.3" Use four (4) expanding wall anchor bolts per each wooden slat. Wall Expanding Wall Anchor 2.0" (8) Wooden Slats 23.0" 23.0" (L) x 3.0" (H) x 1.0" (D) Install the wall-mounting hooks using the four (4) 1" Phillips Head Screws to the top 4 wooden slat. 22.2" Wooden Slat 1" Phillips Head Screws Mounting Hooks 10
-
 1
1 -
2
-
3
-
4
-
 5
5 -
 6
6 -
 7
7 -
 8
8 -
 9
9 -
 10
10 -
 11
11 -
 12
12 -
 13
13 -
 14
14 -
 15
15 -
16
-
17
-
18
-
19
-
20
-
21
-
22
-
23
-
24
-
25
-
26
-
27
-
28
-
29
-
30
-
31
-
32
-
33
-
34
-
35
-
36
-
37
-
38
-
39
-
40
 |
 |