Magnavox MVH-2000 / Owners manual - Page 8
Preparation, Troubleshooting - infrared space heater
 |
View all Magnavox MVH-2000 manuals
Add to My Manuals
Save this manual to your list of manuals |
Page 8 highlights
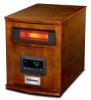
PREPARATION Place the heater on a firm, level surface and plug into a grounded 120 V, 60 Hz power outlet and turn on the power switch on the rear of the unit. Only operate heater in upright position. Insert two AAA batteries into the remote control before using (batteries not included). Please note that infrared heaters do not heat like a traditional space heater. You should not expect infrared heaters to blow hot air like a traditional space heater. Infrared heaters heat objects not air. Infrared heaters are intended to supplement an already heated, insulated room. Square footage specifications assume a single enclosed room not an entire home. Infrared heaters do not heat through walls, floors, and are not intended to replace a main heat source. Infrared heat can take at least 24 hours to warm a room but operate much more efficiently to maintain the desired temperature. Infrared heaters will not work well in uninsulated unheated spaces like screened in porches, RV's, garages, unheated basements, etc. TROUBLESHOOTING PROBLEM POSSIBLE CAUSE CORRECTIVE ACTION The heater does not turn on. 1. The power cord is not plugged in. 2. The electricity at the main fuse box is not working. 3. The battery in the remote control is dead. 4. The thermostat on the heater is set lower than the room temperature. 1. Plug the power cord into an electrical outlet. 2. Check the electricity at the main fuse box. 3. Replace the batteries in the remote control. 4. Increase the thermostat temperature on the heater for a higher heat setting. The heater displays 1. The heater has overheated. an error code "E1" 2. Insufficient power to the unit 3. The air filter is clogged. 4. Insufficient air flow to the heater. 1. Unplug the heater from the wall, wait a few seconds then plug the power cord back in. 2. Make sure the unit is plugged into a dedicated 3-prong outlet, with no extension cords or surge protectors. 3. Clean the airfilter located on the back of the unit. see page 13. 4. Move the unit at least 3ft from the wall. The heater displays 1. Temperature sensor not function- 1. Please contact technical support. an error code "E2" ing properly. 8
-
 1
1 -
2
-
 3
3 -
 4
4 -
 5
5 -
 6
6 -
 7
7 -
 8
8 -
 9
9 -
 10
10 -
 11
11 -
 12
12 -
 13
13 -
14
-
15
-
16
 |
 |
