Makita DCW180Z Instruction Manual - Page 10
Parts Description, Operation
 |
View all Makita DCW180Z manuals
Add to My Manuals
Save this manual to your list of manuals |
Page 10 highlights
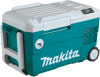
PARTS DESCRIPTION ► Fig.1 1 Control panel 4 Upper cover 7 Opener 10 "DC IN" socket 13 Cool / heat switch button 16 Temperature reduction button 2 Battery cover 5 Handle 8 Filter cover 11 Temperature plus button 14 Temperature display 17 USB power supply port 3 Upper cover hook 6 Carrying Handle 9 Wheel 12 Power button 15 Battery indicator -- OPERATION 1. Connecting the power supply A) Battery CAUTION: Always switch off the tool before installing or removing of the battery cartridge. CAUTION: Hold the tool and the battery cartridge firmly when installing or removing battery cartridge. Failure to hold the tool and the battery cartridge firmly may cause them to slip off your hands and result in damage to the tool and battery cartridge and a personal injury. CAUTION: Be careful not to pinch your finger when opening or closing the battery cover. To install the battery cartridge, open the battery cover. Align the tongue on the battery cartridge with the groove in the housing and slip it into place. Insert it all the way until it locks in place with a little click. Then close the battery cover. To remove the battery cartridge, slide it from the appliance while sliding the button on the front of the cartridge. ► Fig.2 ► 1. Red indicator 2. Button 3. Battery cartridge CAUTION: Always install the battery cartridge fully until the red indicator cannot be seen. If not it may accidentally fall out of the tool causing injury to you or someone around you. CAUTION: Do not install the battery cartridge forcibly. If the cartridge does not slide in easily, it is not being inserted correctly. NOTE: Up to two battery cartridges can be installed, although the appliance uses one battery cartridge for operation. B) AC adaptor (Only use for Recreational vehicle) When using the appliance with AC power, use the AC adaptor supplied with the appliance. Insert the plug to "DC IN" inlet of the appliance and then insert the other end to an outlet. C) Cigarette lighter adaptor When using the appliance with the cigarette lighter socket, use the cigarette lighter adaptor supplied with the appliance. Insert the plug to "DC IN" inlet of the appliance and then insert the other end to the cigarette lighter socket. CAUTION: Insert the plug completely into the "DC IN" inlet. Failure to do so may deform the plug or cause a fire. CAUTION: Always close the "DC IN" socket cover firmly when the power cord is not plugged. NOTICE: When the appliance has been operated for about 24 hours with the battery cartridge installed, battery cartridge may shut down its own power to protect the battery cartridge. In this case, the appliance can not operate with the battery power supply and the battery indicator also goes off. To resume the battery power supply, remove and re-install the battery cartridge. NOTE: When the appliance shifts power supply, the compressor will stop for about 3 minutes to protect the compressor. NOTE: After turning off the appliance, it takes about 3 minutes to restart the compressor because of the protection of the compressor. 2. Turning on the appliance Press the power button to turn on the appliance. Press the power button again to turn off the appliance. 3. Switching cooling / heating mode Press the cool / heat switch button to switch the operating mode. The temperature display flashes the control temperature. • When the appliance operates in cooling mode, the control temperature is -18 °C, -10 °C, 0 °C, 5 °C or 10 °C (0 °F, 15 °F, 30 °F, 40 °F or 50 °F). • When the appliance operates in heating mode, the control temperature is 55 °C or 60 °C (130 °F or 140 °F). 10 ENGLISH
-
 1
1 -
2
-
3
-
4
-
 5
5 -
 6
6 -
 7
7 -
 8
8 -
 9
9 -
 10
10 -
 11
11 -
 12
12 -
 13
13 -
 14
14 -
 15
15 -
16
-
17
-
18
-
19
-
20
-
21
-
22
-
23
-
24
-
25
-
26
-
27
-
28
-
29
-
30
-
31
-
32
 |
 |
