Makita HR5000 Owners Manual - Page 6
Functional, Description, Assembly - hammer drill
 |
View all Makita HR5000 manuals
Add to My Manuals
Save this manual to your list of manuals |
Page 6 highlights
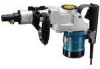
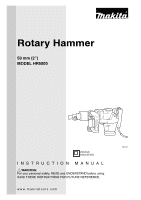
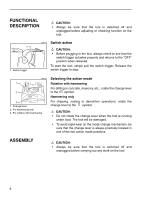
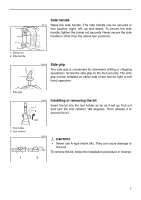
FUNCTIONAL DESCRIPTION CAUTION: • Always be sure that the tool is switched off and unplugged before adjusting or checking function on the tool. 1 1. Switch trigger 003111 Switch action CAUTION: • Before plugging in the tool, always check to see that the switch trigger actuates properly and returns to the "OFF" position when released. To start the tool, simply pull the switch trigger. Release the switch trigger to stop. 003127 1 2 3 1. Change lever 2. For hammering only 3. For rotation with hammering Selecting the action mode Rotation with hammering For drilling in concrete, masonry, etc., rotate the change lever to the symbol. Hammering only For chipping, scaling or demolition operations, rotate the change lever to the symbol. CAUTION: • Do not rotate the change lever when the tool is running under load. The tool will be damaged. • To avoid rapid wear on the mode change mechanism, be sure that the change lever is always positively located in one of the two action mode positions. ASSEMBLY CAUTION: • Always be sure that the tool is switched off and unplugged before carrying out any work on the tool. 6
-
 1
1 -
 2
2 -
 3
3 -
 4
4 -
 5
5 -
 6
6 -
 7
7 -
 8
8 -
 9
9 -
 10
10 -
 11
11 -
 12
12 -
13
-
14
-
15
-
16
 |
 |