Makita HR5210C Owners Manual - Page 5
Selecting the action mode, Torque limiter, Indicator lamp
 |
View all Makita HR5210C manuals
Add to My Manuals
Save this manual to your list of manuals |
Page 5 highlights
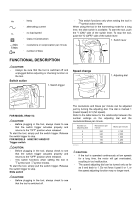
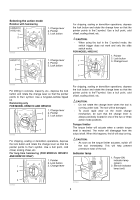
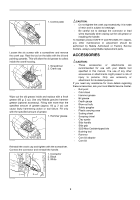
Selecting the action mode Rotation with hammering HR5201C HR5210C 1 2 1. Change lever 2. Pointer 3. Lock button 3 007839 HR5211C 1 2 1. Change lever 2. Pointer 3. Lock button For chipping, scaling or demolition operations, depress the lock button and rotate the change lever so that the pointer points to the symbol. Use a bull point, cold chisel, scaling chisel, etc. CAUTION: • When using the tool in the symbol mode, the switch trigger does not work and only the slide switch works. FOR MODEL HR5211C 1. Pointer 2. Lock button 1 3. Change lever 2 3 007860 For drilling in concrete, masonry, etc., depress the lock button and rotate the change lever so that the pointer points to the symbol. Use a tungsten-carbide tipped bit. Hammering only FOR MODEL HR5201C AND HR5210C 1. Change lever 3 2. Pointer 3. Lock button 2 1 007902 For chipping, scaling or demolition operations, depress the lock button and rotate the change lever so that the pointer points to the symbol. Use a bull point, cold chisel, scaling chisel, etc. For long time hammering (FOR MODELS HR5201C AND HR5210C ONLY) 1. Pointer 2. Lock button 1 3. Change lever 2 3 007862 For chipping, scaling or demolition operations, depress the lock button and rotate the change lever so that the pointer points to the symbol. Use a bull point, cold chisel, scaling chisel, etc. CAUTION: • Do not rotate the change lever when the tool is running under load. The tool will be damaged. • To avoid rapid wear on the mode change mechanism, be sure that the change lever is always positively located in one of the two or three action mode positions. Torque limiter The torque limiter will actuate when a certain torque level is reached. The motor will disengage from the output shaft. When this happens, the bit will stop turning. CAUTION: • As soon as the torque limiter actuates, switch off the tool immediately. This will help prevent premature wear of the tool. Indicator lamp 1. Power-ON indicator lamp (green) 1 2. Service indicator lamp (red) 2 3 007840 007863 5
-
 1
1 -
 2
2 -
 3
3 -
 4
4 -
 5
5 -
 6
6 -
 7
7 -
 8
8 -
 9
9 -
 10
10 -
 11
11 -
12
-
13
-
14
-
15
-
16
-
17
-
18
-
19
-
20
-
21
-
22
-
23
-
24
-
25
-
26
-
27
-
28
-
29
-
30
-
31
-
32
 |
 |
