Makita RT0701CX3 Owners Manual - Page 10
When using as a router only with a plunge, base optional accessory
 |
View all Makita RT0701CX3 manuals
Add to My Manuals
Save this manual to your list of manuals |
Page 10 highlights
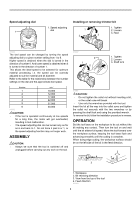
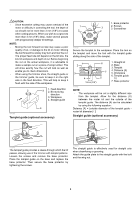
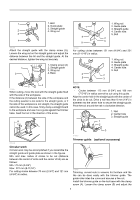
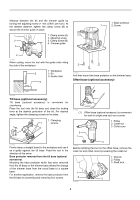
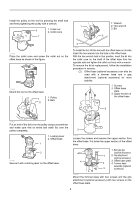
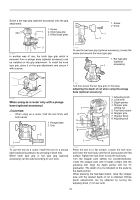
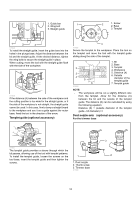
Screw a bar type grip (optional accessory) onto the grip attachment. 1. Screw 1 2. Knob type grip 3. Offset base plate 2 1. Screw 2. Knob 1 2 3 011984 In another way of use, the knob type grip which is removed from a plunge base (optional accessory) can be installed on the grip attachment. To install the knob type grip, place it on the grip attachment and secure it with a screw. 011856 To use the bar type grip (optional accessory), loosen the screw and remove the knob type grip. 1. Bar type grip (optional 1 accessory) 011986 When using as a router only with a plunge base (optional accessory) CAUTION: • When using as a router, hold the tool firmly with both hands. 1. Plunge base 2. Grip 2 011857 And then screw the bar type grip on the base. Adjusting the depth of cut when using the plunge base (optional accessory) 1 2 3 4 5 6 1. Adjusting knob 2. Lock lever 3. Depth pointer 4. Stopper pole setting nut 5. Fast-feed button 6. Stopper pole 7. Stopper block 8. Adjusting bolt 1 011855 To use the tool as a router, install the tool on a plunge base (optional accessory) by pressing it down fully. Either knob type grip or bar type grip (optional accessory) can be used according to your work. 7 8 011983 Place the tool on a flat surface. Loosen the lock lever and lower the tool body until the bit just touches the flat surface. Tighten the lock lever to lock the tool body. Turn the stopper pole setting nut counterclockwise. Lower the stopper pole until it makes contact with the adjusting bolt. Align the depth pointer with the "0" graduation. The depth of cut is indicated on the scale by the depth pointer. While pressing the fast-feed button, raise the stopper pole until the desired depth of cut is obtained. Minute depth adjustments can be obtained by turning the adjusting knob (1 mm per turn). 10
-
 1
1 -
2
-
3
-
4
-
 5
5 -
 6
6 -
 7
7 -
 8
8 -
 9
9 -
 10
10 -
 11
11 -
 12
12 -
 13
13 -
 14
14 -
 15
15 -
16
-
17
-
18
-
19
-
20
-
21
-
22
-
23
-
24
-
25
-
26
-
27
-
28
-
29
-
30
-
31
-
32
-
33
-
34
-
35
-
36
-
37
-
38
-
39
-
40
-
41
-
42
-
43
-
44
-
45
-
46
-
47
-
48
 |
 |
