Makita SP6000K1 Owners Manual - Page 7
Bevel cutting, Sighting - saw
 |
View all Makita SP6000K1 manuals
Add to My Manuals
Save this manual to your list of manuals |
Page 7 highlights
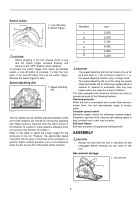
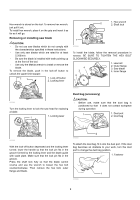
To obtain the 2 to 3 mm depth of cut, push in the stop button toward the saw blade. This is convenient for avoiding splinter on the workpiece. To release the depth of cut from this position for free depth of cut, just pull the button back. 1. Quick stop 1 button 1 1. Lever 007660 007670 Tilting to the left 1 1. Bevel angle shifting lever Bevel cutting 1. Clamping screws 2. Tool base 1 007661 1 007657 Tilting to the right The tool can be tilted to the left 1° bevel angle. To get the left 1° bevel angle, loosen the clamping screws in 2 front and back, tilt the tool handle slightly to the right and push two bevel angle shifting levers at the same time in the direction of arrow which has a marking -1. And then tilt the tool handle to the left while pushing these two 1. Positive stopper levers at the same time. Secure the base with the clamping screws. 1 007659 Turn the positive stopper so that the arrow on it points one of two positions (vertical for 22.5°, horizontal for 45°). Loosen the clamping screws in front and back. Then, tilt the tool base until it stops and secure the base with the clamping screws. To get 48° bevel angle, move the lever to 48° marking as far as it will go. Turn the positive stopper so that the arrow on it points to the horizontal position. Then, tilt the tool base until it stops and secure the base with the clamping screws. NOTE: • Returning the blade to the right angle makes the shifting lever return to 0° by itself. Sighting 1 2 1. Base 2. Cutting line A B 007671 When using the tool without guide rail (accessory) For straight cuts, align the A position on the front of the base with your cutting line. For 45° bevel cuts, align the B position with it. When using the tool with guide rail (accessory) For both straight cuts and 45° bevel cuts, always align the A position on the front of the base with your cutting line. 7
-
 1
1 -
 2
2 -
 3
3 -
 4
4 -
 5
5 -
 6
6 -
 7
7 -
 8
8 -
 9
9 -
 10
10 -
 11
11 -
 12
12 -
13
-
14
-
15
-
16
-
17
-
18
-
19
-
20
-
21
-
22
-
23
-
24
-
25
-
26
-
27
-
28
-
29
-
30
-
31
-
32
-
33
-
34
-
35
-
36
-
37
-
38
-
39
-
40
 |
 |
