Makita SP6000K1 Owners Manual - Page 9
Removing or installing saw blade, Dust bag accessory - accessories
 |
View all Makita SP6000K1 manuals
Add to My Manuals
Save this manual to your list of manuals |
Page 9 highlights
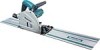
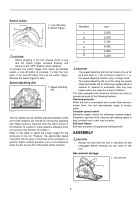
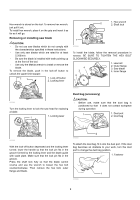
Hex wrench is stored on the tool. To remove hex wrench, just pull it out. To install hex wrench, place it on the grip and insert it as far as it will go. Removing or installing saw blade CAUTION: • Do not use saw blades which do not comply with the characteristics specified in these instructions. • Use only saw blades which are rated for at least 5,200/min. • Be sure the blade is installed with teeth pointing up at the front of the tool. • Use only the Makita wrench to install or remove the blade. To remove the blade, push in the lock-off button to unlock the upper limit stopper. 21 1. Lock-off button 2. Locking lever 2 1. Hex wrench 2. Shaft lock 1 007658 To install the blade, follow the removal procedure in reverse. BE SURE TO TIGHTEN THE HEX BOLT CLOCKWISE SECURELY. 4 3 2 1. Hex bolt 2. Outer flange 3. Saw blade 4. Inner flange 1 007672 007662 Turn the locking lever to lock the saw head for replacing a blade. 1. Locking lever 1 Dust bag (accessory) CAUTION: • Before use, make sure that the dust bag is positioned so that it does not contact workpiece during operation. 1 1. Dust port 2. Dust bag 007655 With the lock-off button depressed and the locking lever turned, lower the handle so that the lock pin fits in the groove formed by the locking lever and the depth guide with scale plate. Make sure that the lock pin fits in the groove. Press the shaft lock fully so that the blade cannot revolve and use the wrench to loosen the hex bolt counterclockwise. Then remove the hex bolt, outer flange and blade. 2 010505 To attach the dust bag, fit it onto the dust port. If the dust bag becomes an obstacle to your work, turn the dust port to change the dust bag position. 1. Fastener 1 010506 9
-
 1
1 -
2
-
3
-
 4
4 -
 5
5 -
 6
6 -
 7
7 -
 8
8 -
 9
9 -
 10
10 -
 11
11 -
 12
12 -
 13
13 -
 14
14 -
15
-
16
-
17
-
18
-
19
-
20
-
21
-
22
-
23
-
24
-
25
-
26
-
27
-
28
-
29
-
30
-
31
-
32
-
33
-
34
-
35
-
36
-
37
-
38
-
39
-
40
 |
 |
