Makita TW1000 Owners Manual - Page 5
Operation, Maintenance - impact wrench
 |
View all Makita TW1000 manuals
Add to My Manuals
Save this manual to your list of manuals |
Page 5 highlights
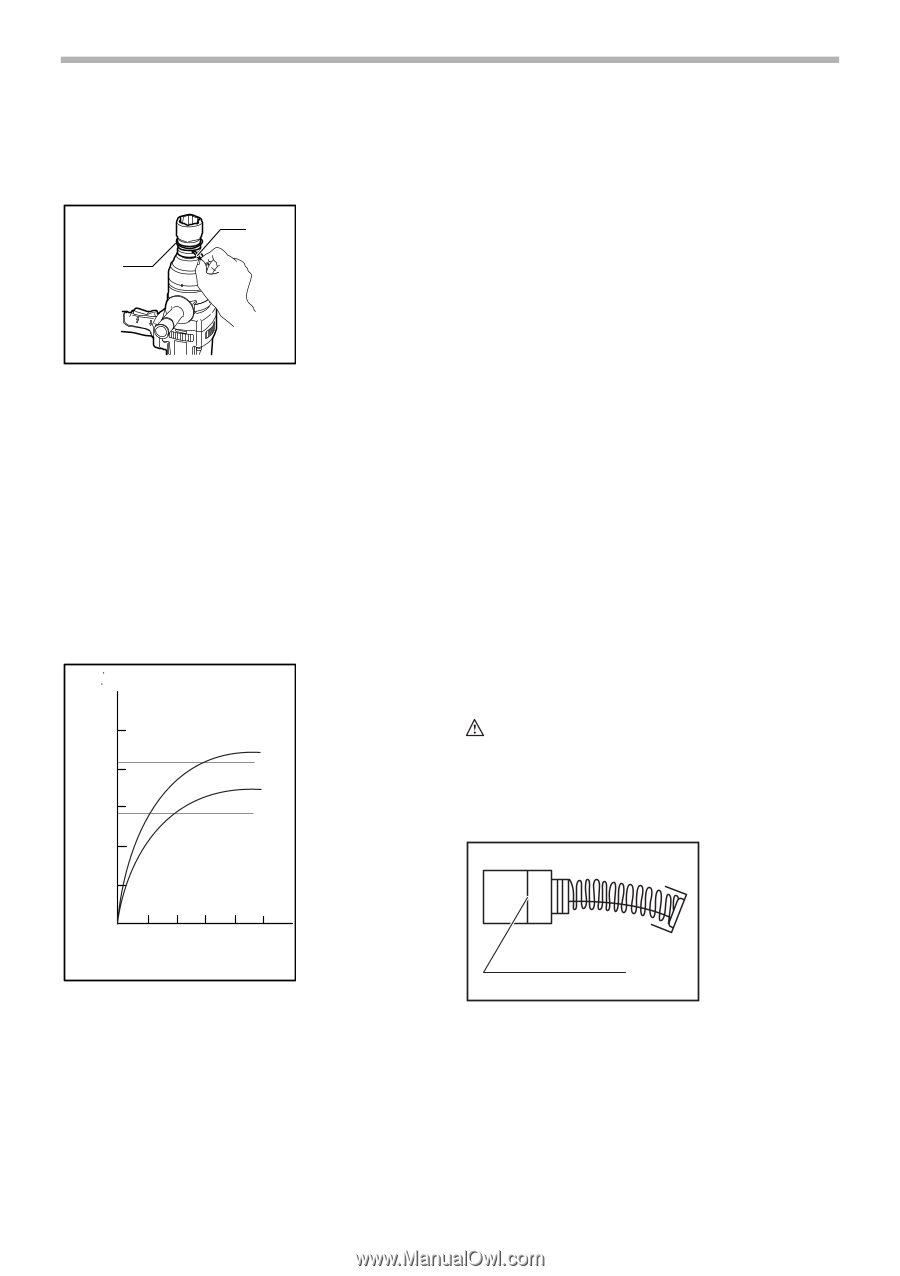
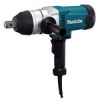
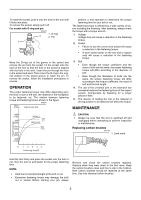
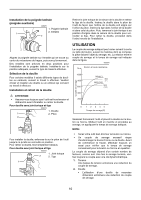
To install the socket, push it onto the anvil of the tool until it locks into place. To remove the socket, simply pull it off. For socket with O-ring and pin 005972 1. O-ring 2 2. Pin 1 Move the O-ring out of the groove in the socket and remove the pin from the socket. Fit the socket onto the anvil of the tool so that the hole in the socket is aligned with the hole in the anvil. Insert the pin through the hole in the socket and anvil. Then return the O-ring to the original position in the socket groove to retain the pin. To remove the socket, follow the installation procedures in reverse. OPERATION The proper fastening torque may differ depending upon the kind or size of the bolt, the material of the workpiece to be fastened, etc. The relation between fastening torque and fastening time is shown in the figure. 005976 N m (ft lbs) High tensile bolt perform a test operation to determine the proper fastening time for your bolt or nut. The fastening torque is affected by a wide variety of factors including the following. After fastening, always check the torque with a torque wrench. 1. Voltage Voltage drop will cause a reduction in the fastening torque. 2. Socket • Failure to use the correct size socket will cause a reduction in the fastening torque. • A worn socket (wear on the hex end or square end) will cause a reduction in the fastening torque. 3. Bolt • Even though the torque coefficient and the class of bolt are the same, the proper fastening torque will differ according to the diameter of bolt. • Even though the diameters of bolts are the same, the proper fastening torque will differ according to the torque coefficient, the class of bolt and the bolt length. 4. The use of the universal joint or the extension bar somewhat reduces the fastening force of the impact wrench. Compensate by fastening for a longer period of time. 5. The manner of holding the tool or the material of driving position to be fastened will affect the torque. MAINTENANCE Fastening torque 1000 (740) 800 (590) 600 (440) 400 (300) 200 (150) M24(1") M24 (1") M22(7/8") M22 (7/8") CAUTION: • Always be sure that the tool is switched off and unplugged before attempting to perform inspection or maintenance. Replacing carbon brushes 001145 1. Limit mark 0 12 345 Fastening time(S) 1 Hold the tool firmly and place the socket over the bolt or nut. Turn the tool on and fasten for the proper fastening time. NOTE: • Hold the tool pointed straight at the bolt or nut. • Excessive fastening torque may damage the bolt/ nut or socket. Before starting your job, always Remove and check the carbon brushes regularly. Replace when they wear down to the limit mark. Keep the carbon brushes clean and free to slip in the holders. Both carbon brushes should be replaced at the same time. Use only identical carbon brushes. 5
-
 1
1 -
 2
2 -
 3
3 -
 4
4 -
 5
5 -
 6
6 -
 7
7 -
 8
8 -
 9
9 -
 10
10 -
 11
11 -
12
-
13
-
14
-
15
-
16
-
17
-
18
-
19
-
20
 |
 |