Marantz MT7001 User Guide - Page 5
Installation Procedure
 |
View all Marantz MT7001 manuals
Add to My Manuals
Save this manual to your list of manuals |
Page 5 highlights
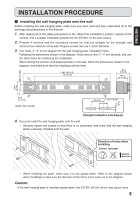
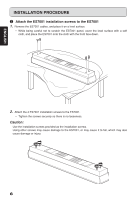
ENGLISH INSTALLATION PROCEDURE q Installing the wall hanging plate onto the wall Before installing the wall hanging plate, make sure you have read and fully understand all of the warnings and precautions in this manual. 1. After reading all of the safety precautions in the lAbout the Installation Locationz section of this manual, find a suitable installation position for the ES7001 on the wall surface. 2. Prepare 4 anchors and the necessary screws etc that are suitable for the strength and construction materials of the wall. Prepare screws that are 4~5mm diameter. 3. Use holes q~r on the diagram for the wall hanging plate installation holes. Following the dimensions shown in the diagram, firstly ensure that q~r are secured, and use the other holes for reinforcing the installation. When drilling the anchors and prepared holes in the wall, follow the dimensions shown in the diagram, and make sure that the installation will be level. 1,080 (42-9/16) 812.8 (32) q 160.3 (6-5/16) 143.0 e (5-11/16) 36.2 (1-7/16) 6.4 (5/16) w 69.9 (2-13/16) (Unit: mm (inch)) 50.8 (2) r 31.8 (1-5/16) Enlarged installation hole diagram 4. Securely install the wall hanging plate onto the wall. • Securely tighten the screws so that there is no looseness, and check that the wall hanging plate is securely installed onto the wall. Direction of holes when installing Correct Incorrect Upward direction 154.5 (6-1/8) • When installing the plate, make sure it is not upside down. Refer to the diagram below when installing to make sure the direction of the holes is the same as in the diagram. Caution: If the wall hanging plate is installed upside down, the ES7001 will fall, which may cause injury. 5
-
 1
1 -
 2
2 -
 3
3 -
 4
4 -
 5
5 -
 6
6 -
 7
7 -
 8
8
 |
 |
