Marantz PM-14S1 HDAM & Current feedback Amp of Marantz Unique technolo - Page 8
Part names and functions
 |
View all Marantz PM-14S1 manuals
Add to My Manuals
Save this manual to your list of manuals |
Page 8 highlights
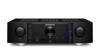
ENGLISH Part names and functions For buttons not explained here, see the page indicated in parentheses ( ). Front panel Q4 Q7 Q6 Q5 Q4 Q3 q w e r t y u i o Q0 Q1 Q2 q INPUT SELECTOR knob This selects the input source (vpage 16). w DISPLAY button This turns the illumination lamp on/off (vpage 19). e Speaker output button/indicator (SPEAKERS) This switches speaker output on/off (vpage 16). • Indicates the status of the unit's as follows: • Speaker on: Blue • Speaker off: Off r TONE button/indicator This turns the tone control on/off (vpage 17). • Indicates the status of the unit's as follows: • Tone control on: Blue • Tone control off: Off t Headphone jack (PHONES) Used to connect headphones. • Turn off speaker output when using headphones (vpage 16). NOTE To prevent hearing loss, do not raise the volume level excessively when using headphones. y Remote control sensor This receives signals from the remote control unit (vpage 2). u Power operation button (X) This turns the power on/off (vpage 16). i BASS control knob This adjusts the bass (vpage 17). o TREBLE control knob This adjusts the treble (vpage 17). Q0 Power amplifier direct mode button/indicator (P.DIRECT IN) This switches the power amp direct mode on/off (vpage 18). • Indicates the status of the unit's as follows: • Power amplifier direct mode on: Blue • Power amplifier direct mode off: Off Q1 Phono equalizer button/indicator (PHONO MC) This switch is set according to the type of player cartridge to be used. Set this switch to MM or MC according to the type of cartridge used on your turntable. • Indicates the status of the unit's as follows: • MC: Blue • MM: Off Q2 Attenuator button (ATT.) This mutes the volume (vpage 17). Q3 VOLUME control knob This adjusts the volume level (vpage 16). Q4 Illumination lamp The illumination lamp lights (blue). Q5 Display This displays various pieces of information. Q6 POWER indicator This is lit as follows according to the power status : • Power on : Blue • Standby : Off • Power off : Off Q7 STANDBY indicator This is lit as follows according to the power status : • Power on : Off • Standby : Red • Power off : Off 4
-
 1
1 -
2
-
 3
3 -
 4
4 -
 5
5 -
 6
6 -
 7
7 -
 8
8 -
 9
9 -
 10
10 -
 11
11 -
 12
12 -
 13
13 -
14
-
15
-
16
-
17
-
18
-
19
-
20
-
21
-
22
-
23
-
24
-
25
-
26
-
27
-
28
-
29
-
30
-
31
-
32
 |
 |
