Marantz PM-15S2 PM-15S2 User Manual - English - Page 14
Basic Connections
 |
View all Marantz PM-15S2 manuals
Add to My Manuals
Save this manual to your list of manuals |
Page 14 highlights
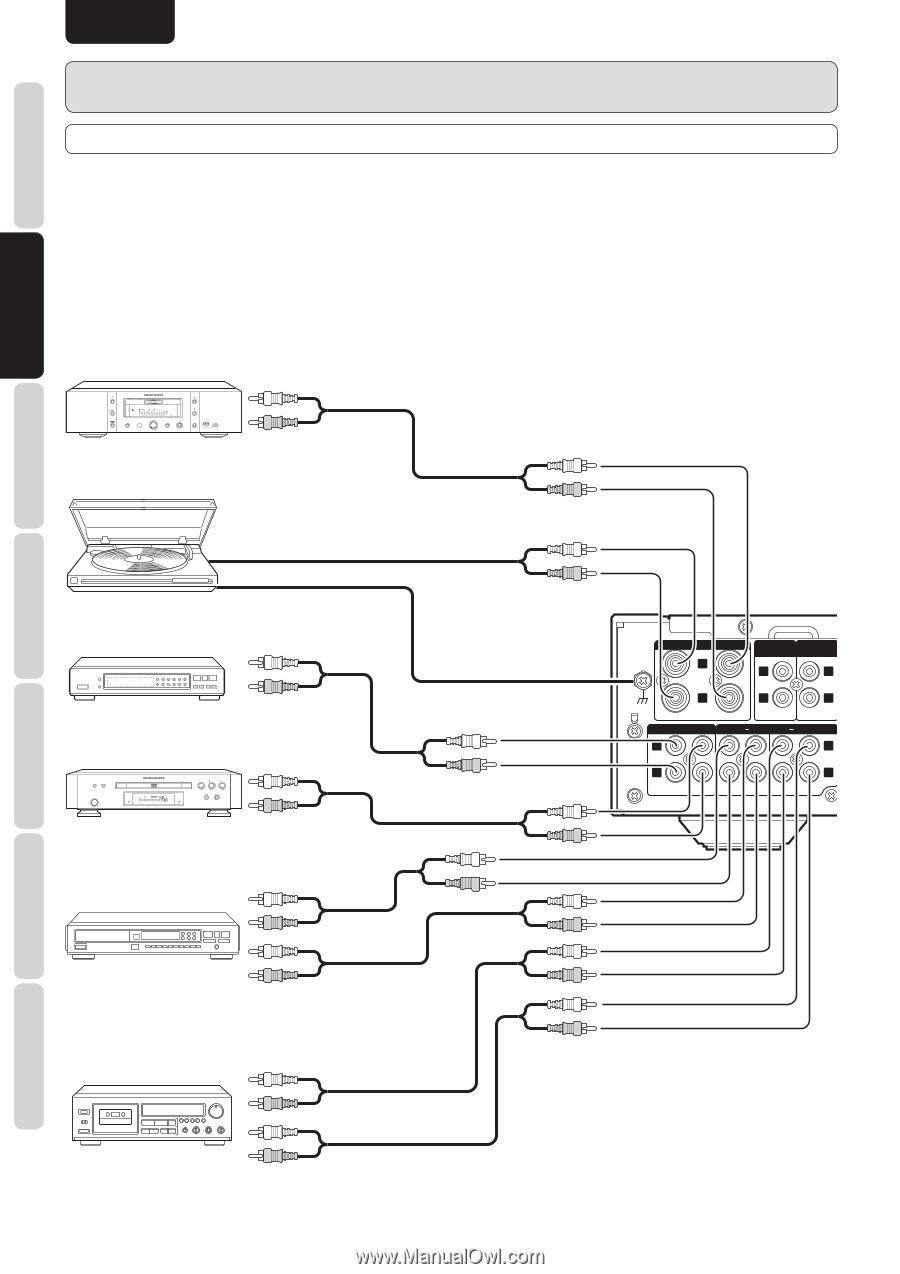
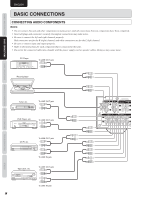
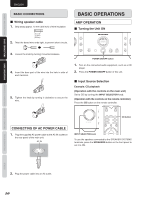
NAMES AND FUNCTIONS BASIC CONNECTIONS ENGLISH BASIC CONNECTIONS CONNECTING AUDIO COMPONENTS Notes: • Do not connect this unit and other components to mains power until all connections between components have been completed. • Insert all plugs and connectors securely. Incomplete connections may make noise. • Be sure to connect the left and right channels properly. Red connectors are for the R (right) channel, and white connectors are for the L (left) channel. • Be sure to connect input and output properly. • Refer to the instructions for each component that is connected to this unit. • Do not tie the connected cable into a bundle with the power supply cord or speaker cables. Doing so may cause noise. CD Player OPEN/ CLOSE SUPER AUDIO CD PLAYER SA-15S1 DISPLAY OFF SOUND MODE POWER ON/OFF PONES LEVEL PLAY STOP PAUSE To LINE OUT jack Record player BASIC OPERATIONS ADVANCED CONNECTIONS ADVANCED OPERATIONS TROUBLESHOOTING Tuner, etc. To LINE OUT jack DVD Player, etc. DIMMER RANDOM VIDEO ON/OFF DVD PLAYER DV-12S1 OPEN/CLOSE PLAY STOP PAUSE POWER STANDBY V-PART DVD 192kHz GRP AUDIO 96kHz TRK TITLE DIG OFF CHP PROGRESSIVE DOLBY D TEMAIN TOTAL VIDEO OFF LAST MEMO CONDITION DOWN MIX LCR LFE LS S RS FL OFF To LINE OUT jack CD-R, etc. To LINE OUT jack To LINE IN jack Tape deck, etc. To LINE OUT jack To LINE IN jack 8 PHONO CD PHONO GND L PRE OUT P.DIRECT IN L L R R R IN 1 LINE 2 IN 1 RECORDER 2 L L R R IN IN IN OUT IN OUT OTHERS
-
 1
1 -
2
-
3
-
4
-
5
-
6
-
7
-
8
-
 9
9 -
 10
10 -
 11
11 -
 12
12 -
 13
13 -
 14
14 -
 15
15 -
 16
16 -
 17
17 -
 18
18 -
 19
19 -
20
-
21
-
22
-
23
-
24
-
25
-
26
-
27
-
28
-
29
-
30
-
31
-
32
-
33
 |
 |