Marantz PM-KI PEARL PM-KI-PEARL User Manual - English - Page 24
ADVANCED OPERATIONS, How to Trim Volume Level
 |
View all Marantz PM-KI PEARL manuals
Add to My Manuals
Save this manual to your list of manuals |
Page 24 highlights
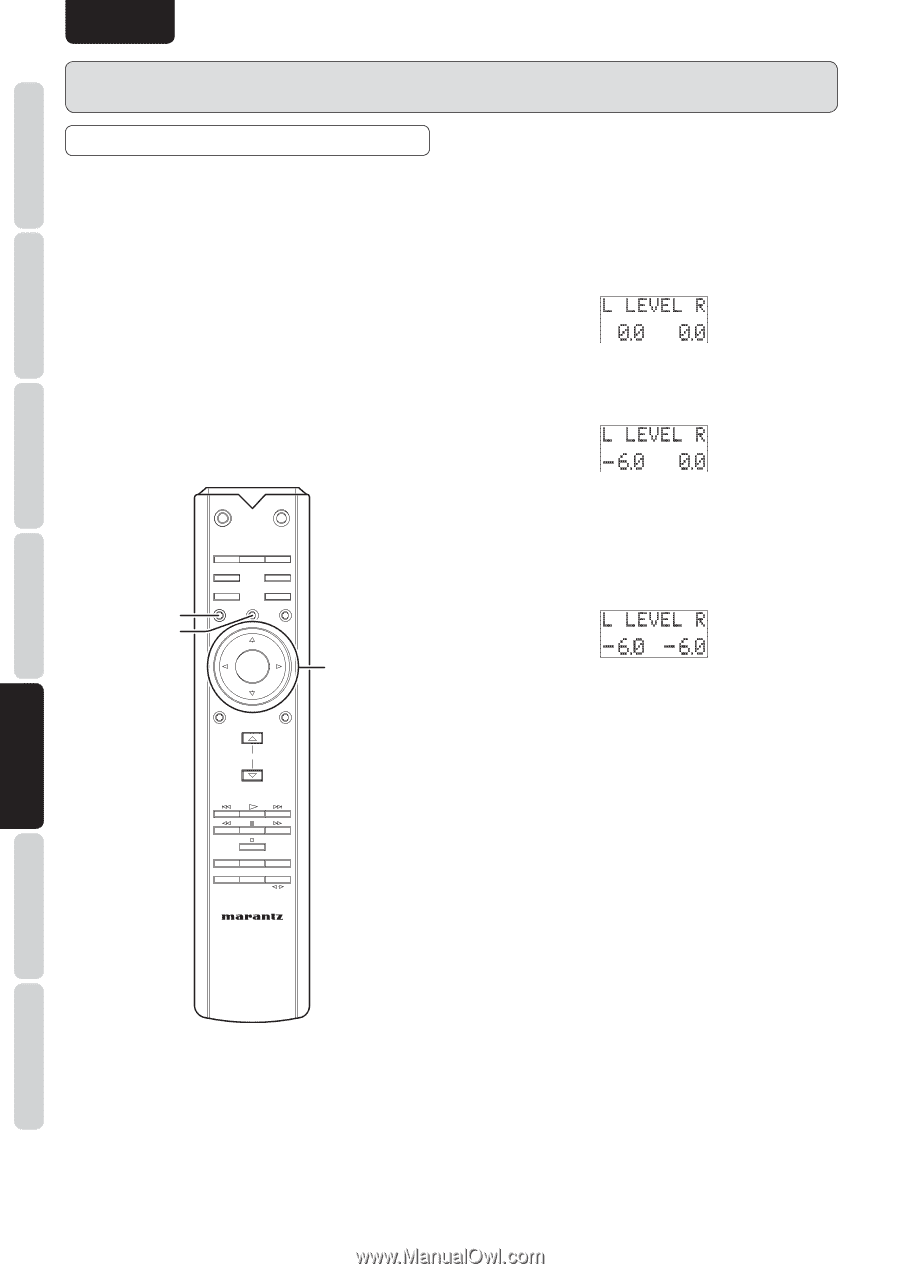
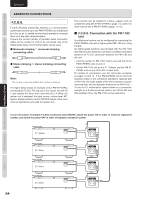
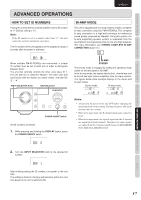
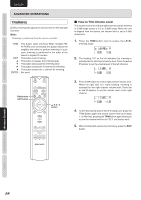
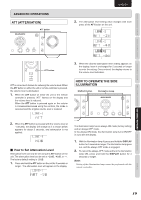
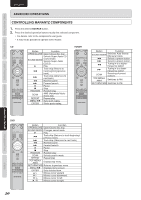
NAMES AND FUNCTIONS BASIC CONNECTIONS BASIC OPERATIONS ADVANCED CONNECTIONS ADVANCED OPERATIONS TROUBLESHOOTING ENGLISH ADVANCED OPERATIONS TRIMMING LEVEL trimming that adjusts the volume level on left and right channels Note: Trimming is performed from the remote controller. TRIM : This button starts trimming. When multiple PMKI-PEARLs are connected, this button selects the amplifier with which to perform trimming. In such case, trimming is performed in the order of the lowest to highest ID number. EXIT : This button ends trimming. 3 : This button increases the trimming level. 4 : This button decreases the trimming level. 2 : This button selects the R channel for trimming. 1 : This button selects the L channel for trimming. ENTER : Not used OPEN/ CLOSE SOUND MODE TRIM button EXIT button PHONO BALANCED CD RECORDER 1 LINE 1 RECORDER 2 TRIM EXIT LINE 2 TONE + L R ENTER DISPLAY - ATT 3, 4, 2, 1 button VOLUME RANDOM SCAN REPEAT TOP MENU RETURN AM/A FM/B MENU 7 How to Trim Volume Level The volume level of the left and right channels can be trimmed in 0.5dB steps across a 0.0 to -9.0dB range. When the unit is shipped from the factory, the volume level is set to 0.0dB (maximum). 1. Press the TRIM button once to access the LEVEL trimming mode. 2. The flashing "0.0" on the left indicates that trimming is activated for the left channel volume level. Press the 3 and 4 buttons to set the volume level of the left channel. 3. Press the 2 button to set the right channel volume level. When the right side "0.0" starts flashing, trimming is activated for the right channel volume level. Press the 3 and 4 buttons to set the volume level of the right channel. 4. To trim the volume level of the ID 2 (slave) unit, press the TRIM button again and set the volume level as in steps 1~3. After that, pressing the TRIM button again allows you to trim the volume level for the "ID 3" unit and so forth. 5. When finished with volume level trimming, press the EXIT button. OTHERS 18
-
 1
1 -
2
-
3
-
4
-
5
-
6
-
7
-
8
-
9
-
10
-
11
-
12
-
13
-
14
-
15
-
16
-
17
-
18
-
 19
19 -
 20
20 -
 21
21 -
 22
22 -
 23
23 -
 24
24 -
 25
25 -
 26
26 -
 27
27 -
 28
28 -
 29
29 -
30
-
31
-
32
-
33
 |
 |