Marantz PM8004 PM8004 User Manual - English - Page 13
Advanced operations - pre out
 |
View all Marantz PM8004 manuals
Add to My Manuals
Save this manual to your list of manuals |
Page 13 highlights
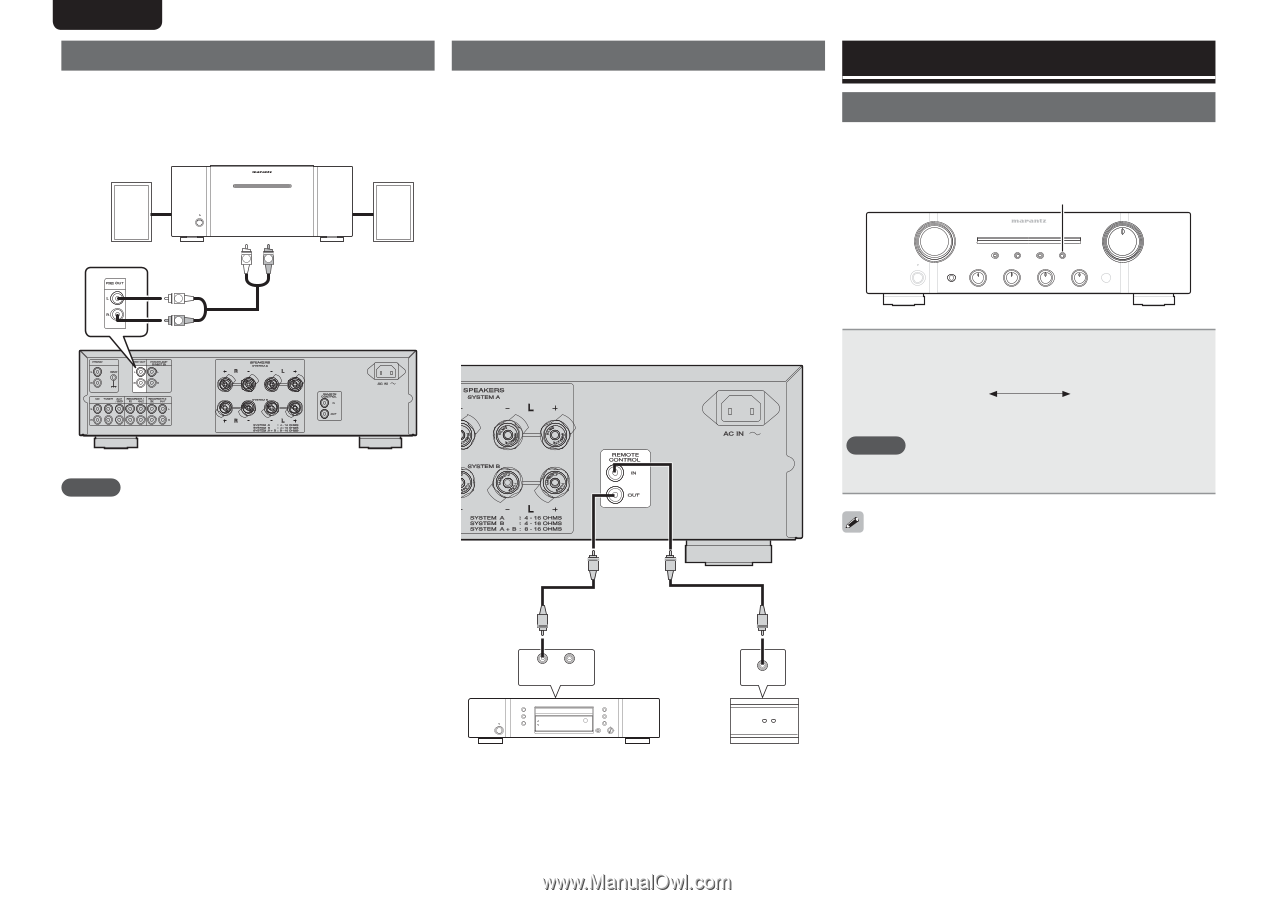
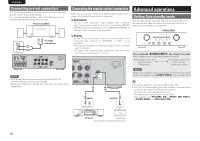
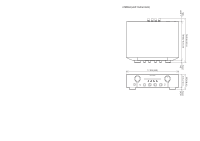
ENGLISH Connecting pre out connectors If you use a power amplifier, connect it as shown below, and then you can use this unit as a preamplifier. For connecting speaker systems, refer to the instruction manual supplied with the power amplifier to be used. Power-amplifier L R To input connectors L R Connecting the remote control connectors When you use this unit connected to Marantz audio components, it sends control signals to operate each component. nnConnection Use the remote connection cable (supplied with a Marantz audio component you want to connect) to connect the REMOTE CONTROL OUT terminal of this unit to the REMOTE CONTROL IN terminal of the component to be connected. Advanced operations Setting Auto standby mode With the Auto standby mode ON, this unit will automatically enter the Auto standby mode after about 30 continuous minutes of no output from the speakers or headphones. SOURCE DIRECT nnSetting Set the remote control switch located on the rear panel of the connected audio component to "EXTERNAL" or "EXT." to use this feature. • This setting will disable remote sensor reception of the connected audio component. • To operate the connected audio component, point the remote control at the remote sensor of this unit. Press and hold for at least 5 seconds. • Auto standby mode is switched between On and Off. Auto standby mode "Off" Power indicator Flashes once Auto standby mode "On" Power indicator Flashes three times NOTE • NEVER insert the short-circuiting pin plug into the PRE OUT terminals. Doing so could result in damage. • Signals are output from the PRE OUT terminals even when using headphones. INPUT OUTPUT NOTE Perform the operation using the buttons on the unit. You cannot perform the operation using [SOURCE DIRECT] on the remote control. • The default setting for the Auto standby mode is OFF. • This unit will automatically enter Auto standby mode after about continuous 30 minutes in the following conditions. • No output from the selected input source. • No operation performed on the remote control. • No operation of , , or . IN OUT REMOTE CONTROL RC OUT CD player Option unit (such as remote control receiver unit) 10
-
 1
1 -
2
-
3
-
4
-
5
-
6
-
7
-
 8
8 -
 9
9 -
 10
10 -
 11
11 -
 12
12 -
 13
13 -
 14
14 -
 15
15 -
 16
16 -
 17
17
 |
 |