Marantz SD4050 SD4050 User Guide - Page 9
Recording Deck B Only
 |
View all Marantz SD4050 manuals
Add to My Manuals
Save this manual to your list of manuals |
Page 9 highlights
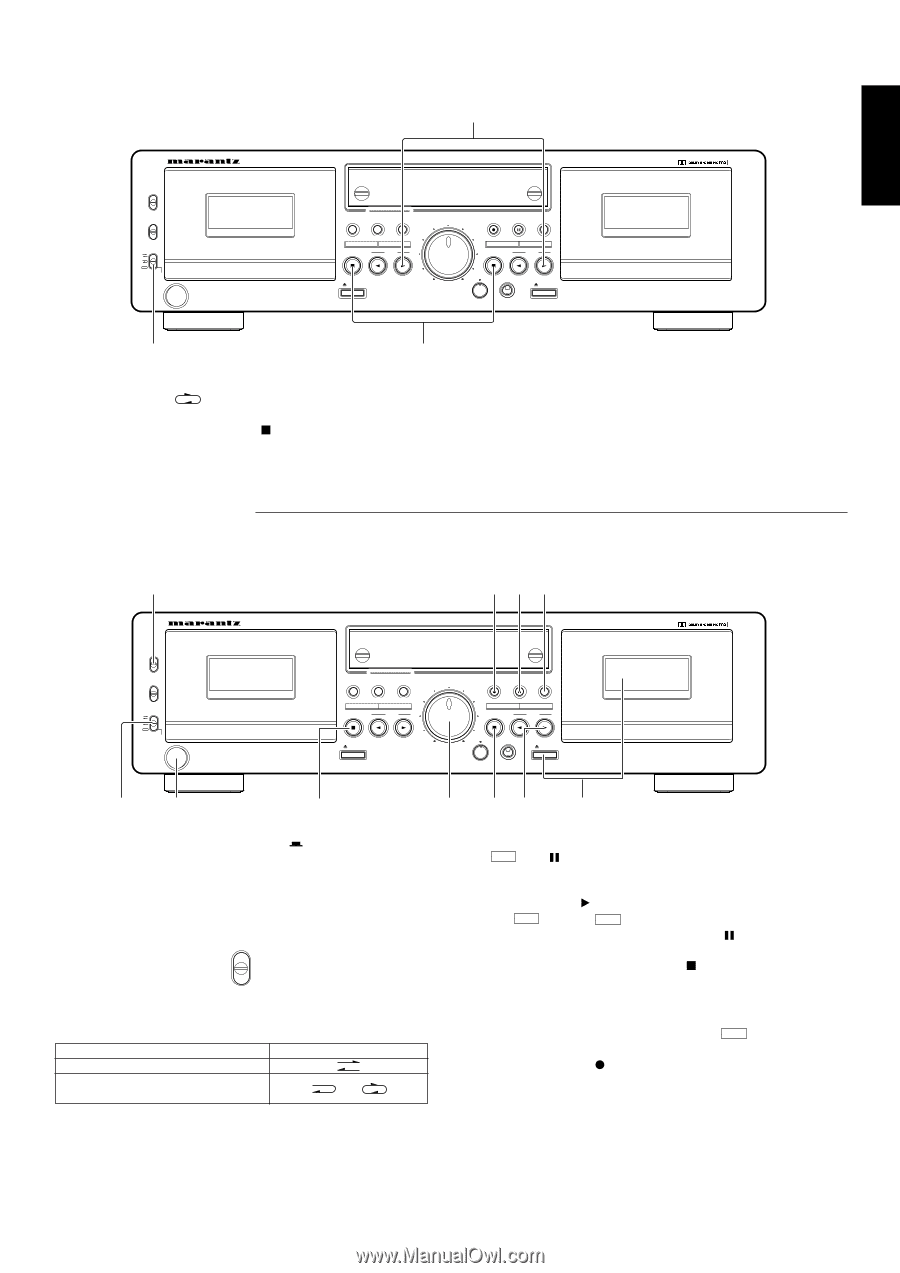
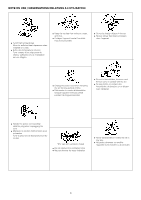
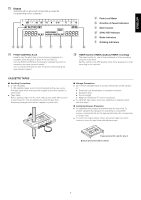
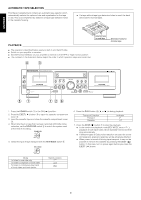
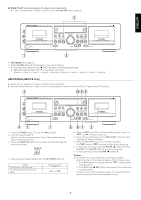
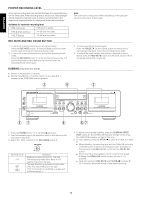
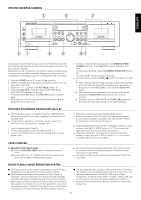
FRANÇAIS ENGLISH í RELAY PLAY (continuous playback of the tapes in deck A and deck B) ¼ Load a cassette tape into deck A and B, and set the Dolby NR button correctoly. w DOLBY NR C B OFF TIMER REC OFF PLAY REV. MODE CCONT. PLAY DOUBLE CASSETTE DECK SD4050 COUNTER RESET COUNTER RESET DUBBING SPEED SYNC REV NORMAL HIGH REC LEVEL RECORD PAUSE REC MUTE AUTO REVERSE AUTO TAPE SELECT/HIGH SPEED DUBBING STOP PLAY POWER ON/OFF A PLAY EJECT STOP PLAY AUTO REVERSE AUTO TAPE SELECT/HIGH SPEED DUBBING MIN MAX PITCH CONTROL - PHONES + EJECT BREC/PLAY q e 1. REV MODE set to q. 2. Press the PLAY button w of the deck you first wish to listen to. 3. To stop relay play, press the stop ( ) e of the deck currently playing the tape. ¼ Relay play will play deck A and B in succession for 5 times, (Deck A Ǟ Deck B Ǟ Deck A Ǟ Deck B Ǟ Deck A) or (Deck B Ǟ Deck A Ǟ Deck B Ǟ Deck A Ǟ Deck B). RECORDING (DECK B only) ¼ Switch on your amplifier or receiver and the source component. ¼ Set the Function Selector or Tape monitor on your amplifier or receiver to the SOURCE or Tape monitor OFF position. e !0ot DOLBY NR C B OFF TIMER REC OFF PLAY REV. MODE CCONT. PLAY DOUBLE CASSETTE DECK SD4050 COUNTER RESET COUNTER RESET DUBBING SPEED SYNC REV NORMAL HIGH REC LEVEL RECORD PAUSE REC MUTE AUTO REVERSE AUTO TAPE SELECT/HIGH SPEED DUBBING STOP PLAY POWER ON/OFF A PLAY EJECT STOP PLAY AUTO REVERSE AUTO TAPE SELECT/HIGH SPEED DUBBING MIN MAX PITCH CONTROL - PHONES + EJECT BREC/PLAY rq u y iu w 1. Press the POWER switch q to the ON ( ) position. 2. Load the cassette tape w. (Check that the erasure prevention tabs of the cassette housing have not been broken off.) 3. Press the DOLBY NR switch e and select the Dolby NR type that suits the recording. DOLBY NR C B OFF 4. Select the type of tape transport with the REV MODE switch r. Mode To record on only one side To continuously record on both sides Switch position or 5. Press the REC button !0 to set the recording pause mode. The REC and indicator will light up. 6. Adjust the recording level with the REC LEVEL control y while watching the Peak Level Meter. 7. Press the PLAY ( ) button u to start the recording. The PLAY and the REC Indicator will light during recording. 8. To pause the recording, press the PAUSE ( ) button o. Press the PLAY u or PAUSE button o to resume recording. 9. To stop recording, press the STOP ( ) button i. Caution: ¼ Be careful not to erase important recordings by mistake. Inadvertent start of recording will happen in the following cases: 1. If the PLAY button is pressed while the REC indicator lights, recording starts. 2. If the PLAY and REC button are pressed at the same time, recording starts. The best way to avoid accidental erasure is to break off the two erasure prevention tabs on the cassette housing. 9
-
 1
1 -
2
-
3
-
 4
4 -
 5
5 -
 6
6 -
 7
7 -
 8
8 -
 9
9 -
 10
10 -
 11
11 -
 12
12 -
 13
13 -
 14
14 -
15
-
16
-
17
-
18
-
19
-
20
-
21
-
22
-
23
-
24
-
25
-
26
 |
 |