Marantz SR8300 User Guide - Page 20
Working With Modes, Adjusting The Settings
 |
View all Marantz SR8300 manuals
Add to My Manuals
Save this manual to your list of manuals |
Page 20 highlights
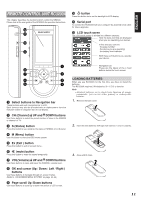
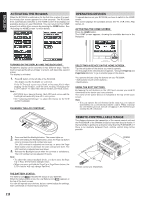
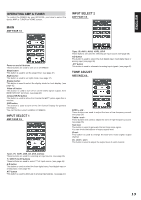
ENGLISH WORKING WITH MODES RC3200A starts up in Use mode. In this mode you operate your devices. For customizing the RC3200A (adjusting the settings, learning buttons or recording macros) you have to switch to the appropriate mode. Note • When switching between modes you will always return to the last active screen. The RC3200A can be put into 4 different modes. These modes are: Use mode: For operating your devices. See "Operating Devices". Setup mode: For changing the RC3200A system settings. See "Adjusting the Settings" for more details. Learn mode: For learning commands from other remote controls. See "Learning Commands" for more details. Macro mode: For recording macros. You can assign multiple commands to one single button. See "Recording Macros" for more details. Note • Learning commands and recording macros is only possible per device. This means that you first have to select a specific device to perform these actions. 1. On the HOME screen tap the soft button of the device you want to customize. The first page of the selected device appears. 2. Press and hold the Mode button for 3 seconds. The Mode screen appears. Note You have to press and hold the Mode button for 3 seconds to prevent accidental changes. 3. Select the desired mode from the Mode screen. Note • When you switch to another mode from the HOME screen, you cannot choose the Learn mode and Macro mode. To switch to these modes you first have to go to the specific device you want to customize. ADJUSTING THE SETTINGS The RC3200A settings can be adjusted in the Setup mode. 1. Press and hold the Mode button for 3 seconds. The Mode screen appears. 2. Tap Setup in the Mode screen. The first Setup page appears. The RC3200A settings consist of 3 setup pages with several settings per page. Use the Page Up and Page Down buttons to navigate to the appropriate setup page. FIRST SETUP PAGE On the first setup page you can adjust: • the LCD timeout; • the backlight timeout; • the beep volume. Adjust the LCD Timeout The LCD timeout indicates how long the LCD touch screen stays active before it turns off. The LCD will only time out when you don't touch any buttons. You can set the timeout between 1 second and 120 seconds. Press "+" to increase or "-" to decrease the time the LCD stays active. 1. Tap "+" or "-"once to adjust the timeout 1 second up or down. 2. Press and hold "+" or "-" to adjust the timeout per 10 seconds up or down. Adjust the Backlight Timeout The backlight setting indicates how long the backlight of the LCD touch screen and the buttons stays active. The backlight timeout can be set between 1 second and 120 seconds. Note • The backlight cannot stay active longer than the LCD. If you increase the backlight timeout, the LCD timeout will automatically increase as well. Press "+" to increase or "-" to decrease the time the backlight stays active. 1. Tap "+" or "-" once to adjust the timeout 1 second up or down. 2. Press and hold "+" or "-" to adjust the timeout per 10 seconds up or down. Note • When the settings for the LCD timeout and the backlight timeout are high, the battery lifetime may be reduced. Change the Beep volume The beep volume setting adjusts or turns off the volume of all button and system beeps on the RC3200A. The beep volume levels are mute, soft, medium and loud. 1. Press "+" to increase or "-" to decrease the beep volume. 16
-
 1
1 -
2
-
3
-
4
-
5
-
6
-
7
-
8
-
9
-
10
-
11
-
12
-
13
-
14
-
 15
15 -
 16
16 -
 17
17 -
 18
18 -
 19
19 -
 20
20 -
 21
21 -
 22
22 -
 23
23 -
 24
24 -
 25
25 -
26
-
27
-
28
-
29
-
30
-
31
-
32
-
33
-
34
-
35
-
36
-
37
-
38
-
39
-
40
-
41
-
42
-
43
-
44
-
45
-
46
-
47
-
48
-
49
-
50
-
51
-
52
-
53
-
54
-
55
-
56
 |
 |
