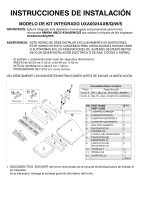
Maytag AMC5143AAS Installation Instructions - Page 4
Step 4 : Insertion Of Microwave Oven To Cabinet
 |
UPC - 719881136790
View all Maytag AMC5143AAS manuals
Add to My Manuals
Save this manual to your list of manuals |
Page 4 highlights
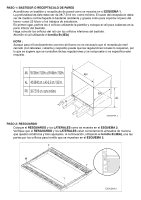
3. Unscrew the Outer-Panel screw of position P. After unscrewing, screw the Duct-Back B using Screw B(2EA). Refer to the SKETCH 6. SKETCH 6 STEP 4 : INSERTION OF MICROWAVE OVEN TO CABINET Insert the Microwave Oven into the Cabinet and coincide the foot & Duct-Rain foaming holes. Put it on the rail. Refer to the SKETCH 7. SKETCH 7 ELECTRIC SUPPLY PLUG THE THREE-PRONG POWER CORD INTO A PROPERLY GROUNDED OUTLET, 120V, 60Hz. STEP 5 : INSERTION OF THE TRIM ASSEMBLY Screw the TRIM ASSEMBLY to the Cabinet using the Secrew A(4EA). Next, put the TRIM-CAP (R) & (L). Refer to the SKETCH 8. SKETCH 8 SKETCH 8 Part No. : 8101P615-60 Code No. : DE68-02898A
-
 1
1 -
 2
2 -
 3
3 -
 4
4 -
 5
5 -
 6
6 -
 7
7 -
 8
8
 |
 |

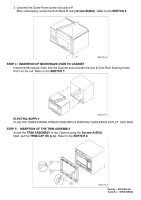
3. Unscrew the Outer-Panel screw of position P.
After unscrewing, screw the Duct-Back B using
Screw B(2EA)
. Refer to the
SKETCH 6.
STEP 4 : INSERTION OF MICROWAVE OVEN TO CABINET
Insert the Microwave Oven into the Cabinet and coincide the foot & Duct-Rain foaming holes.
Put it on the rail. Refer to the
SKETCH 7.
ELECTRIC SUPPLY
PLUG THE THREE-PRONG POWER CORD INTO A PROPERLY GROUNDED OUTLET, 120V, 60Hz.
STEP 5 :
INSERTION OF THE TRIM ASSEMBLY
Screw the
TRIM ASSEMBLY
to the Cabinet using the
Secrew A(4EA)
.
Next, put the
TRIM-CAP (R) & (L)
. Refer to the
SKETCH 8
.
SKETCH 6
SKETCH 7
SKETCH 8
Part No. : 8101P615-60
Code No. :
DE68-02898A