Maytag MAH5500BWW Use and Care Guide - Page 9
Are And, Leaning - door seal
 |
View all Maytag MAH5500BWW manuals
Add to My Manuals
Save this manual to your list of manuals |
Page 9 highlights
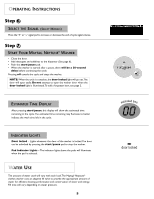
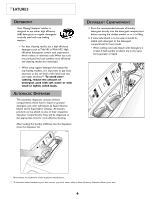
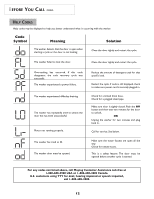
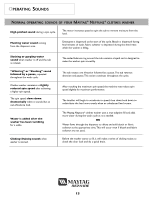
CARE AND CLEANING Turn off the water faucets after finishing the day's washing. This will shut off the water supply to the clothes washer and prevent the unlikely possibility of damage from escaping water. Leave the door open to allow the inside of the washer to dry out. Use a soft cloth to wipe up all detergent, bleach or other spills as they occur. Clean the following as recommended: Control Panel - Clean with a soft, damp cloth. Do not use abrasive powders or cleaning pads. Do not spray cleaners directly on the panel. Cabinet - Clean with soap and water. CLEANING THE INTERIOR Clean the interior of the washer periodically to remove any dirt, soil, odor, mold, mildew or bacteria residue that may remain in the washer as a result of washing clothes. We recommend taking the following steps every 60 to 120 days to clean and freshen your washer interior. The frequency with which the washer should be cleaned and freshened depends on factors such as usage, the amount of dirt, soil or bacteria being run through your washer, or the use of cold water. Failure to follow these instructions may result in unsatisfactory conditions, including unpleasant odor and/or permanent stains on the washer or washload. CLEANING THE DISPENSER To clean and freshen the washer interior: 1. Make a solution of one cup chlorine bleach and two cups warm water. Be careful not to spill or splash the bleach solution. 2. Wipe the lower portion of gray door seal with bleach solution and soft cloth. 3. Fill the bleach dispenser with chlorine bleach. 4. Run the washer through a complete cycle using hot water. 5. Repeat the wash cycle if necessary. Hard water deposits may be removed, if needed using a recommended cleaner labeled clothes washer safe. The dispenser may need to be cleaned periodically due to laundry additive build-up. For easy clean-up of the dispenser, grasp the removable two-compartment container (for bleach and softener) as shown in illustration #1. As you begin to lift the two-compartment container, tilt slightly inward, according to illustration #2 and remove from the main dispenser. Once the two-compartment container is removed from the main dispenser, take it to a sink. Follow illustration #3 to remove the cap covering the siphon tube for the bleach and softener. Run warm water and a soft brush or cloth over the two parts to remove any excess laundry additives. Clean the main dispenser area using water and a soft cloth. Once the main dispenser is clean, follow the illustrations in reverse order to replace the two compartment container to its original location. NOTE: Do not use any cleaning substance but water in the main dispenser. It is possible for cleaning substances to drain into the tub. If this should happen, set the washer for a rinse and spin cycle to remove any cleaning substance from the washer before doing a load of laundry. 1 2 3 OFTENER BLEACH FILL AX M S M AX FILL 8
-
 1
1 -
2
-
3
-
 4
4 -
 5
5 -
 6
6 -
 7
7 -
 8
8 -
 9
9 -
 10
10 -
 11
11 -
 12
12 -
 13
13 -
 14
14 -
15
-
16
-
17
-
18
-
19
-
20
-
21
-
22
-
23
-
24
-
25
-
26
-
27
-
28
-
29
-
30
-
31
-
32
-
33
-
34
-
35
-
36
-
37
-
38
-
39
-
40
-
41
-
42
-
43
-
44
-
45
-
46
-
47
-
48
-
49
-
50
-
51
-
52
 |
 |