Maytag MEDB955F Door Reversal Guide
Maytag MEDB955F Manual
 |
View all Maytag MEDB955F manuals
Add to My Manuals
Save this manual to your list of manuals |
Maytag MEDB955F manual content summary:
- Maytag MEDB955F | Door Reversal Guide - Page 1
NOTE: To complete the door swing reversal exactly as seen in these instructions, a door reversal kit must be purchased. For ordering information, please 's website or reference the contact information listed on your Quick Start Guide. Tools Needed Plastic putty knife Minimum 8" (203 mm) long - Maytag MEDB955F | Door Reversal Guide - Page 2
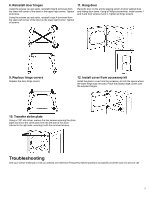
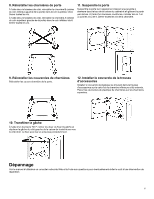
6. Remove hinges from door C. Using a #2 Phillips screwdriver, remove the remaining 4 screws from the hinges. Then remove hinges A and B and set the screws and hinges aside. After removing the magnet latch, move it to the opposite side of the door by reversing the previous steps. 7. Transfer - Maytag MEDB955F | Door Reversal Guide - Page 3
strike plate and move the strike plate from the left side of the dryer cabinet to the right side, securing it with the removed screws. Troubleshooting See your Owner's Manual or visit our website and reference Frequently Asked Questions to possibly avoid the cost of - Maytag MEDB955F | Door Reversal Guide - Page 4
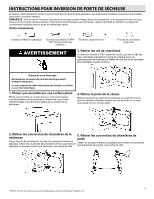
Web du fabricant ou utiliser les coordonnées indiquées dans le guide de démarrage rapide. Outils nécessaires Couteau à mastic en plastique Tournevis courant électrique avant d'enlever les portes. Le non-respect de cette instruction peut causer un décès ou un choc électrique. 1. Placer une serviette - Maytag MEDB955F | Door Reversal Guide - Page 5
6. Retirer les charnières de la porte C. À l'aide d'un tournevis cruciforme no 2, retirer les 4 vis qui restent sur les charnières. Retirer ensuite les charnières A et B, puis mettre les vis et les charnières de côté. Après avoir enlevé le verrou magnétique, le fixer de l'autre côté de la porte - Maytag MEDB955F | Door Reversal Guide - Page 6
8. Réinstaller les charnières de porte À l'aide des vis laissées de côté, réinstaller la charnière B (retirée du coin inférieur gauche de la porte) dans le coin supérieur droit. Serrer toutes les vis. À l'aide des vis laissées de côté, réinstaller la charnière A (retirée du coin supérieur gauche de - Maytag MEDB955F | Door Reversal Guide - Page 7
INSTRUCCIONES PARA INVERTIR EL SENTIDO DE ABERTURA DE LA PUERTA DE LA SECADORA Puede invertir el cierre de la puerta de la abertura hacia la derecha a la abertura hacia la izquierda, si lo desea. Las siguientes instrucciones son para los modelos con puertas de abertura lateral. NOTA: Para completar - Maytag MEDB955F | Door Reversal Guide - Page 8
6. Quite las bisagras de la puerta C. Con un destornillador Phillips n.° 2, quite los 4 tornillos restantes de las bisagras. Luego quite las bisagras A y B y deje a un lado los tornillos y las bisagras. Después de quitar el pestillo magnético, revierta los pasos anteriores para moverlo al lado - Maytag MEDB955F | Door Reversal Guide - Page 9
del lado izquierdo al lado derecho del gabinete de la secadora; asegúrelo con los tornillos que quitó. Solución de problemas Consulte el Manual del usuario o visite nuestro sitio web y consulte la sección de "Preguntas frecuentes", para evitar posiblemente el costo de una visita de servicio técnico
-
 1
1 -
 2
2 -
 3
3 -
 4
4 -
 5
5 -
 6
6 -
 7
7 -
8
-
9
 |
 |
1
DRYER DOOR REVERSAL INSTRUCTIONS
You can change your door swing from a right-side opening to a left-side opening, if desired. The following instructions are applicable for
models with a side-opening door.
NOTE:
To complete the door swing reversal exactly as seen in these instructions, a door reversal kit must be purchased. For ordering
information, please visit the manufacturer’s website or reference the contact information listed on your Quick Start Guide.
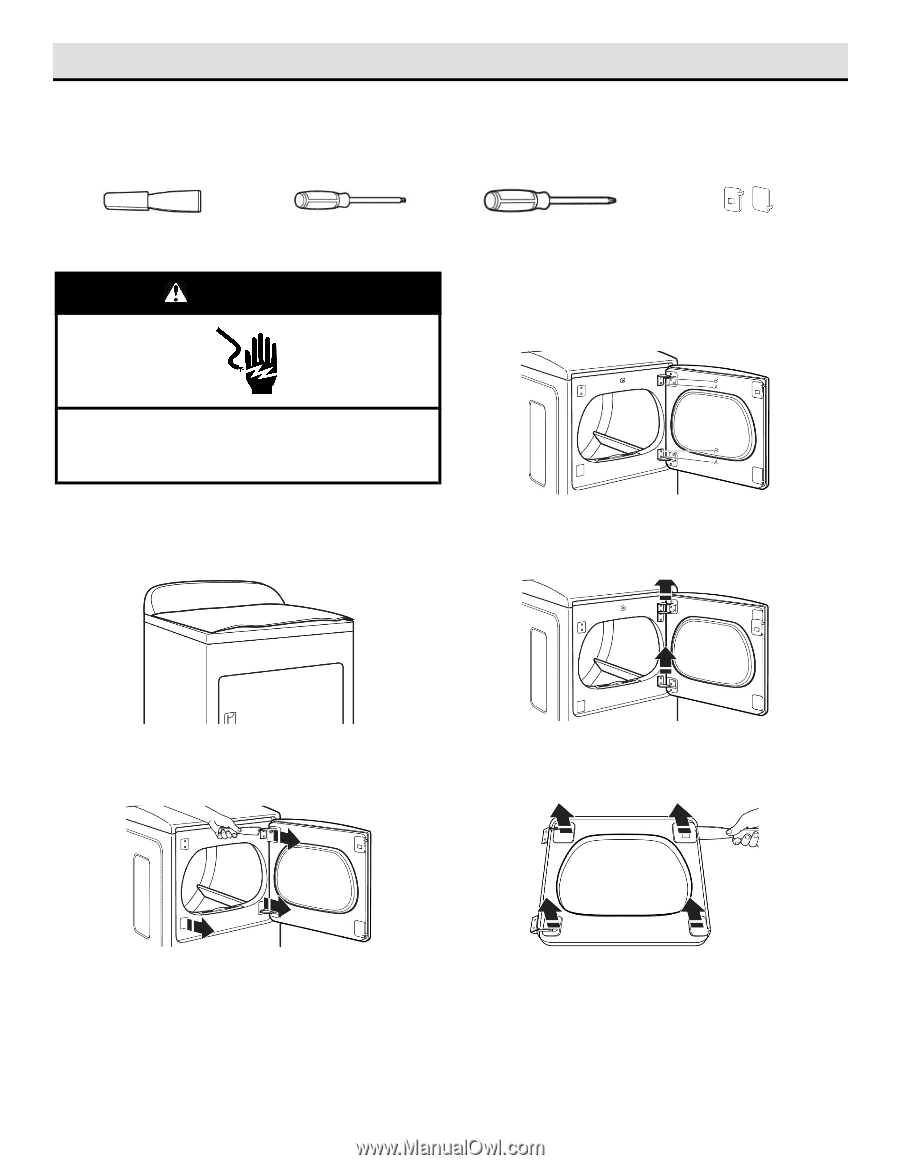
Tools Needed
Plastic putty knife
Minimum 8" (203 mm) long
TORX
®
T20
®
star driver
#2 Phillips screwdriver
Optional assembly kit covers
WARNING
Electrical Shock Hazard
Disconnect power before removing doors.
Failure to do so could result in death or electrical shock.
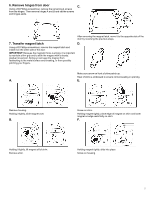
3. Remove hinge screws
Using a T20
®
star driver, remove screws (A) and then screws (B)
from each of the two hinges attaching the dryer door to the front
panel of the dryer. Set the hinge screws off to the side for use in
reinstalling the door.
1. Place towel on flat workspace
Place a towel or soft cloth on a flat workspace, such as the top of
the dryer or the floor, to avoid damaging the dryer’s surface or the
dryer door.
4. Remove door from cabinet
Remove the dryer door from the cabinet by lifting upward and out.
Lay the door on the towel or soft cloth you placed on a flat
workspace.
2. Remove hinge covers from dryer
Open the dryer door. Use a plastic putty knife to remove the hinge
covers and plastic covers from the front panel of the dryer. Set
them aside.
5. Remove door hinge covers
Use a plastic putty knife to remove the door hinge covers. Set them
aside.
TORX and T20 are trademarks of Acument Intellectual Property, LLC.