Maytag MEDP586K Owners Manual
Maytag MEDP586K Manual
 |
View all Maytag MEDP586K manuals
Add to My Manuals
Save this manual to your list of manuals |
Maytag MEDP586K manual content summary:
- Maytag MEDP586K | Owners Manual - Page 1
ELECTRONIC DRYER USE AND CARE GUIDE GUIDE D'UTILISATION ET D'ENTRETIEN DE LA SÉCHEUSE ÉLECTRONIQUE MANUAL DE USO Y CUIDADO AND FEATURES 5 CYCLE GUIDE - TIMED DRY..........5 CYCLE GUIDE - SENSOR CYCLES 6 USING YOUR DRYER 6 DRYER CARE 7 TROUBLESHOOTING 9 ASSISTANCE OR SERVICE BACK COVER SÉCURIT - Maytag MEDP586K | Owners Manual - Page 2
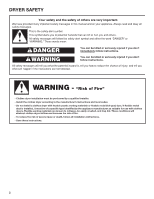
DRYER SAFETY 2 - Maytag MEDP586K | Owners Manual - Page 3
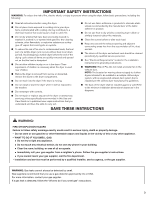
minimum installation dimensions/clearances in the diagrams. ■ Do not repair or replace any part of the dryer or attempt any servicing unless specifically recommended in this Use and Care Guide or in published user-repair instructions that you understand and have the skills to carry out. SAVE THESE - Maytag MEDP586K | Owners Manual - Page 4
dry laundry. Proper venting will reduce your drying times and improve your energy savings. See Installation Instructions. The venting system attached to the dryer plays a big role in good airflow. Service calls caused by improper venting are not covered by the warranty and will be paid by the - Maytag MEDP586K | Owners Manual - Page 5
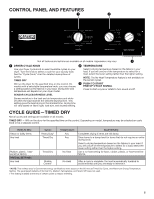
Use your Dryer Cycle knob to select available cycles on your dryer. Turn the knob to select a cycle for your laundry load. See the "Cycle Guide" chart for detailed descriptions of cycles. TIMED DRY Will run the dryer for the specified time on the control. On models with a selectable temperature knob - Maytag MEDP586K | Owners Manual - Page 6
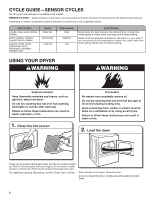
CYCLE GUIDE-SENSOR CYCLES Not all cycles and settings are available on all Do not dry anything that has ever had anything flammable on it (even after washing). Failure to follow these instructions can result in death, explosion, or fire. 1. Clean the lint screen Fire Hazard No washer can completely - Maytag MEDP586K | Owners Manual - Page 7
of the dryer. Select the desired cycle for your load. See the "Cycle Guide" chart or the display for more information about each cycle. 4. Set drying depending on dryer usage. Cleaning should be done by a qualified servicer. From the exhaust vent Lint should be removed every two years, or more - Maytag MEDP586K | Owners Manual - Page 8
wiring. 3. Make sure leveling legs are secure in dryer base. 4. Use tape to secure dryer door. Reinstalling the Dryer Follow the Installation Instructions to locate, level, and connect the dryer. Changing the drum light (on some models) 1. Unplug dryer or disconnect power. 2. Open the dryer - Maytag MEDP586K | Owners Manual - Page 9
TROUBLESHOOTING First try the solutions suggested here or visit our website at www.maytag.com/help In Canada, visit www.maytag.ca for assistance and to possibly avoid a service installed. See the Installation Instructions. Clothing knotted or balled breaker. If the problem continues, call a qualified - Maytag MEDP586K | Owners Manual - Page 10
TROUBLESHOOTING First try the solutions suggested here or visit our website at www.maytag.com/help In Canada, visit www.maytag.ca for assistance and to possibly avoid a service call. If you experience Possible Causes Solution Cycle time too short Sensor cycle ending early. The load may not be - Maytag MEDP586K | Owners Manual - Page 11
: DANGER Risque possible de décès ou de blessure grave si vous ne suivez pas immédiatement les instructions. AVERTISSEMENT Risque possible de décès ou de blessure grave si vous ne suivez pas les instructions. Tous les messages de sécurité vous diront quel est le danger potentiel et vous disent - Maytag MEDP586K | Owners Manual - Page 12
est utilisée à proximité des enfants. ■ Avant de retirer la sécheuse du service ou pour la mettre au rebut, enlever la porte. ■ Ne pas accéder ne serait pas expressément recommandé dans le Guide d'utilisation et d'entretien ou dans des instructions de réparation par l'utilisateur que vous comprenez - Maytag MEDP586K | Owners Manual - Page 13
pour sécher efficacement les vêtements. Une ventilation adéquate réduit les durées de séchage et accroît les économies d'énergie. Consulter les Instructions d'installation. Le système d'évacuation fixé à la sécheuse joue un rôle important dans la circulation de l'air. Les interventions de dépannage - Maytag MEDP586K | Owners Manual - Page 14
, de la taille de la charge et du réglage de niveau de séchage. GUIDE DE PROGRAMMES - SÉCHAGE MINUTÉ Certains programmes ne sont pas offerts sur certains modè Détails du programme : Articles lourds, encombrants Heavy Duty (service intense)* Aucune Termine le séchage des articles encore humides. - Maytag MEDP586K | Owners Manual - Page 15
GUIDE DE PROGRAMMES - PROGRAMMES DE DÉTECTION Certains programmes ne sont pas offerts sur sur une corde à linge ou par le programme de séchage à l'air. Le non-respect de ces instructions peut causer un décès ou un incendie. 2. Charger la sécheuse Nettoyer le filtre à charpie avant chaque charge - Maytag MEDP586K | Owners Manual - Page 16
le programme souhaité pour la charge. Voir le tableau « Guide de programmes » ou l'affichage pour plus d'informations sur chaque dessus du plancher pour une installation dans un garage. Le non-respect de ces instructions peut causer un décès, une explosion ou un incendie. Nettoyage de l'intérieur - Maytag MEDP586K | Owners Manual - Page 17
base de la sécheuse. 4. Utiliser du ruban adhésif pour fixer la porte de la sécheuse. Réinstallation de la sécheuse Suivre les « Instructions d'installation » pour choisir l'emplacement, ajuster l'aplomb de la sécheuse et la raccorder. Changement de l'ampoule d'éclairage du tambour (sur certains mod - Maytag MEDP586K | Owners Manual - Page 18
es ici ou consulter notre site Web au www.maytag.com/help - Au Canada, visiter le www.maytag.ca - pour obtenir de l'aide et éviter direction. Un long conduit augmentera les durées de séchage. Voir les instructions d'installation. Diamètre incorrect du conduit d'évacuation. Utiliser un conduit de 4 - Maytag MEDP586K | Owners Manual - Page 19
DÉPANNAGE Essayer d'abord les solutions suggérées ici ou consulter notre site Web au www.maytag.com/help - Au Canada, visiter le www.maytag.ca - pour obtenir de l'aide et éviter une intervention de réparation. Si les problèmes suivants surviennent Causes possibles Solution Temps de programme - Maytag MEDP586K | Owners Manual - Page 20
SEGURIDAD DE LA SECADORA Su seguridad y la seguridad de los demás es muy importante. Hemos incluido muchos mensajes importantes de seguridad en este manual y en su electrodoméstico. Lea y obedezca siempre todos los mensajes de seguridad. Este es el símbolo de alerta de seguridad. Este símbolo le - Maytag MEDP586K | Owners Manual - Page 21
controles. ■ No repare ni reemplace ninguna pieza de la secadora ni trate de repararla a menos que esto se recomiende específicamente en este Manual de uso y cuidado o en instrucciones de reparación publicadas para el usuario que usted comprenda y solo si cuenta con la experiencia necesaria para - Maytag MEDP586K | Owners Manual - Page 22
ADVERTENCIA: Las pérdidas de gas no siempre se pueden detectar por el olfato. Los proveedores de gas recomiendan que usted use un detector de gas aprobado por UL (Laboratorio de normalización) o CSA (Asociación canadiense de seguridad). Para obtener más información, póngase en contacto con su - Maytag MEDP586K | Owners Manual - Page 23
PANEL DE CONTROL Y CARACTERÍSTICAS 1 2 No todas las características y opciones están disponibles en todos los modelos. El aspecto puede variar. 3 1 PERILLA DE CICLOS DE LA SECADORA Utilice la perilla de ciclos de la secadora para seleccionar entre los ciclos disponibles en su secadora. Gire la - Maytag MEDP586K | Owners Manual - Page 24
GUÍA DE CICLOS - SENSOR CYCLES (CICLOS CON SENSOR) No todos los ciclos ni los ajustes están disponibles en todos los modelos. SENSOR CYCLES (Ciclos con sensor): Estos ciclos detectan la humedad en la carga o la temperatura del aire y se apagan cuando la carga alcanza el nivel de sequedad - Maytag MEDP586K | Owners Manual - Page 25
3. Seleccione el ciclo deseado Pulse el mando START (inicio) para comenzar el ciclo. Pulse el mando END OF CYCLE (fin del ciclo) para activar/desactivar el sonido. Retire de inmediato las prendas en cuanto haya finalizado el ciclo para reducir las arrugas. CUIDADO DE LA SECADORA Limpieza del lugar - Maytag MEDP586K | Owners Manual - Page 26
Limpieza del filtro de pelusa Limpieza en cada carga El filtro de pelusa está en la abertura de la puerta de la secadora. Un filtro obstruido con pelusa puede aumentar el tiempo de secado. Para limpiar: 1. Jale el filtro de pelusa directamente hacia arriba. Quite la pelusa enrollándola con los dedos - Maytag MEDP586K | Owners Manual - Page 27
SOLUCIÓN DE PROBLEMAS Pruebe primero las soluciones sugeridas aquí o visite nuestro sitio web en www.maytag.com/help En Canadá, visite www.maytag.ca para obtener asistencia y evitar posiblemente una llamada de servicio. Si experimenta lo siguiente Causas posibles Solución Las prendas no se - Maytag MEDP586K | Owners Manual - Page 28
SOLUCIÓN DE PROBLEMAS Pruebe primero las soluciones sugeridas aquí o visite nuestro sitio web en www.maytag.com/help En Canadá, visite www.maytag.ca para obtener asistencia y evitar posiblemente una llamada de servicio. Si experimenta lo siguiente Causas posibles Solución El tiempo del ciclo es - Maytag MEDP586K | Owners Manual - Page 29
Before calling for assistance or service, please check "Troubleshooting" or visit www.maytag.com/help. It may save you the cost of a service call. If you still need help, follow the instructions below. When calling, please know the purchase date and the complete model and serial number of your - Maytag MEDP586K | Owners Manual - Page 30
án bien y funcionarán bien ya que están fabricadas con la misma precisión empleada en la fabricación de cada electrodoméstico nuevo de marca MAYTAG®. Para ubicar piezas de repuesto FSP® o para accesorios visite www.maytagpartsonline.com ¿Tiene preguntas? Llámenos al número gratuito 1-800-344-1274 - Maytag MEDP586K | Owners Manual - Page 31
NOTE 31 - Maytag MEDP586K | Owners Manual - Page 32
W11601607B ®/™ ©2022 Maytag. All rights reserved. Used under license in Canada. Tous droits réservés. Utilisé sous licence au Canada. Todos los derechos reservados. Usado bajo licencia en Canadá. 07/22
-
 1
1 -
 2
2 -
 3
3 -
 4
4 -
 5
5 -
 6
6 -
 7
7 -
8
-
9
-
10
-
11
-
12
-
13
-
14
-
15
-
16
-
17
-
18
-
19
-
20
-
21
-
22
-
23
-
24
-
25
-
26
-
27
-
28
-
29
-
30
-
31
-
32
 |
 |

W11601607B
ELECTRONIC DRYER USE AND CARE GUIDE
Table of Contents
DRYER SAFETY
..............................
2
CHECK YOUR VENT SYSTEM
FOR GOOD AIRFLOW
....................
4
CONTROL PANEL AND
FEATURES
......................................
5
CYCLE GUIDE – TIMED DRY
.........
5
CYCLE GUIDE – SENSOR
CYCLES
..........................................
6
USING YOUR DRYER
.....................
6
DRYER CARE
.................................
7
TROUBLESHOOTING
.....................
9
ASSISTANCE OR
SERVICE
...................
BACK COVER
SÉCURITÉ DE LA SÉCHEUSE
.....
11
VÉRIFICATION D’UNE
CIRCULATION D’AIR
ADÉQUATE POUR LE SYSTÈME
D’ÉVACUATION
............................
13
TABLEAU DE COMMANDE ET
CARACTÉRISTIQUES
..................
14
GUIDE DE PROGRAMMES –
SÉCHAGE MINUTÉ
......................
14
GUIDE DE PROGRAMMES –
PROGRAMMES DE
DÉTECTION
..................................
15
UTILISATION DE LA
SÉCHEUSE
...................................
15
ENTRETIEN DE LA SÉCHEUSE ...16
DÉPANNAGE
.................................
18
ASSISTANCE OU
SERVICE ...COUVERTURE ARRIÈRE
SEGURIDAD DE LA
SECADORA
...................................
20
REVISE QUE EL SISTEMA DE
VENTILACIÓN TENGA UN BUEN
FLUJO DE AIRE
............................
22
PANEL DE CONTROL Y
CARACTERÍSTICAS
.....................
23
GUIA DE CICLOS – TIMED DRY
(SECADO PROGRAMADO)
..........
23
GUÍA DE CICLOS – SENSOR
CYCLES (CICLOS CON
SENSOR)
.......................................
24
USO DE SU SECADORA
..............
24
CUIDADO DE LA SECADORA
......
25
SOLUCIÓN DE PROBLEMAS
.......
27
AYUDA O SERVICIO
TÉCNICO
..........
CONTRAPORTADA
GUIDE D’UTILISATION ET D’ENTRETIEN
DE LA SÉCHEUSE ÉLECTRONIQUE
MANUAL DE USO Y CUIDADO
DE LA SECADORA ELECTRÓNICA
Tabla de contenidos
Table des matières