Maytag MES5875BAB Use and Care Guide - Page 25
Leveling Legs
 |
UPC - 719881157429
View all Maytag MES5875BAB manuals
Add to My Manuals
Save this manual to your list of manuals |
Page 25 highlights
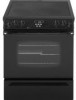
Leveling Legs Storage Drawer (select models) Be sure the range should be leveled when installed. If the range is not level, turn the leveling legs, located at each corner of the range, until range is level. _ _,,JJ __ ANTI]_BRACKET _" LEVELING LEG The storage drawer can be removed to allow you to clean under the range. To remove: 1. Empty drawer and pull out to the first stop position. 2. Lift up the front of the drawer. 3. Pull out to the second stop position. 4. Grasp sides and lift drawer up and out. To replace: 1. Fit the ends of the drawer glides into the rails in the range. 2. Lift up the front of the drawer and gently push in to the first stop position. 3. Lift drawer up again and push until drawer is closed. 24
-
 1
1 -
2
-
3
-
4
-
5
-
6
-
7
-
8
-
9
-
10
-
11
-
12
-
13
-
14
-
15
-
16
-
17
-
18
-
19
-
 20
20 -
 21
21 -
 22
22 -
 23
23 -
 24
24 -
 25
25 -
 26
26 -
 27
27 -
 28
28 -
 29
29 -
 30
30 -
31
-
32
-
33
-
34
-
35
-
36
-
37
-
38
-
39
-
40
-
41
-
42
-
43
-
44
-
45
-
46
-
47
-
48
-
49
-
50
-
51
-
52
-
53
-
54
-
55
-
56
-
57
-
58
-
59
-
60
-
61
-
62
-
63
-
64
-
65
-
66
-
67
-
68
-
69
-
70
-
71
-
72
-
73
-
74
-
75
-
76
-
77
-
78
-
79
-
80
-
81
-
82
-
83
-
84
 |
 |

Leveling Legs
Storage
Drawer
(select
models)
Be sure the range should be leveled when
installed.
If the range is not level, turn the
leveling legs, located at each corner of the
range, until range
is
level.
_
_,,JJ
__
ANTI]_BRACKET
_"
LEVELING
LEG
The storage drawer can be removed to allow you to clean
under the range.
To remove:
1. Empty drawer and pull out to the first stop position.
2. Lift up the front of the drawer.
3. Pull out to the second stop position.
4. Grasp sides and lift drawer up and out.
To replace:
1. Fit the ends of the drawer glides
into
the rails
in
the range.
2. Lift up the front of the drawer and gently
push
in to the
first stop position.
3. Lift drawer up again and push until drawer is closed.
24