Maytag MES5875BAB Use and Care Guide - Page 9
Control Panel, Clock
 |
UPC - 719881157429
View all Maytag MES5875BAB manuals
Add to My Manuals
Save this manual to your list of manuals |
Page 9 highlights
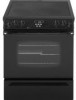
Control Panel A B CD E F G H I J K LNi N 0 The control panel is designed for ease in programming. The displaywindow on the control shows time of day, timer and oven functions. Control panel shown includes Convect and other model specific features. (Styling may vary depending on model.) Bake B Broil Clean Convect Roast (select models) Delay Number Pads Autoset Keep Warm Convect Bake (select models) Cook & Hold iiiiiKi!iFi!iai!v!_orite Timer iii_iMClock Oven Light iiiiiiiiiiiOCAi!iN!i!Ci EL Use for baking and roasting. Use for broiling and top browning. Use to set self-clean cycle. Use for convection roasting. Programs the oven to start baking at a later time. Use to set time and temperature. Use to quickly set temperatures. Use to keep cooked food warm in oven. Use for convection baking. Bakes for a preset time, then holds food warm for 1 hour. Use to set and save a specific Cook & Hold procedure. Sets Timer. Use to set time-of-day clock. Use to turn the oven light on or off. Cancels all operations except Timer and Clock. Note: Four seconds after pressing the number pads or the Autoset 0 pad, the time or temperature will automatically be entered. If more than 30 seconds elapse between touching a function pad and the number pads or the Autoset O pad, the function will be canceled and the display will return to the previous display. Clock The clock can be set to display time in a 12-hour or 24-hour format. The clock is set at the factory for the 12-hour format. To change the clock to 24=hour format: 1. Press and hold the CANCEL and Favorite pads for three seconds. • 12 Hr flashes in the display. 2. Press the Autoset O pad to select 24 Hr; press again to select 12 Hr. 3. Set the time of day following the directions in the "To set the Clock" section. tJ Autoset To set the Clock: 1. Press the Clock pad. • The time of day flashes in the display. Using the Touchpads Press the desired pad. Press the number pads to enter time or temperature. Press the Autoset 0 pad to enter temperature. • A beep will sound when any pad is touched. • A double beep will sound if a programming error occurs. 2. Press the appropriate number pads to set the time of day. • Colon flashes in the display. 3. Press the Clock pad again or wait four seconds. • The colon will remain on. When electrical power is supplied or after a power interruption, the last clock time before power was interrupted will flash, coat. 8
-
 1
1 -
2
-
3
-
 4
4 -
 5
5 -
 6
6 -
 7
7 -
 8
8 -
 9
9 -
 10
10 -
 11
11 -
 12
12 -
 13
13 -
 14
14 -
15
-
16
-
17
-
18
-
19
-
20
-
21
-
22
-
23
-
24
-
25
-
26
-
27
-
28
-
29
-
30
-
31
-
32
-
33
-
34
-
35
-
36
-
37
-
38
-
39
-
40
-
41
-
42
-
43
-
44
-
45
-
46
-
47
-
48
-
49
-
50
-
51
-
52
-
53
-
54
-
55
-
56
-
57
-
58
-
59
-
60
-
61
-
62
-
63
-
64
-
65
-
66
-
67
-
68
-
69
-
70
-
71
-
72
-
73
-
74
-
75
-
76
-
77
-
78
-
79
-
80
-
81
-
82
-
83
-
84
 |
 |
