Maytag MET8665XS Owners Manual - Page 15
To Broil Using Cook Time, BROILING CHART - sears
 |
UPC - 883049199337
View all Maytag MET8665XS manuals
Add to My Manuals
Save this manual to your list of manuals |
Page 15 highlights
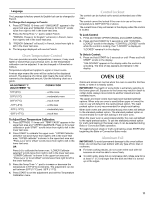
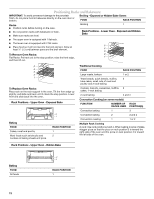
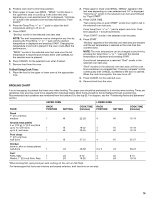
2. Position oven door to broil stop position. 3. Press upper or lower oven BROIL. "BROIL" scrolls down in the upper text area or scrolls up in the lower text area depending on oven selected and "HI" is displayed. "Set temp or" scrolls in the selected oven text area followed by "Push START." 4. Press the Temp/Time "+" or "-" pads to adjust the broil temperature setting to HI or LO. 5. Press START. "Broiling" scrolls in the selected oven text area. NOTE: The broil temperature may be changed at any time by pressing the Time/Temp "+" or "-" pad until the desired temperature is displayed and pressing START. Changing the temperature once food is placed in the oven could affect the performance. "BROIL" scrolls in the selected oven text area once the set temperature is reached and remains there until CANCEL for the selected oven is pressed. 6. Press CANCEL for the selected oven when finished. 7. Remove food from the oven. To Broil Using Cook Time: 1. Place the food in the upper or lower oven at the appropriate time. BROILING CHART 2. Press upper or lower oven BROIL. "BROIL" appears in the text area depending on oven selected and "HI" is displayed. "Set temp or" scrolls in the selected oven text area followed by "Push START." 3. Press COOK TIME. "Set cooking time or push START" scrolls from right to left in the selected oven text area. Press Temp/Time "+" or "-" pad to adjust cook time. Cook time adjusts in 1-minute increments. "Push START" scrolls in the selected oven text area. 4. Press START. "Broiling" appears in the selected oven text area and remains until the set temperature is reached or the cook time has counted down. NOTE: The oven temperature can be changed at any time by pressing the Temp/Time "+" or "-" pad until the desired temperature is displayed and pressing START. Once the set temperature is reached, "Broil" scrolls in the selected oven text area. "Broil" remains in the selected oven text area until the cook time countdown is complete then "Cooking complete" scrolls continuously until CANCEL is pressed or the door is opened. When the cook time expires, the oven turns off. 5. Press CANCEL for the selected oven. 6. Remove food from the oven. It is not necessary to preheat the lower oven when broiling. The upper oven should be preheated for 5 minutes when broiling. Times are guidelines only and may need to be adjusted for individual tastes. Most foods should be turned halfway through cooking time. Recommended rack positions are numbered from the bottom (1) to the top (5). For diagram, see the "Positioning Racks and Bakeware" section. UPPER OVEN LOWER OVEN FOOD RACK POSITION SETTING COOK TIME RACK (minutes) POSITION SETTING COOK TIME (minutes) Steak 1" (2.5 cm) thick medium 1 Ground meat patties 4 oz (113 g), ³ ₄" (2.0 cm) thick up to 12, well-done 1 up to 6, well-done 1 Pork chops 1" (2.5 cm) thick, well-done 1 Chicken bone-in, skin-on breast pieces well-done 1 Fish* Filets, flaky 1 Steaks, 1" (2.5 cm) thick, flaky 1 HI 22-28 4 HI 15-19 HI 18-22 4 HI 20-25 4 HI 15-19 HI 15-19 HI 27-31 4 HI 22-27 LO 40-50 3 or 4 LO 20-24 LO 8-12 4 LO 18-22 4 L0 8-13 LO 10-16 *When broiling fish, spray broil pan with cooking oil. Do not turn fish filets. For hamburgers that have rare interiors and seared exteriors, broil less time on one side. 15
-
 1
1 -
2
-
3
-
4
-
5
-
6
-
7
-
8
-
9
-
 10
10 -
 11
11 -
 12
12 -
 13
13 -
 14
14 -
 15
15 -
 16
16 -
 17
17 -
 18
18 -
 19
19 -
 20
20 -
21
-
22
-
23
-
24
-
25
-
26
-
27
-
28
-
29
-
30
-
31
-
32
-
33
-
34
-
35
-
36
-
37
-
38
-
39
-
40
-
41
-
42
-
43
-
44
-
45
-
46
-
47
-
48
-
49
-
50
-
51
-
52
-
53
-
54
-
55
-
56
 |
 |
