Maytag MGDB725BW Installation Guide - Page 9
Install Leveling Legs, Make Gas Connection - gas dryer
 |
View all Maytag MGDB725BW manuals
Add to My Manuals
Save this manual to your list of manuals |
Page 9 highlights
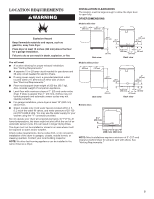
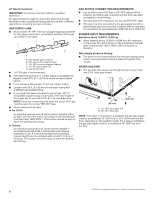
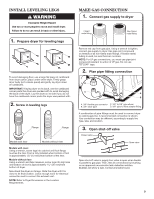
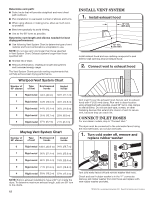
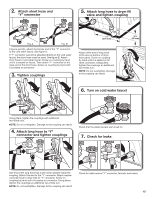
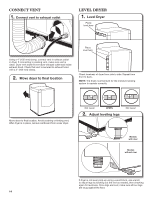
INSTALL LEVELING LEGS MAKE GAS CONNECTION 1. Connect gas supply to dryer 1. Prepare dryer for leveling legs To avoid damaging floor, use a large flat piece of cardboard from dryer carton; place under entire dryer. Firmly grasp dryer body (not console panel) and gently lay dryer down on cardboard. IMPORTANT: If laying dryer on its back, use the cardboard corner posts the dryer was packed with to avoid damaging the back of the dryer. Lay the dryer on its side if you do not have the cardboard corner posts the dryer was packed with. 2. Screw in leveling legs Flange Flange Models with riser Models without riser Models with riser: Using a wrench, screw legs into cabinet until foot flange touches the riser. Foot is fully installed when bottom of foot is approximately 1/2" (13 mm) from bottom of the riser. Models without riser: Using a wrench and tape measure, screw legs into leg holes until bottom of foot is approximately 13/8" (35 mm) from bottom of dryer. Now stand the dryer on its legs. Slide the dryer until it is close to its final location. Leave enough room for electrical connection and to connect the exhaust vent. NOTE: Refer to Dryer Dimensions in the Location Requirements. Flared male fitting A Non-flared male fitBting Remove red cap from gas pipe. Using a wrench to tighten, connect gas supply to dryer. Use pipe-joint compound on threads of all non-flared male fittings. If flexible metal tubing is used, be sure there are no kinks. NOTE: For LP gas connections, you must use pipe-joint compound resistant to action of LP gas. Do not use TEFLON®† tape. 2. Plan pipe fitting connection D C A B A. 3/8" flexible gas connector C. 3/8" to 3/8" pipe elbow B. 3/8" dryer pipe D. 3/8" pipe-to-flare adapter fitting A combination of pipe fittings must be used to connect dryer to existing gas line. A recommended connection is shown. Your connection may be different, according to supply line type, size, and location. 3. Open shut-off valve Closed valvAe BOpen valve Open shut-off valve in supply line; valve is open when handle is parallel to gas pipe. Then, test all connections by brushing on an approved noncorrosive leak-detection solution. Bubbles will show a leak. Correct any leaks found. 9
-
 1
1 -
2
-
3
-
 4
4 -
 5
5 -
 6
6 -
 7
7 -
 8
8 -
 9
9 -
 10
10 -
 11
11 -
 12
12 -
 13
13 -
 14
14 -
15
-
16
-
17
-
18
-
19
-
20
-
21
-
22
-
23
-
24
-
25
-
26
-
27
-
28
-
29
-
30
-
31
-
32
 |
 |
