Maytag MMMF6030P Owners Manual - Page 7
Electrical Requirements, INSTALLATION, Prepare Microwave Oven Hood Combination
 |
View all Maytag MMMF6030P manuals
Add to My Manuals
Save this manual to your list of manuals |
Page 7 highlights
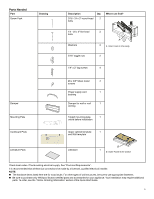
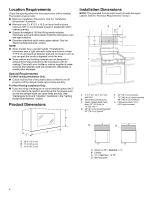
Exact dimensions may vary depending on type of range/cooktop below. *36" (91.4 cm) is recommended for 72" (182.8 cm) installation height. **30" (76.2 cm) is typical for 66" (167.6 cm) installation height. ***12" (30.5 cm) to 12.75" (32 cm) cabinets, the microwave oven is bulge to the cabinet. 12.75" (32 cm) to 13" (33 cm) cabinets, the microwave oven is flush to the cabinet. NOTE: If cabinets are deeper 13" (33 cm) to 16" (40.6 cm), use the bump out mounting kit replacing the mounting plate from the wall. The bump out mounting kit (part# W11630300) is not provided. To order, see the "Online Ordering Information" section of the Quick Start Guide. For other dimension's cabinet, suggest select other Whirlpool Products. B A C A. (Bump out) 13" ≤ DEEPER ≤ 16" B. Cabinet C. Bump put mounting bracket GROUNDING INSTRUCTIONS For a grounded, cord-connected appliance: This appliance must be grounded. In the event of a malfunction or breakdown, grounding will reduce the risk of electric shock by providing a path of least resistance for electric current. This appliance is equipped with a cord having an equipment-grounding conductor and a grounding plug. The plug must be plugged into an appropriate outlet that is properly installed and grounded in accordance with all local codes and ordinances. WARNING: Improper connection of the equipmentgrounding conductor can result in a risk of electric shock. Check with a qualified electrician or serviceman if you are in doubt as to whether the appliance is properly grounded. Do not modify the plug provided with the appliance: if it will not fit the outlet, have a proper outlet installed by a qualified electrician. SAVE THESE INSTRUCTIONS This device complies with Industry Canada ICES-001. Electrical Requirements WARNING Electrical Shock Hazard Plug into a grounded 3 prong outlet. Do not remove ground prong. Do not use an adapter. Do not use an extension cord. Failure to follow these instructions can result in death, fire, or electrical shock. Observe all governing codes and ordinances. Required: � A 120 V, 60 Hz, AC only, 15 or 20 A electrical supply with a fuse or circuit breaker. Recommended: � A time-delay fuse or time-delay circuit breaker � A separate circuit serving only this microwave oven. INSTALLATION Prepare Microwave Oven Hood Combination WARNING Excessive Weight Hazard Use two or more people to move and install or uninstall appliance. Failure to do so can result in back or other injury. 1. To avoid possible damage to the work surface, cover the work surface. 2. Remove cardboard plate from the outer foam in the carton. It is for upper-cabinet and wall installation. 3. Remove the screw pack from the inner foam in the cavity. 4. Remove the damper from the inner foam in the cavity. 5. Remove the literature pack from the outer foam in the carton. 6. Remove shipping materials, tape and film from microwave. 7. Remove the mounting plate from the inner foam in the cavity. 8. Tape the microwave oven door closed so that the door does not swing open while the microwave oven is being handled. NOTE: To avoid damage to the microwave oven, do not grip or use the door or door handle while the microwave oven is being handled. 7
-
 1
1 -
 2
2 -
 3
3 -
 4
4 -
 5
5 -
 6
6 -
 7
7 -
 8
8 -
 9
9 -
 10
10 -
 11
11 -
 12
12 -
13
-
14
-
15
-
16
-
17
-
18
-
19
-
20
-
21
-
22
-
23
-
24
-
25
-
26
-
27
-
28
-
29
-
30
-
31
-
32
-
33
-
34
-
35
-
36
-
37
-
38
-
39
-
40
 |
 |
