Maytag MTW6600TB Installation Instructions - Page 1
Maytag MTW6600TB - Ing Washer Manual
 |
View all Maytag MTW6600TB manuals
Add to My Manuals
Save this manual to your list of manuals |
Page 1 highlights
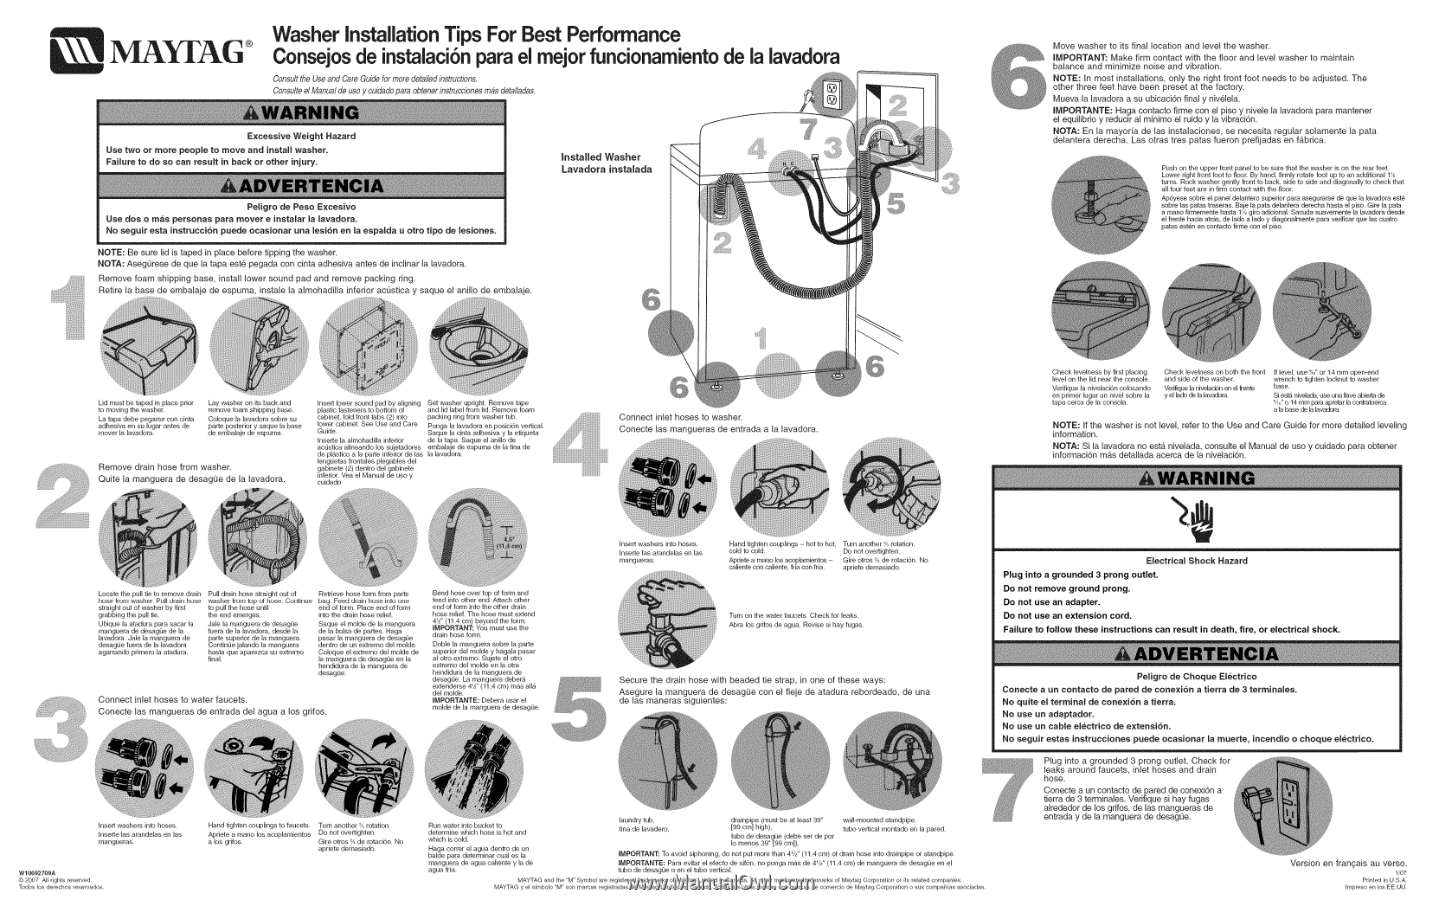
®AG ® Washer Installation Tips For Best Performance Consejosde instalaci6nparael rnejorfuncionarniento de la lavadora Consultthe UseandCare Guideformoredetailedinstructions. Consulteel Manualde usoy cuidadopara obtenerinstruccionesmas detattadas. Excessive Weight Hazard Use two or more people to move and install washer. Failure to do so can result in back or other injury. Installed Washer Lavadora instalada NOTE: Be sure lid is taped in place before tipping the washer. NOTA: Asegt]rese de que la tapa este pegada con cinta adhesiva antes de inclinar la lavadora. Remove foam shipping base, install lower sound pad and remove packing ring. Retire la base de embalaje de espuma, instale la almohadilla inferior act]stica y saque el anillo de embalaje. Move washer to its final location and level the washer. IMPORTANT: Make firm contact with the floor and level washer to maintain balance and minimize noise and vibration. NOTE: In most installations, only the right front foot needs to be adjusted. The other three feet have been preset at the factory. Mueva la lavadora a su ubicaci6n final y nivelela. IMPORTANTE: Haga contacto firme con el piso y nivele la lavadora para mantener el equilibrio y reducir al minimo el ruido y la vibraci6n. NOTA: En la mayoria de las instalaciones, se necesita regular solamente la pata delantera derecha. Las otras tres patas fueron prefijadas en fAbrica. Push on the upper front panel to be sure that the washer is on the rear feet. Lower right front foot to floor• By hand, firmly rotate foot up to an additional 1 turns• Rock washer gently front to back, side to side and diagonally to check that all four feet are in firm contact with the floor• Ap6yese sobre el panel delantero superior para asegurarse de que la lavadora este sobre las patas traseras. Baje la pata delantera derecha hasta el piso. Gire la pata a mano firmemente hasta 1V2giro adicional. Sacuda suavemente la lavadora desde el frente hacia atras, de lado a lado y diagonalmente para verificar que las cuatro patas est_n en contacto firme con el piso. Lid must be taped in place prior to moving the washer• La tapa debe pegarse con cinta adhesiva en su lugar antes de mover la lavadora. Lay washer on its back and remove foam shipping base. Coloque la lavadora sobre su parte posterior y saque la base de embalaje de espuma. Remove drain hose from washer. Quite la manguera de desagOe de la lavadora. Insert lower sound pad by aligning plastic fasteners to bottom of cabinet, fold front tabs (2) into lower cabinet• See Use and Care Guide• Inserte la almohadilla inferior act]stica alineando los sujetadores de plastico a la parte inferior de las lengQetas frontales plegables del gabinete (2) dentro del gabinete inferior• Vea el Manual de uso y cuidado Set washer upright• Remove tape and lid label from lid. Remove foam packing ring from washer tub. Ponga la lavadora en posici6n vertical. Saque la cinta adhesiva y la etiqueta de la tapa. Saque el anillo de embalaje de espuma de la tina de la lavadora. Connect inlet hoses to washer. Conecte las mangueras de entrada a la lavadora. Check levelness by first placing level on the lid near the console• Verifique la nivelacion colocando en primer lugar un nivel sobre la tapa cerca de la consola. Check levelness on both the front and side of the washer• Verilique la nivelacion en el frente y el lado de la lavadora. If level, use _?' or 14 mm open-end wrench to tighten Iocknut to washer base. Si est_ nivelada, use una Ilaveabierta de gAJ'o 14 mm para aprefar la confrafuerca a la base de la lavadora. NOTE: If the washer is not level, refer to the Use and Care Guide for more detailed leveling information. NOTA: Si la lavadora no est4 nivelada, consulte el Manual de uso y cuidado para obtener informaci6n mb,s detallada acerca de la nivelaci6n. Locate the pull tie to remove drain hose from washer. Pull drain hose straight out of washer by first grabbing the pull tie. Ubique la atadura para sacar la manguera de desag0e de la lavadora. Jale la manguera de desagt]e fuera de la lavadora agarrando primero la atadura. Pull drain hose straight out of washer from top of hose. Continue to pull the hose until the end emerges• Jale la manguera de desag0e fuera de la lavadora, desde la parte superior de la manguera. Contint]e jalando la manguera hasta que aparezca su extremo final• Retrieve hose form from parts bag. Feed drain hose into one end of form. Place end of form into the drain hose relief• Saque el molde de la manguera de la bolsa de partes. Haga pasar la manguera de desagQe dentro de un extremo del molde. Coloque el extremo del molde de la manguera de desag0e en la hendidura de la manguera de desagQe. Connect inlet hoses to water faucets. Conecte las mangueras de entrada del agua a los grifos. Bend hose overtop ofform and feed into other end. Atfach other end of form into the other drain hose relief• The hose must extend 4_" (11.4 cm) beyond the form. IMPORTANT: You must use the drain hose form. Doble la manguera sobre la parte superior del molde y hagala pasar al ofro extremo. Sujete el ofro extremo del molde en la otra hendidura de la manguera de desag0e. La manguera deber_ extenderse 4_5'' (11,4 cm) mas alia del molde. IMPORTANTE: Debera usar el molde de la manguera de desag0e. Insert washers into hoses• Inserte las arandelas en las mangueras. Hand tighten couplings - hot to hot, cold to cold. Apriete a mano los acoplamientos caliente con caliente, fria con fria. Turn another 2/4rotation. Do not overtighten. Gire otros _4de rotaci6n. No apriete demasiado. Turn on the water faucets• Check for leaks• Abra los grifos de agua. Revise si hay fugas. Secure the drain hose with beaded tie strap, in one of these ways: Asegure la manguera de desagQe con el fleje de atadura rebordeado, de una de las maneras siguientes: Insert washers into hoses• Inserte las arandelas en las mangueras. W10092709A © 2007 All dghts reserved. Todos los derechos reservados. Hand tighten couplings to faucets• Apriete a mano los acoplamientos a los grifos. Turn another % rotation• Do not overtighten. Gire otros _ de rotaci6n. No apriete demasiado. Run water into bucket to determine which hose is hot and which is cold. Haga correr el agua dentro de un balde para determinar cual es la manguera de agua caliente y la de agua fria. laundry tub, drainpipe (must be at least 39" wall-mounted standpipe• tina de lavadero, [99 cm] high), tubo de desagQe (debe ser de por Io menos 39" [99 cm]), tubo vertical montado en la pared• IMPORTANT: To avoid siphoning, do not put more than 41/2" (11.4 cm) of drain hose into drainpipe or standpipe• IMPORTANTE: Para evitar el efecto de sif6n, no ponga mas de 4/12" (11,4 cm) de manguera de desagQe en el tubo de desag0e o en el tubo vertical• MAYTAG and the "M" Symbol are registered trademarks of Maytag Limited in Canada• All other marks are trademarks of Maytag Corporation or its related companies. MAYTAG y el simbo[o "M" son rnarcas reglstradas de Maytag Umlted en CanadA. Todas las otras marcas son marcas de comerclo de Maytag Corporation o sus compai_ias asocladas. Electrical Shock Hazard Plug into a grounded 3 prong outlet. Do not remove ground prong. Do not use an adapter. Do not use an extension cord. Failure to follow these instructions can result in death, fire, or electrical shock. Peligro de Choque El_ctrico Conecte a un contacto de pared de conexion No quite el terminal de conexi6n a tierra. No use un adaptador, No use un cable electrico de extensi6n. a tierra de 3 terminales. No seguir estas instrucciones puede ocasionar la muerte, incendio o choque electrico. Plug into a grounded 3 prong outlet. Check for leaks around faucets, inlet hoses and drain hose. Conecte a un contacto de pared de conexi6n a tierra de 3 terminales. Verifique si hay fugas alrededor de los grifos, de las mangueras de entrada y de la manguera de desagQe. Version en fran(_ais au verso. 1/07 Printed in U.S.A. Impreso en los EE.UU.
-
 1
1 -
 2
2
 |
 |