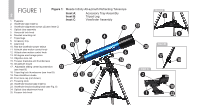
Meade Infinity 80mm User Manual - Page 6
Attach The Viewfinder, Attach The Diagonal Prism And, Eyepiece, Align The Viewfinder, Attach
 |
View all Meade Infinity 80mm manuals
Add to My Manuals
Save this manual to your list of manuals |
Page 6 highlights
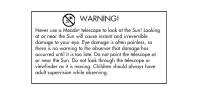
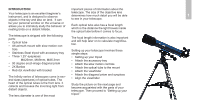
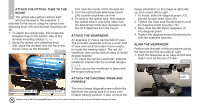
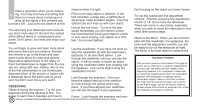
ATTACH THE OPTICAL TUBE TO THE 4 MOUNT The optical tube gathers distant light which is focused in the eyepiece. It attaches to the mount using the optical tube attaching knob (24) and dovetail mounting rail (6). 1. To attach the optical tube, first locate the threaded hole on the bottom side of the dovetail mounting rail(6) (Fig 4). 2. Using the optical tube attaching knob (24), place the dovetail onto the top of the mount, lining up the threaded Fig. 4 Mounting holes hole near the center of the dovetail rail. 3. Turn the optical tube attachment knob (24) counter-clockwise until firm. 4. To remove the optical tube, first support the optical tube in one hand. Next, turn the attachment knob (24) clockwise until the OTA detaches from the mount. ATTACH THE VIEWFINDER An eyepiece (1) has a narrow field of view. The included viewfinder (2) has a wider field of view and red dot to make it even easier to locate the viewing object. The red dot viewfinder also comes with an easy to install dovetail bracket. 1. To install the red dot viewfinder, slide the viewfinder bracket into the dovetail adapter (Fig 5). 2. Next, secure the viewfinder in place with the single locking knob. ATTACH THE DIAGONAL PRISM AND EYEPIECE Attachment knob (24) Mounting screw The erect-image diagonal prism reflects the light from the optical tube to a more comfortable viewing position. It also corrects the Looking at or near the Sun will cause irreversible damage to your eye. Do not point this telescope at or near the Sun. Do not look through the telescope as it is moving. image orientation so the image is right side up, and correct left-to-right. 1. To install, slide the diagonal prism (13) into the focuser draw tube (15). 2. Tighten the draw tube thumbscrew to hold the diagonal prism securely (15). 3. Next, slide the MA 26mm eyepiece (1) into diagonal prism. 4. Tighten the diagonal prism thumbscrew to hold the eyepiece securely. ALIGN THE VIEWFINDER Perform the first part of this procedure during the daytime and the last step at night. 1. Point the telescope at an easy-to-find land object such as the top of a tele- Fig. 5 Locking knob
-
 1
1 -
 2
2 -
 3
3 -
 4
4 -
 5
5 -
 6
6 -
 7
7 -
 8
8 -
 9
9 -
 10
10 -
 11
11 -
 12
12 -
13
-
14
-
15
-
16
-
17
-
18
-
19
-
20
 |
 |