Meade LX600-ACF 10 inch User Manual - Page 22
Polar Mode
 |
View all Meade LX600-ACF 10 inch manuals
Add to My Manuals
Save this manual to your list of manuals |
Page 22 highlights
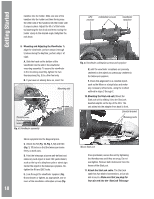
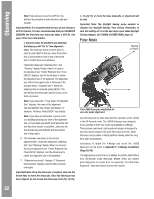
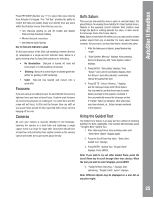
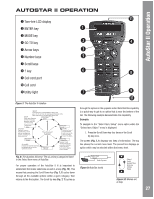
AutoStar #497 OHbAsNerDvBiOngX Note: Press any key to abort the GPS fix. You will then be prompted to enter the time, date and location. Important Note: It is recommended that you do not attempt a GPS fix indoors. It is also recommended that you CALIBRATE SENSORS the first time your telescope takes a GPS fix. See page 33 for more information. e. Once the level, tilt and North are detected, the telescope will "Go To" two alignment stars. The telescope will go to these stars in order to orient itself to the sky. Once it has done this, it will be able to point to any of the more than 145,000 stars in its database. "Automatic Alignment: Selecting Star" and "Slewing" display. Finally, when it is close to the alignment star "Center Brightest Star: Press ENTER" displays. Use the Arrow keys to center the alignment star in the eyepiece. The alignment star will be the brightest star in that area of the sky (and hence, "brightest star"). When the alignment star is centered, press ENTER. This also defines the telescope's optical center on the StarLock sensor. Note: If you press the "?" key while "Ctr Brightest Star" displays, the name of the alignment star that AutoStar has chosen will display. For example, "Arcturus: Press ENTER" may display. Note: If you have an obstruction, such as a tree or a building blocking your view of the alignment star, or if you have any doubts at all about the star that has been chosen, no problem. Just press the Scroll Down key and AutoStar will find another star to align upon. 6. The telescope now slews to the second alignment star. "Automatic Alignment: Selecting Star" and "Slewing" display. When it is close to the second alignment star "Center Brightest Star: Press ENTER" displays. Use the Arrow keys to center the alignment star in the eyepiece. 7. "Alignment successful" displays. If "Alignment Unsuccessful" displays, perform the procedure over again. Important Note: Once the telescope is aligned, only use the Arrow keys to move the telescope. Once the telescope has been aligned, do not loosen the telescope locks (Pg. 10, Fig. 1, 12 and 17), or move the base manually, or alignment will be lost. Important Note: The Daylight Saving menu enables or disables the Daylight Savings Time setting: Remember to turn this setting off or on the two days a year when Daylight Saving changes. See TIMING IS EVERYTHING, page 35. Polar Mode Pointing at Polaris North The LX600 in proper orientation for one-star polar alignment Up until this point we have described the operation of the LX600 in the Alt-Azmuth mode. The LX600 telescope was designed to be operated in the Polar mode using Meade's X-Wedge. This precision machined, rigid equatorial wedge is designed to securely mount between the giant field tripod and the LX600 telescope and provides a steady platform ideally suited for long term astro photography. Instructions to attach the X-Wedge and mount the LX600 telescope can be found in Appendix F: X-Wedge Installation (Page 62-66). The alignment procedure for an X-Wedge mounted LX600 differs from Alt-Azmuth mode telescope. Meade offers you several polar alignments to choose from, but generally "One-Star Polar Alignment" described below is preferred method. 22
-
 1
1 -
2
-
3
-
4
-
5
-
6
-
7
-
8
-
9
-
10
-
11
-
12
-
13
-
14
-
15
-
16
-
 17
17 -
 18
18 -
 19
19 -
 20
20 -
 21
21 -
 22
22 -
 23
23 -
 24
24 -
 25
25 -
 26
26 -
 27
27 -
28
-
29
-
30
-
31
-
32
-
33
-
34
-
35
-
36
-
37
-
38
-
39
-
40
-
41
-
42
-
43
-
44
-
45
-
46
-
47
-
48
-
49
-
50
-
51
-
52
-
53
-
54
-
55
-
56
-
57
-
58
-
59
-
60
-
61
-
62
-
63
-
64
-
65
-
66
-
67
-
68
-
69
-
70
-
71
-
72
 |
 |
