Meade LX850-ACF User Manual - Page 22
Slew Speeds, Aligning for the First Time, Finding True North/Aligning on Polaris
 |
View all Meade LX850-ACF manuals
Add to My Manuals
Save this manual to your list of manuals |
Page 22 highlights
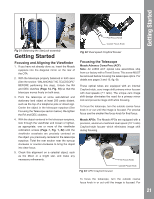
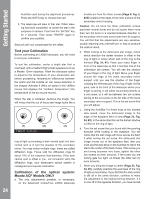
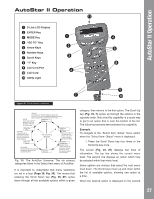
AutoStar #G4et9t7inHgASNtDarBtOedX precise focus use the smaller fine focus knob for final focus. If you have a 2" eyepiece, remove the 1.25" eyepiece adapter from the diagonal by loosening the thumbscrew(s). Slide the 2" eyepiece into the diagonal and tighten with the eyepiece locking screw(s). The bottom side of the focuser has a locking knob which locks the focuser drawtube in place. Use this lock knob when the focuser is attached with heavy equipment to prevent unwanted movement to the drawtube. Slew Speeds AutoStar II has nine slew speeds that move the optical tube at rates that are directly proportional to the sidereal rate and have been calculated to accomplish specific functions. Press the Speed key (Number key "1") and then press a Number key (1-9) to change the slew speed, which is shown for about two seconds on AutoStar II's display. Autostar's Setup/Align Menu. Once you do this at the end of each observing session you will need only to park your scope and your telescope will keep this alignment until the telescope axes are unlocked or the mount is moved. When you turn the telescope back on after parking, it will be aligned and ready to use. If you forget to park the scope, select Easy Alignment so long as the tripod and OTAs have not been adjusted. Finding True North/Aligning on Polaris To ensure maximum pointing accuracy and tracking it is import that your telescope's mount and OTA be aligned Polaris, or if Polaris is not visible, true north. The nine available speeds are: Number Key 1= 1x =Guide Rate, programmable Number Key 2= 2x =2x sidereal (0.5 arc-min/sec or 0.008°/sec) Number Key 3= 8x =8x sidereal (2 arc-min/sec or 0.033°/sec) Number Key 4= 16x = 16x sidereal (4 arc-min/sec or 0.067°/sec) Number Key 5= 64x = 64x sidereal (16 arc-min/sec or 0.27°/sec) Number Key 6= 1/4° =15arc-min/sec Number Key 7= 1/2° = 30arc-min/sec Number Key 8= 1° = 60arc-min/sec Number Key 9= 3° = 180arc-min/sec Speeds 1, 2, or 3: Best used for fine centering of an object in the field of view of a higher power eyepiece, such as a 12mm or a 9mm eyepiece. Speeds 4, 5, or 6: Enable centering of an object in the field of a low-to-moderate power eyepiece, such as the standard Super Plössl 26mm. Speeds 7 or 8: Best used for rough centering of an object in the viewfinder. Speed 9: Moves the telescope quickly from one point in the sky to another. Aligning for the First Time Anytime you have removed and reinstalled the StarLock or OTA, you should select "One Star Alignment" in the Fig 33A: Locating Polaris Begin aligning the telescope by locating Polaris. Finding Polaris is simple. Most people recognize the "Big Dipper. The Big Dipper has two stars that point the way. Polaris is the last star in the "handle" of the Little Dipper (Fig. 33A). Once you have located Polaris in the sky, orient your telescope so that the control panel faces south (away from Polaris). You may need to rotate the telescope mount on its tripod to achieve this orientation (loosen the two Azimuth Lock Knobs [page 7, fig. 1, 16], rotate and re-tighten the lock knobs). The telescope mount and its OTA are now pointing very near to the celestial north. Loosen the three (3) DEC locks (page7 , fig. 1, 23), rotate the OTA so that it is parallel with the mount (pointing towards Polaris) and then re-lock the DEC. If you were to have performed this maneuver perfectly, you would be able to see Polaris through the finder scope (make sure that you aligned the finderscope to the OTA). If you cannot, rotate the entire telescope/ OTA assembly until you can. 22
-
 1
1 -
2
-
3
-
4
-
5
-
6
-
7
-
8
-
9
-
10
-
11
-
12
-
13
-
14
-
15
-
16
-
 17
17 -
 18
18 -
 19
19 -
 20
20 -
 21
21 -
 22
22 -
 23
23 -
 24
24 -
 25
25 -
 26
26 -
 27
27 -
28
-
29
-
30
-
31
-
32
-
33
-
34
-
35
-
36
-
37
-
38
-
39
-
40
-
41
-
42
-
43
-
44
-
45
-
46
-
47
-
48
-
49
-
50
-
51
-
52
-
53
-
54
-
55
-
56
-
57
-
58
-
59
-
60
 |
 |
