Meade LX850-ACF User Manual - Page 25
StarLock Operation
 |
View all Meade LX850-ACF manuals
Add to My Manuals
Save this manual to your list of manuals |
Page 25 highlights
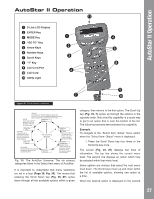
StarLock Operation too far and you need to turn in the opposite direction. Always double check the image in the center of the field of the eyepiece. g. You may find after your initial adjustment that the dark center is off in a new direction (e.g., instead of being off side-to-side it is now off in an up-and-down direction). In this case repeat steps b through f to find the new adjustment screw. h. Now try a higher power eyepiece (e.g., 9mm or less) and repeat the above tests. Any lack of collimation at this point will require only very slight adjustments of the three set screws. You now have good collimation of the optics. i. As a final check of alignment, examine the star image in focus with the higher power eyepiece as suggested under good viewing conditions. The star point should appear as a small central dot (commonly referred to as an "Airy disc") with a diffraction ring surrounding it. To give a final precision collimation, make extremely slight adjustments of the three set screws, if necessary, to center the Airy disc in the diffraction ring. You now have the best alignment of the optics possible with this telescope. Calibrate Home After a precise polar alignment (drift alignment) you may want to calibrate the Home Sensors on your mount. This procedure sets the 90 degree declination position and the zero hour angle of the RA axis very accurately. When you perform future alignments, the system uses these positions to aid in a precise alignment. Parking the Scope Designed for a telescope that is not moved between observing sessions. Align the telescope one time, then use this function to park the telescope. Once parked, the screen prompts to turn off power. The advantage of parking is that you do not need to align the telescope the next time you turn on Autostar; it remembers your alignment. Tip: When waking their telescope, some users select a bright star from the Objects menu and perform a GoTo on that star. If the star is not in the exact center of the eyepiece, move the star to the center using the arrow keys and then hold ENTER down for more than two seconds. This activates the Enter to Sync function and fine tunes and improves the telescope's alignment. Important Note: When the "Park Scope" option is chosen and the display prompts you to turn off the telescope's power, Autostar II is unable to be returned to operation without turning the power off and then back on. Most users can use the default park position when parking their LX850. The default park position is identical to the home position; counterweight shaft pointing downward and ota pointing forward toward the celestial pole. However, if you are storing your telescope in a location where it cannot be stored in the home position, for example, such as an observatory with a top that slides back, just move your telescope to the position you want to store it. Choose "Park Position" from the Setup: Telescope menu. When "Park Position" displays, use the down arrow key to scroll through the choices. Select "Use Current" if your position is anything other than the Home Position. If you are using the Home Position, select "Use Default." StarLock Operation Your LX850 Telescope incorporates the advanced StarLock™ system that makes target acquisition and accurate autoguiding during exposures completely automatic. The StarLock system incorporates a narrow field 80mm f/5 optic and a super wide-angle lens that automatically finds your target with high precision, locks on to a field star and automatically begins guiding. StarLock Menu: Press RET/GUIDE (Number key "7") to select this menu directly from Autostar II's keypad. This "Hot Key" provides the ability to control the StarLock system easily and directly from any place within the Autostar menus. From this key, you can: • Turn StarLock guiding on and off. Enable and disable StarLock High Precision Pointing • Monitor StarLock corrections • Set Different Guide Speeds Key to StarLock Indicator Lamps On the back surface of the StarLock assembly, between the two (2) receptacles is a single red LED indicator lamp. Below is a guide showing what the lamp blink patterns are indicating: • No illumination StarLock is turned off, does not have power or is idle awaiting commands. • Blinking StarLock is searching for a suitable guide star (either for guiding or HPP centering). • Solid StarLock has located and locked onto a guide star. 25
-
 1
1 -
2
-
3
-
4
-
5
-
6
-
7
-
8
-
9
-
10
-
11
-
12
-
13
-
14
-
15
-
16
-
17
-
18
-
19
-
 20
20 -
 21
21 -
 22
22 -
 23
23 -
 24
24 -
 25
25 -
 26
26 -
 27
27 -
 28
28 -
 29
29 -
 30
30 -
31
-
32
-
33
-
34
-
35
-
36
-
37
-
38
-
39
-
40
-
41
-
42
-
43
-
44
-
45
-
46
-
47
-
48
-
49
-
50
-
51
-
52
-
53
-
54
-
55
-
56
-
57
-
58
-
59
-
60
 |
 |
