Meade StarNavigator 130mm Instruction Manual - Page 12
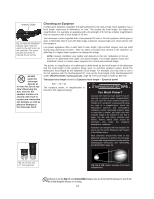
Join an Astronomy Club, Attend a Star Party
 |
View all Meade StarNavigator 130mm manuals
Add to My Manuals
Save this manual to your list of manuals |
Page 12 highlights
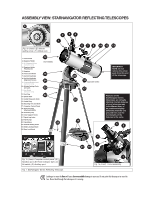
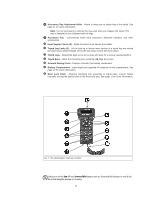
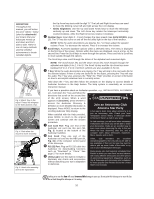
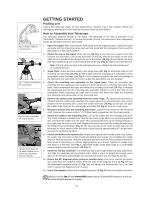
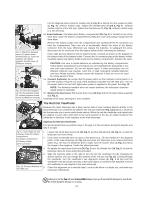
DEFINITION: Throughout this manual, you will notice the term "Alt/Az." Alt/Az (short for altazimuth) just means that your telescope moves up and down and from side to side. Alt/Az is one of many methods used by amateur astronomers to locate celestial objects. Fasten wingnuts Fig. 3 Attach Tray to the tripod: Thread the wingnuts to the bolts (bottom view). Fig. 4: Pads allow the mount to move smoothly. Fig. 5: Attach the mounting arm to the tripod base. the Up Arrow key starts with the digit "9." The Left and Right Arrow keys are used to move the blinking cursor left and right across the LCD display. • Alt/Az Alignment: Use the Up and Down Arrow keys to move the telescope vertically up and down. The Left Arrow key rotates the telescope horizontally counterclockwise, while the Right Arrow key rotates it clockwise. g Number Keys: Input digits 0 - 9 and changes the slew speeds (see SLEW SPEEDS, page 15). The "0" key also turns on and off the red utility light on the top of the handbox. NOTE: While the audio descriptions are playing, the 7 & 9 keys adjust the speaker volume. Press 7 to decrease the volume. Press 9 to increase the volume. h Scroll Keys: Accesses database options within a selected menu. The menu is displayed on the first line of the screen. Options within the menu are displayed, one at a time, on the second line. Press the Scroll keys to move through the options. Press and hold a Scroll key to move quickly through the options. The Scroll keys also scroll through the letters of the alphabet and numerical digits. NOTE: The Scroll Down key and the Down Arrow key move forward through the alphabet and digits (A to Z, 0 to 9). The Scroll Up key and the Up Arrow key move backward (Z to A, 9 to 0). Common symbols are also available in the list. i ? Key: While the audio descriptions are playing, the ? key will skip to the next audio file for the selected object. If there is only one audio file for the object, pressing the ? key will stop the audio. The ? key also accesses the "Help" file. "Help" provides on-screen information on how to accomplish whatever task is currently active. Hold down the ? key and then follow the prompts on the display to access details of Audiostar functions in the Help feature. The Help system is essentially an on-screen instruction manual. If you have a question about an Audiostar operation, e.g., INITIALIZATION, ALIGNMENT, etc., hold down the ? key and follow the directions that scroll on the second line of the LCD screen. When a word appears in [brackets], press ENTER to access the Audiostar Glossary. A definition or more detailed information is displayed. Press MODE to return to the Join an Astronomy Club Attend a Star Party scrolling Audiostar Help display. A fun way to learn more about astronomy is to When satisfied with the Help provided, press MODE to return to the original screen and continue with the chosen procedure. j Coil Cord Port: Plug one end of the join an astronomy club. Check your local newspaper, school, library, or telescope dealer to find out if there's a club in your area. At club meetings, you will meet other astronomy enthusiasts with whom you will be able to share your discoveries. Clubs are an excellent way to Audiostar coil cord into this port (10, learn more about observing the sky, to find out Fig. 2) located at the bottom of the where the best observing sites are, and to Audiostar handbox. 1) Coil Cord: Plug one end of the compare notes about telescopes, eyepieces, filters, tripods, and so forth. Audiostar coil cord into the HBX port (A, Often, club members are excellent Fig. 1C) of the computer control panel astrophotographers. Not only will you be able to of the telescope. 1! RS-232 Port: Plug an RS-232 cable into Audiostar for downloading functions see examples of their art, but you may even be able to pick up some "tricks of the trade" to try out on your StarNavigator telescope. such as "Download" or "Clone." See Many groups also hold regularly scheduled Star page 27 for more details. 1@ Utility Light: Use this built-in red light to illuminate star charts and accessories without disturbing your eye's adaptation to darkness. Parties at which you can check out and observe with many different telescopes and other pieces of astronomical equipment. Magazines such as Sky & Telescope and Astronomy print schedules for many popular Star Parties around the United States and Canada. Looking at or near the Sun will cause irreversible damage to your eye. Do not point this telescope at or near the Sun. Do not look through the telescope as it is moving. 10
-
 1
1 -
2
-
3
-
4
-
5
-
6
-
 7
7 -
 8
8 -
 9
9 -
 10
10 -
 11
11 -
 12
12 -
 13
13 -
 14
14 -
 15
15 -
 16
16 -
 17
17 -
18
-
19
-
20
-
21
-
22
-
23
-
24
-
25
-
26
-
27
-
28
-
29
-
30
-
31
-
32
-
33
-
34
-
35
-
36
-
37
-
38
-
39
-
40
-
41
-
42
-
43
-
44
-
45
-
46
-
47
-
48
 |
 |
