Meade StarNavigator 130mm Instruction Manual - Page 19
Easy Two-Star Align
 |
View all Meade StarNavigator 130mm manuals
Add to My Manuals
Save this manual to your list of manuals |
Page 19 highlights
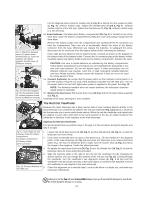
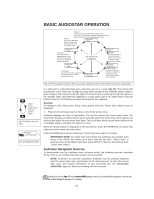
IMPORTANT NOTE: Audiostar requests the Zip Code or Country/State, City, and Telescope Model information only the first time Audiostar is activated. If you wish to change this information, use the "Site" and "Telescope Model" options in the Setup menu. See pages 26 and 27 for more information. IMPORTANT NOTE: While performing the automatic tracking procedure, only use the Arrow keys to move the telescope. Once the telescope has been set in the Alt/Az home position, do not loosen the telescope locks (10F, Fig. 1b), or move the base manually, or alignment will be lost. the city and state or country of your observing location). Press Up to select the zip code option or down to enter the city and state. Note: The location settings (country/state/province and city, or zip code) are only asked for the first time you turn on the control panel. If you wish to change this setting later on, use the Site menu. See SITE, pages 26 and 27, for more information. a. If you chose the zip code option (USA only), the leftmost "0" is highlighted. Use the Number keys to enter the digits. As you enter a digit, the next digit to the right will be highlighted. Enter the next digit. Repeat this process until all 5 digits of your zip code are entered. Press ENTER. b. If you chose the location option, the next screen asks for the country or state/province (listed alphabetically) of the observing site. Use the Scroll keys to scroll through the list of countries, states, and provinces. Press ENTER when the correct location displays. The next screen asks for the city (listed alphabetically) closest to the observing site. Use the Scroll keys to scroll through the list of cities. Press ENTER when the correct city appears on screen. 6. Daylight Savings Time: The next screen requests the status of Daylight Savings Time. Press one of the Scroll keys to toggle between the YES/NO settings. When the desired setting displays, press ENTER. NOTE: When multiple choices are available within a menu option, the current option is usually displayed first and highlighted by a right pointing Arrow (>). 7. AudioStar then requests the telescope model number. Use the Scroll keys to cycle through the database of models. Press ENTER when your model number displays. 9. System initialization is complete. In order to automatically locate and track celestial objects, the telescope needs to perfrom an alignment procedure on the night sky. See the section Easy (Two-Star) Align below on performing this procedure. Easy (Two-Star) Align The fastest and easiest way to locate objects with Audiostar's GO TO capabilities is to use Easy Align. Audiostar automatically picks two stars from its database for the Easy Align procedure. During this procedure, Audiostar slews the telescope to a first alignment star. The user is asked to verify that the telescope is pointed at the chosen star and then prompted to centre the star in the eyepiece. The process is repeated with a second star to complete the alignment. NOTE: Before aligning the telescope, first verify that INITIALIZING AUDIOSTAR, page 16, has been performed. See MOVING THROUGH AUDIOSTAR'S MENUS, page 16, if you wish to learn how to operate Audiostar's keys. Looking at or near the Sun will cause irreversible damage to your eye. Do not point this telescope at or near the Sun. Do not look through the telescope as it is moving. 17
-
 1
1 -
2
-
3
-
4
-
5
-
6
-
7
-
8
-
9
-
10
-
11
-
12
-
13
-
 14
14 -
 15
15 -
 16
16 -
 17
17 -
 18
18 -
 19
19 -
 20
20 -
 21
21 -
 22
22 -
 23
23 -
 24
24 -
25
-
26
-
27
-
28
-
29
-
30
-
31
-
32
-
33
-
34
-
35
-
36
-
37
-
38
-
39
-
40
-
41
-
42
-
43
-
44
-
45
-
46
-
47
-
48
 |
 |
