Meade TE256W User Manual - Page 8
Battery Installation, Placement, Operation, Remote Sensors Status
 |
View all Meade TE256W manuals
Add to My Manuals
Save this manual to your list of manuals |
Page 8 highlights
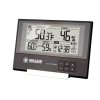
BATTERY INSTALLATION • Remove the battery door located at the back of the main unit. • Insert two (2) CR2032 lithium cell batteries and replace the battery compartment door. PLACEMENT • When mounting the main unit on the wall or vertical surface, fold the table stand back into the unit. • Make sure that the main unit is locating within the operating range of all remote sensors. • Ideally the main unit should be placed within line of sight of remote sensors. Avoid placing the main unit where surfaces emitting and radiating heat (e.g. heating ducts or air conditioners) and areas with interference from wireless devices (e.g. cordless phones, radio headsets, baby monitoring devices and other electronics). OPERATION Once the main unit is powered, the display will show all available LCD segments for a moment. GETTING STARTED TEMPERATURE/ HUMIDITY WINDOW The main unit supports up to 3 remote sensors, corresponding to a separate channel of the temperature and relative humidity display. The temperature can be displayed in Celsius (ºC) or Fahrenheit (ºF). The main unit carries the temperature and humidity sensor and uses this data to calculate an indoors comfort level - Wet, Comfort or Dry. A temperature alert function is available for all channels. It can be programmed to sound if the channel temperature exceeds or falls below the pre-set upper and lower limits. REMOTE SENSORS STATUS The wave icon next to the current channel icon shows the connection status of the corresponding remote sensor: Icon Status Searching for the signals from the remote sensor Corresponding remote sensor signal received successfully No signals received for over 1 hour SEARCH FOR REMOTE SENSORS • The main unit can be manually activated to search for the signals from remote sensors by pressing and holding DOWN (? ) button. OPERATION • To select the temperature & humidity mode, press UP (? ) or DOWN (? ) until the icon flashes with a beep sound alert. 8
-
 1
1 -
2
-
 3
3 -
 4
4 -
 5
5 -
 6
6 -
 7
7 -
 8
8 -
 9
9 -
 10
10 -
 11
11 -
 12
12 -
 13
13 -
14
-
15
 |
 |
