Memorex MDF0738-BLK User Guide - Page 9
Setup Menu - photo frame
 |
UPC - 749720012954
View all Memorex MDF0738-BLK manuals
Add to My Manuals
Save this manual to your list of manuals |
Page 9 highlights
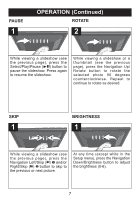
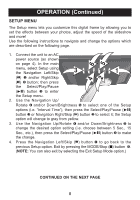
OPERATION (Continued) SETUP MENU The Setup menu lets you customize this digital frame by allowing you to set the effects between your photos, adjust the speed of the slideshow and more! Use the following instructions to navigate and change the options which are described on the following page. 1. Connect the unit to an AC power source (as shown 46 25 on page 4). In the main menu, select Setup using the Navigation Left/Skip 3 1 (o) 1 and/or Right/Skip (n) 2 button; then press the Select/Play/Pause (®p) button 3 to enter the Setup menu. 2. Use the Navigation Up/ Rotate 4 and/or Down/Brightness 5 to select one of the Setup options (i.e. "Interval Time"), then press the Select/Play/Pause (®p) button 3 or Navigation Right/Skip (n) button 2 to select it; the Setup option will change to gray from yellow. 3. Use the Navigation Up/Rotate 4 and/or Down/Brightness 5 to change the desired option setting (i.e. choose between 5 Sec., 15 Sec., etc.), then press the Select/Play/Pause (®p) button 3 to make the change. 4. Press the Navigation Left/Skip (o) button 1 to go back to the previous Setup option. Exit by pressing the MODE/Stop (I) button 6. (NOTE: You can also exit by selecting the Exit Setup Mode option.) CONTINUED ON THE NEXT PAGE 8
-
 1
1 -
2
-
3
-
 4
4 -
 5
5 -
 6
6 -
 7
7 -
 8
8 -
 9
9 -
 10
10 -
 11
11 -
 12
12 -
 13
13 -
 14
14 -
15
-
16
-
17
-
18
-
19
-
20
-
21
-
22
-
23
-
24
-
25
-
26
-
27
-
28
-
29
-
30
-
31
-
32
-
33
-
34
 |
 |
