Metabo KHE 5-40 Operating Instructions - Page 12
Cleaning, Maintenance, Troubleshooting, Accessories, Repairs, Environmental Protection, Technical
 |
View all Metabo KHE 5-40 manuals
Add to My Manuals
Save this manual to your list of manuals |
Page 12 highlights
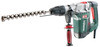
en ENGLISH Setting which enables the chisel to be rotated to the desired position. The chisel can be locked in different positions. - Insert the chisel. - Turn the switch button (8) to position . - Turn the chisel to the required position. - Turn the switch button (8) to position . - Turn the chisel until it engages. When a chisel is fitted, only operate the machine in the chiselling operating mode . 7.4 Switching On and Off KHE 5-40: To switch on the machine, press the trigger switch (11). To switch off release the trigger switch (11). MHE 5: To switch on the machine, press the trigger switch (11): the trigger switch (11) engages (continuous operation). In continuous operation, the machine continues running if it is forced out of your hands. Therefore, always hold the machine with both hands using the handles provided, stand securely and concentrate. To switch off push the locking lever (10) up and release the trigger switch (11). 7.5 Setting impact force Rotate the adjustment wheel (13) to change the impact strength (and speed). The impact strength is increased from setting A to F and the mode display (15) flashes. In setting G, the tool delivers the maximum impact strength, in this setting the mode display (15) is constantly lit. Area of use Plaster/light construction materials Brickwork/removing tiles Drilling/chiselling into concrete Adjustment wheel A - B C - D E - F 7.6 Metabo VibraTech (MVT) For reduced vibrations and less stress on the hands. Always apply a moderate amount of pressure to the handle when pushing down the machine and do not force. Vibrations are reduced most effectively at the central position (9). 8. Cleaning, Maintenance The power tool should be cleaned regularly, often and thoroughly through all air vents using a vacuum cleaner or by blowing in dry air. Prior to this operation, separate the power tool from the power source and wear protective glasses and dust mask. 12 A damaged dust protection cap (6) must be replaced immediately. To replace the dust protection cap (6) slide the tool lock (7) back. Grasp the dust protection cap and pull firmly forwards and off. Fit the new dust protection cap onto the spindle at an angle and press hard to secure. 9. Troubleshooting Overloading and Service Display (14): If the overloading and service display (14) flashes, the carbon brushes are almost completely worn (residual lifetime approximately 8 hours). If the brushes are completely worn, the machine switches off automatically. Have the brushes replaced by an authorised service centre. With a 30% overload, the overloading and service display (14) lights up. The power tool should not be continuously operated at this load. 10. Accessories Use only genuine Metabo accessories. Use only accessories which fulfil the requirements and specifications listed in these operating instructions. For a complete range of accessories, see www.metabo.com or the catalogue. 11. Repairs Repairs to electrical tools must be carried out by qualified electricians ONLY! Contact your local Metabo representative if you have Metabo power tools requiring repairs. For addresses see www.metabo.com. You can download a list of spare parts from www.metabo.com. 12. Environmental Protection Observe national regulations on environmentally compatible disposal and on the recycling of disused machines, packaging and accessories. Only for EU countries: Never dispose of power tools in your household waste! In accordance with European Directive 2002/ 96/EC on waste electrical and electronic equipment and its implementation in national legal systems, used power tools must be collected separately and handed in for environmentally compatible recycling. 13. Technical Specifications Explanatory notes on the specifications on page 3. Changes due to technological progress reserved. PTP12 = Rated input power = Power output = Torque nD11 = No-load speed = Max. drilling diameter in concrete with impact masonry bits
-
 1
1 -
2
-
3
-
4
-
5
-
6
-
 7
7 -
 8
8 -
 9
9 -
 10
10 -
 11
11 -
 12
12 -
 13
13 -
 14
14 -
 15
15 -
 16
16 -
 17
17 -
18
-
19
-
20
-
21
-
22
-
23
-
24
-
25
-
26
-
27
-
28
-
29
-
30
-
31
-
32
-
33
-
34
-
35
-
36
-
37
-
38
-
39
-
40
-
41
-
42
-
43
-
44
-
45
-
46
-
47
-
48
-
49
-
50
-
51
-
52
-
53
-
54
-
55
-
56
-
57
-
58
-
59
-
60
-
61
-
62
-
63
-
64
-
65
-
66
-
67
-
68
-
69
-
70
-
71
-
72
-
73
-
74
-
75
-
76
-
77
-
78
-
79
-
80
-
81
-
82
-
83
-
84
-
85
-
86
-
87
-
88
 |
 |
