Metabo MFE 30 Operating Instructions - Page 17
ON and OFF - chaser
 |
View all Metabo MFE 30 manuals
Add to My Manuals
Save this manual to your list of manuals |
Page 17 highlights
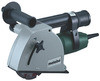
ENGLISH 8 Using the wall chaser with only one diamond cutting blade If the front diamond cutting blade is removed and only the rear blade left in place the wall chaser is also suitable for parting cuts (e.g. for tiles). Figure 2 9 Depth of cut After loosening the star-knob screw (4) the wall chaser can be set to any desired depth of cut between 0 mm and 30 mm (against scale 1). Tighten the star-knob screw again after depth of cut setting. 10 Stone-dust extraction For extraction of the dust generated when chases are cut, the suction hose 30 344 (4 m) is inserted into the seat of the dust port (5). The bayonet joint prevents the unintentional loosening of the hose when working with the tool. When using a second suction hose 30 344, the dust collector can be placed up to 8 m away from the jobsite. To connect a suction hose without a bayonet joint use the connection adapter supplied with the tool. Caution! Never use the wall chaser without dust extraction, as the motor would quickly become clogged by the stone dust. 12 Working with the wall chaser Position the handle so that the user can grip it firmly without touching the safety guard. Contact with live wires energises the metal parts of the housing and can cause electric shock to the operator. The handle (2) can be adjusted after loosening the hexagon head screw (14). Set handle to desired position and tighten hexagon head screw again. At the rear end of the guide shoe (10) is a triangular marking (8). This marking is in line with the rear diamond cutting blade and serves as cutting position indicator when cutting chases. Place the wall chaser (with motor running) with the guide shoe (10) onto the surface the chase is to be cut into and slowly push down until the preset depth of cut is reached. Then pull the wall chaser in the direction of cut, e.g. from top to bottom as shown in figure A (page 4) or - with horizontal cuts - towards the operator, as in figure B (page 4). The rib remaining between the two cuts is removed with the clearing tool supplied. Deep chases in hard material (e.g. concrete) can not be cut in a single pass. 13 Overload protection 13.1 Safety clutch Integrated into the wall chaser's gearbox is an automatic safety clutch. It protects the operator from the high torque generated if the diamond cutting blades should jam. At the same time the safety clutch protects and frees the wall chaser's motor and gear box. If the safety clutch responds switch OFF immediately (do not let the clutch ride!) 11 Switching the wall chaser ON and OFF To switch ON, the slide switch (13) is pushed forward until it engages. To the rear of the slide switch the symbol "I" appears. The wall chaser is operational when the LED (6), which lights up shortly after switching on, goes off. To switch OFF, press down on the rear (the raised end in the "I" position) end of the slide switch (13) (position "0"). 13.2 Electronic overload protection In the event of a very high, brief overload the integrated overload protection limits the power input to prevent a further inadmissible temperature rise of the motor. If, while the wall chaser is in use - as a result of an overload - there is a sudden sharp reduction in speed or the diamond cutting blades come to a stop, it should be left running idle for a short time. If the tool is subjected to an overload for an extended period, the LED (6) lights up. The wall chaser should be left running idle until the motor has cooled down to its normal operating temperature and the LED goes off. 17
-
 1
1 -
2
-
3
-
4
-
5
-
6
-
7
-
8
-
9
-
10
-
11
-
 12
12 -
 13
13 -
 14
14 -
 15
15 -
 16
16 -
 17
17 -
 18
18 -
 19
19 -
 20
20 -
 21
21 -
 22
22 -
23
-
24
-
25
-
26
-
27
-
28
-
29
-
30
-
31
-
32
-
33
-
34
-
35
-
36
-
37
-
38
-
39
-
40
-
41
-
42
-
43
-
44
-
45
-
46
-
47
-
48
-
49
-
50
-
51
-
52
 |
 |
