Miele Triflex HX2 Runner Operating instructions/Installation instructions - Page 185
The battery was not placed in the PowerUnit when
 |
View all Miele Triflex HX2 Runner manuals
Add to My Manuals
Save this manual to your list of manuals |
Page 185 highlights
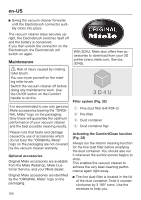
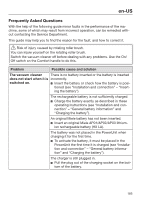
en-US Frequently Asked Questions With the help of the following guide minor faults in the performance of the machine, some of which may result from incorrect operation, can be remedied without contacting the Service Department. This guide may help you to find the reason for the fault, and how to correct it. Risk of injury caused by rotating roller brush. You can injure yourself on the rotating roller brush. Switch the vacuum cleaner off before dealing with any problems. Use the On/ Off switch on the Comfort handle to do this. Problem Possible cause and solution The vacuum cleaner There is no battery inserted or the battery is inserted does not start when it is incorrectly. switched on. Insert the battery or check how the battery is posi- tioned (see "Installation and connection" - "Insert- ing the battery"). The rechargeable battery is not sufficiently charged. Charge the battery exactly as described in these operating instructions (see "Installation and connection" - "General battery information" and "Charging the battery"). An original Miele battery has not been inserted. Insert an original Miele AP01/AP02/AP03 lithiumion rechargeable battery (HX LA). The battery was not placed in the PowerUnit when charging it for the first time. To activate the battery, it must be placed in the PowerUnit the first time it is charged (see "Installation and connection" - "General battery information" and "Charging the battery"). The charger is still plugged in. Pull the plug out of the charging socket on the bot- tom of the battery. 185
-
 1
1 -
2
-
3
-
4
-
5
-
6
-
7
-
8
-
9
-
10
-
11
-
12
-
13
-
14
-
15
-
16
-
17
-
18
-
19
-
20
-
21
-
22
-
23
-
24
-
25
-
26
-
27
-
28
-
29
-
30
-
31
-
32
-
33
-
34
-
35
-
36
-
37
-
38
-
39
-
40
-
41
-
42
-
43
-
44
-
45
-
46
-
47
-
48
-
49
-
50
-
51
-
52
-
53
-
54
-
55
-
56
-
57
-
58
-
59
-
60
-
61
-
62
-
63
-
64
-
65
-
66
-
67
-
68
-
69
-
70
-
71
-
72
-
73
-
74
-
75
-
76
-
77
-
78
-
79
-
80
-
81
-
82
-
83
-
84
-
85
-
86
-
87
-
88
-
89
-
90
-
91
-
92
-
93
-
94
-
95
-
96
-
97
-
98
-
99
-
100
-
101
-
102
-
103
-
104
-
105
-
106
-
107
-
108
-
109
-
110
-
111
-
112
-
113
-
114
-
115
-
116
-
117
-
118
-
119
-
120
-
121
-
122
-
123
-
124
-
125
-
126
-
127
-
128
-
129
-
130
-
131
-
132
-
133
-
134
-
135
-
136
-
137
-
138
-
139
-
140
-
141
-
142
-
143
-
144
-
145
-
146
-
147
-
148
-
149
-
150
-
151
-
152
-
153
-
154
-
155
-
156
-
157
-
158
-
159
-
160
-
161
-
162
-
163
-
164
-
165
-
166
-
167
-
168
-
169
-
170
-
171
-
172
-
173
-
174
-
175
-
176
-
177
-
178
-
179
-
 180
180 -
 181
181 -
 182
182 -
 183
183 -
 184
184 -
 185
185 -
 186
186 -
 187
187 -
 188
188 -
 189
189 -
 190
190 -
191
-
192
-
193
-
194
-
195
-
196
-
197
-
198
-
199
-
200
 |
 |
