Motorola 98690H User Manual - Page 1
Motorola 98690H Manual
 |
View all Motorola 98690H manuals
Add to My Manuals
Save this manual to your list of manuals |
Page 1 highlights
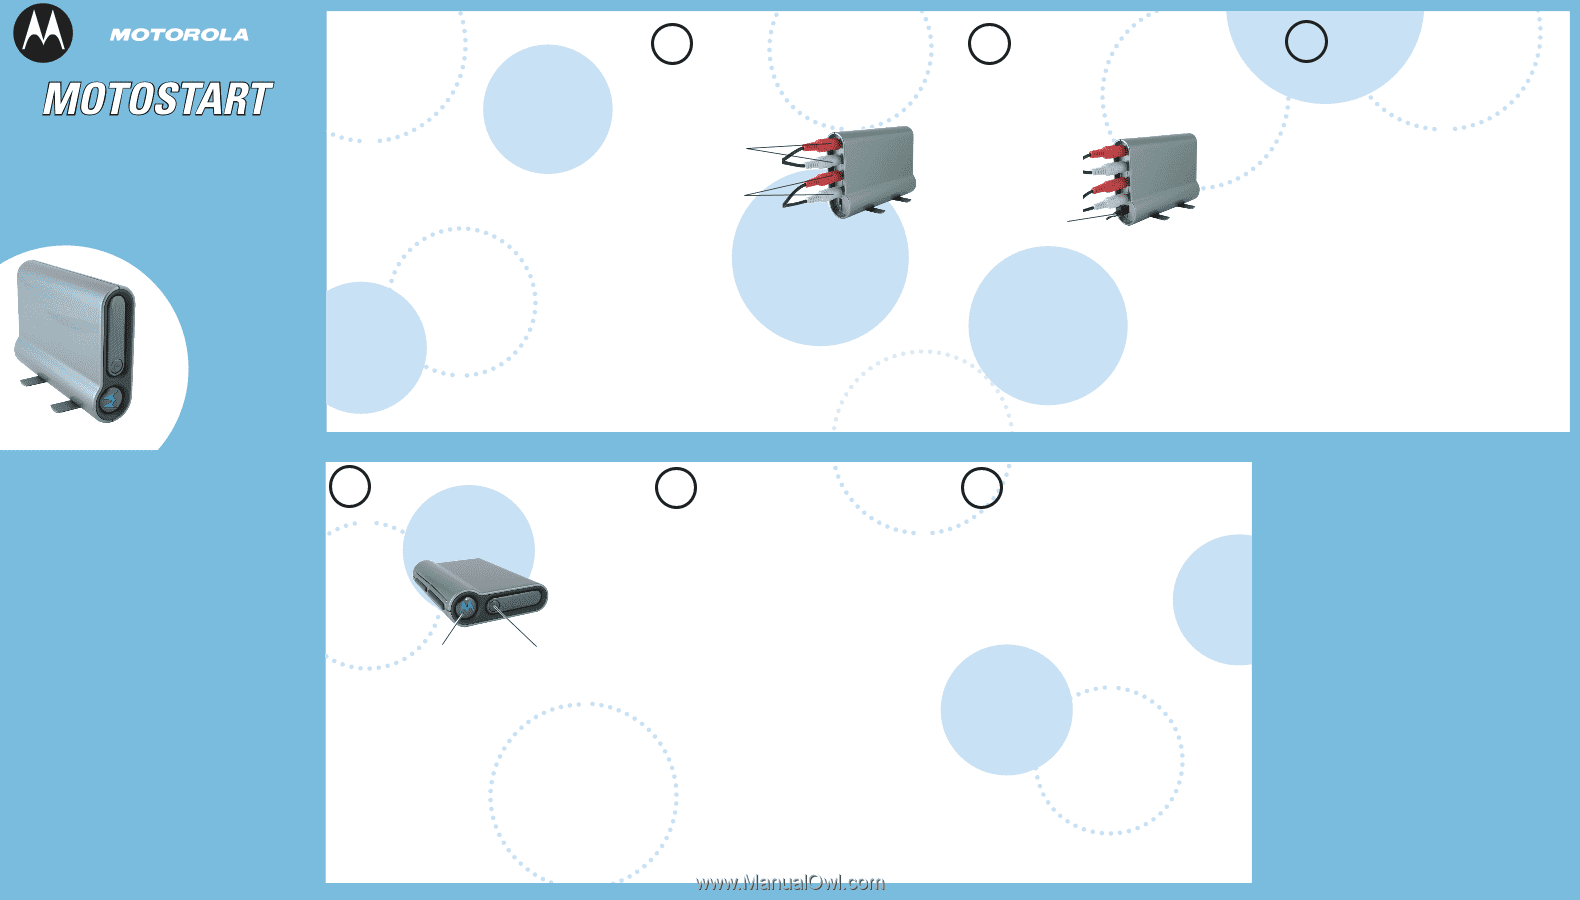
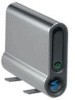
DC800 Bluetooth® Home Stereo Adapter Get Connected in 5 Quick Steps 1 - 2 CONNECT 3 - 4 PAIR 5 TEST AND USE Before using this product, read the Important Safety and Legal Information pamphlet and follow its instructions. Follow the numbered steps to connect and use a Motorola Bluetooth® DC800 Home Stereo Adapter. Note: The DC800 Home Stereo Adapter is a Class 1 Bluetooth device. Bluetooth features and Bluetooth Class 1 power levels are not allowed for outdoor operation in France. To avoid unlawful interference with radio signals, do not use the Bluetooth features in France unless you are indoors. Note: To operate with the DC800 Home Stereo Adapter, your Bluetooth audio device must support A2DP Profile capability. Note: To maintain compliance with RF exposure guidelines, you must keep the DC800 Home Stereo Adapter at least 20 centimeters (8 inches) away from any person. 1 AUDIO CONNECTIONS Make the following audio connections to your stereo adapter (using the supplied cables): Audio Out Jacks Audio In Jacks 1 Connect the Audio Out jacks on the stereo adapter to unused Audio In jacks on your home stereo system. 2 Connect the Audio In jacks on the stereo adapter to unused Audio Out jacks (such as Tape Out) on your home stereo system. Note: If your home stereo does not support Line Out audio, you may have to connect through the headphone jack with the included RCA-to-headphone cable. Note: To stream music from your phone (when equipped with 2.5mm stereo output jack), use the included RCA-to2.5mm cable to connect to the adapter's Audio In jacks. 2 POWER CONNECTIONS Make the following power connection to your stereo adapter: Power Jack 1 Plug the included AC power supply into the Power Jack on the stereo adapter. 2 Plug the other end of the AC power supply into a wall outlet. 3 PAIR WITH BLUETOOTH HEADSET Enable your gateway to transmit music to your Bluetooth wireless headphone: Note: This guide does not provide steps for pairing your gateway with a Bluetooth USB PC Adapter or a Bluetoothenabled PC. Consult the USB Adapter or PC's user guide for details on completing this step. 1 Holding your headphone close to the gateway, place the headset into pairing mode. If using the Motorola HT820 Bluetooth Stereo Headphone, place in pairing mode by pressing and holding the headphone's Call button for approximately 6 seconds until the indicator light is solidly lit. For other products, refer to your headset's user's guide for details. 2 Turn on the stereo adapter by pressing in the Power button. After a few moments, the Pairing Button indicator light begins blinking to indicate the power is on. Motorola, Inc. Consumer Advocacy Office 1307 East Algonquin Road Schaumburg, IL 60196 USA www.hellomoto.com 1-877-MOTOBLU 1-800-331-6456 (United States) 1-888-390-6456 (TTY/TDD United States for hearing impaired) 1-800-461-4575 (Canada) Part Number: 6809494A97-B MOTOROLA and the Stylized M Logo are registered in the US Patent & Trademark Office. The Bluetooth trademarks are owned by their proprietor and used by Motorola, Inc. under license. All other product or service names are the property of their respective owners. The use of wireless devices and their accessories may be prohibited or restricted in certain areas. Always obey the laws and regulations on the use of these products. © Motorola, Inc. 2005. 3 PAIR WITH BLUETOOTH HEADSET CONTINUED Pairing Button with Indicator Light Power Button 3 Press and hold the Pairing button on the stereo adapter until the indicator light remains solidly lit (about 5 seconds). The stereo adapter searches for Bluetooth devices. When the stereo adapter finds the headphone, the indicator light rapidly flashes indicating that pairing is successful. Once the connection is established, the indicator light changes to a slower, pulsing light. 4 PAIR WITH BLUETOOTH PHONE Enable your stereo adapter to receive music from the built-in MP3 player of your Bluetooth A2DP-capable phone: Note: These steps are for most Motorola phones. Certain phones require additional steps to enable stereo audio streaming (A2DP Profile). See your phone's user's guide to verify proper steps. 1 Turn on the stereo adapter by pressing in the Power button. After a few moments, the Pairing button indicator light begins blinking to indicate the power is on. 2 From the phone, perform a Bluetooth device discovery while holding it close to the adapter. The phone lists Bluetooth devices it finds. 3 Select Motorola DC800. 4 Select OK or Yes to pair your stereo adapter and phone. 5 Enter the passkey: 0000 6 Select OK. The Pairing button indicator light flashes rapidly to indicate pairing is successful. 5 TEST AND USE Verify the headphone and stereo adapter work together: 1 On your home stereo system, play music from your favorite source and turn the stereo receiver to that source. 2 Place the headphone on your head. If your stereo adapter and headphone are successfully paired, you will hear music on the headphone. To verify the phone and stereo adapter work together: 1 On your phone, select and play MP3 music. 2 On your home stereo system, select the input the adapter is connected to. If your stereo adapter and phone are successfully paired, you will hear the MP3 music on your home stereo system. TROUBLESHOOTING My stereo adapter doesn't find my headphone. Make sure the headphone is close to the stereo adapter and in pairing mode, and the Pairing button indicator light on your stereo adapter is on and steady (see step 3). My stereo adapter worked with my phone before but now it's not working. Make sure your phone is on and the Bluetooth feature is turned on in your phone. If the Bluetooth feature was turned off or was turned on only temporarily, you may need to restart the Bluetooth feature and pair your phone and stereo adapter again (see step 4). Support. If you need more help, contact us at 1- 877-MOTOBLU. FOR DETAILS ABOUT YOUR STEREO ADAPTER visit us at www.hellomoto.com/bluetooth and click Support.
-
 1
1 -
 2
2
 |
 |