Motorola HMEZ1000 Quick Start Guide - Page 6
Don't Know, The Introduction to Detecting Wired Cameras window is - wireless camera
 |
UPC - 612572097243
View all Motorola HMEZ1000 manuals
Add to My Manuals
Save this manual to your list of manuals |
Page 6 highlights
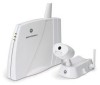
Quick Start Guide Easy Start Kit 11 Click Next. The Introduction to Detecting Wired Cameras window is displayed. If you purchased a wired camera, you can connect it now. 12 Click Next. The Introduction to Detecting Devices window is displayed. 13 Click Next. The Device Discovery window is displayed: Each device must be discovered to work with the system. 14 Plug in the wireless camera's 9V AC power adapter into an AC power outlet that cannot be switched on and off. If possible, we recommend powering the camera using its AC adapter. When AC power is not available, you can use batteries to provide power for about two hours of video transmission. The Wireless Camera must use AC power for the discovery process. 15 To associate the Wireless Camera with your USB Gateway, push the discovery button on the camera with the discovery tool. After the camera is discovered, it is listed on the Device Discovery window. Discovery button If desired, unplug the camera and move it to the desired location. The camera will remain "discovered." For information about mounting the camera, see the Wireless Camera Quick Start Guide. 16 Click Next. A window displays. If you have a Wi-Fi® wireless network, choose the Wi-Fi network channel from the drop-down list and click Next. The Motorola Home Monitor software intelligently works around this channel. If you do not have a Wi-Fi wireless network, choose Don't Know from the drop-down list and click Next. You can change this later. Page 4
-
 1
1 -
 2
2 -
 3
3 -
 4
4 -
 5
5 -
 6
6 -
 7
7 -
 8
8 -
 9
9 -
 10
10 -
 11
11
 |
 |
