Motorola MS355R User Guide - Page 3
Menu Options - radio
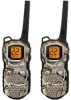 |
View all Motorola MS355R manuals
Add to My Manuals
Save this manual to your list of manuals |
Page 3 highlights
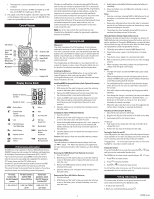
Date : Jan 14, 2011 For maximum clarity, hold the radio two to three inches away See the "Interference Eliminator Tone / Code Values" table on Model : MS350R from your mouth and speak directly into the microphone. Do not cover the microphone while talking. overleaf for details on tone frequencies and code values. 1. Press until the code starts to flash. Talk Range Desc2r. ipPretsisono:r LitonseelecAt thretcsodfe.or User Guide This radio is designed to maximize performance and improve transmission range. Do not use the radios closer than five feet apart. 3. Press to save the code setting or to continue set up. You can set a different code for each channel using this procedure. An extended press of or allows you to scroll Note: When you connect a headset, the radio is automatically set to the last chosen sensitivity level. QT Noise Filtering The QT noise-filtering feature helps to ensure uninterrupted communication with other Motorola radios that have this feature. This feature also filters out unwanted transmissions from other radios. This is useful in places where there is heavy radio traffic, such as amusement parks or ski resorts. Power Boost To boost the radio's power up to high power, press the top portion of the button when talking. If you know your party is close by, you can conserve the battery's energy by pushing the lower part of the button to use less power. Note: If you are on an FRS only channel (see "Channels and rapidly so you can quickly reach the code you want. This menu setting for repeater channels 15R-22R is used for receiving only. The value must match with the repeater output. Many repeaters will require a value of 0 or OFF. The transmitted code is set separately and is often required for repeater access. See "Selecting the Repeater Access (TX) Code" on overleaf for Note: QT noise filtering is not available when the radio is scanning. To turn QT noise filtering on or off: 1. Press until displays. The current setting On/Off will flash. Frequencies" tables on overleaf for details) the radio will only use additional information. 2. Press or to turn noise filtering On or Off. low power when either portion of the is pressed. Note: You must set the Interference Eliminator Code to 0 to 3. Press to confirm your selection or to continue Monitor Button Use the Monitor function to check if a channel is currently in use by others. For maximum range performance, the Monitor function will also help you to hear signals that are weak. communicate with radios that do not have Interference Eliminator Codes. Setting and Transmitting Call Tones This radio can transmit different call tones to other radios in your set up. To transmit to a radio that has QT noise filtering turned on: 1. Select the same channel and Interference Eliminator Code as the other radio. To latch the Monitor function on, Press and hold for three seconds. When an empty channel is located, you will hear continuous static and noise on that channel. group so you can alert them that you want to talk. The radio has 10 call tones from which to choose. To set a call tone: 2. Press to send a call tone. This allows your voice to pass through the QT noise filter on the receiving radio. 3. Press and speak normally. To turn the Monitor function off, tap a second time or press . 1. Press until the current call tone setting flashes and Note: If you skip step 2, the beginning of your message may Push to Talk Timeout Timer To prevent accidental transmissions and save battery life, the appears. 2. Press or to change and hear the call tone. not be heard on the receiving radio. For a 30-second period, starting after the last transmission, all transmissions received on the selected channel and code will pass radio emits a continuous warning tone and stops transmitting if 3. Press to set the new call tone or to continue set up. through the QT noise filter. you press for 60 continuous seconds. To transmit your call tone to other radios set to the same channel and Interference Eliminator Code as your radio, VibraCallTM Alert VibraCallTM is a vibrating alert that notifies that the radio is Menu Options There are 12 options you may set to your preferences. Each press press . Note: Setting the call tone to 0 disables the call tone feature. receiving a message. This is useful in noisy environments. When the alert is on, the radio vibrates once every 30 seconds when you receive a message on the channel and code you set. of the MENU key advances you to the next option setting. Press the or keys to change the setting. The menu will automatically close 5 seconds after the last press of any button. After the last menu item, the radio exits MENU mode and returns to operation of the radio. A press of the button while setting any menu option will immediately save all your settings and return Hands-Free Use Without Accessories ( ) You can use the iVOX feature to transmit hands-free without the need for any headset accessories. Once iVOX is turned on, the radio detects your voice and transmits when you speak into the internal microphone. 1. To turn vibrating alerts on, press until is displayed. The current setting will flash. 2. Press or to change the setting to On/Off. 3. Press to set or to continue set up. to operation of the radio. 1. Press until appears on the display. The current bAalltMterEyNisUfsuelltytidnigsschwairllgreedveorrtrbeamcokvteodthfoerfamcotroerythdaenfa3u0ltsveaclounedsDMsif.atohtedee:lJ:aMn2.S134sPe5r,et0t2sinsR0g1O1no/Or ff will to flash. select On or Off. Keypad Tones You may enable or disable the speaker key tones. You will hear the key tone each time a button is pushed. Menus and Values Description : Line Arts for User Guide 3. Press to setDorate t:oJcaonntin1u4e,se2t0u1p.1 1. Press until appears. The current setting On/Off will flash. 1. Channel (1-22 and 15R-22R) Model : MS350R 2. Press either or to turn On or Off. 2. Interference Eliminator Code (1-121 or OFF) 3. Call Tone (1-10 or OFF) 4. iVOX (ON/OFF) HYoaundcsa-nFrtreaenUsmseitWhaiDtnhdeAss-cfcrceeresipsmotoriiroeesnre( :liaLbilny)weitAh rthtesufsoerofUser Guid3e. Press to confirm or to continue set up. optional headset accessories. Once VOX is turned on, the radio Note: When the key tone feature is off, the following are not disabled: 5. VOX sensitivity (1-3) detects your voice and transmits when you speak. • Transmit timeout alert tone 6. QT Noise Filtering (ON/OFF) 7. VibraCall (ON/OFF) 8. Keypad Tones (ON/OFF) Many accessories (sold separately) are available for this radio. For more information, visit our Web site at www.motorola.com or shop.giantintl.com. • Call tone • Low battery alert tone or • The transmitted talk confirmation tone 9. Talk Confirmation Tone (ON/OFF) 10. Auto Power Off (30/60/90 minutes or OFF) 11. Repeater Channel Enable (ON/OFF) 1. Turn the radio off and plug the VOX accessory into the accessory port. Transmitting a Talk Confirmation Tone You can set this radio to transmit a unique tone when you finish transmitting. It is like saying "Roger" or "Over" to let others 12. Repeater Transmitted Interference Eliminator Code 2. Turn the radio on. VOX shows on the display. know you are finished talking. Talk Confirmation Tone is disabled Selecting the Channel This radio has 22 simplex channels plus 8 repeater duplex channels. Channels are shared by other radio users and channel selection will vary based on your location. Select a channel that is 3. Adjust the volume appropriately by pressing or . Lower the volume before placing the accessory on your head or in your ear. 4. To turn off, simply remove accessory. in repeater mode on channels 15R-22R. 1. Press until the appears. The current setting On/Off flashes. 2. Press or to turn On or Off. not being used from the 22 available simplex channels. Channels 8-14 are low power (FRS 0.5 watt). All other channels are GMRS. When the radio is on a FRS 0.5 watt channel, displays. When the radio is on a GMRS 1.5 watt channel, displays. The 8 GMRS repeater duplex channels 15R - 22R are disabled by default. See "Enabling Repeater Channels" on overleaf in order to select a repeater channel. See the "Channels and Frequencies" tables on overleaf for details on channel frequencies. Notes: • There is a short delay between the time you start talking and when the radio transmits. There is a short delay before the transmission is completed. • The accessory port cover must be tightly in place to maintain the water tight seal of the radio. Setting the Sensitivity Level When in Mode Adjusting the radio's sensitivity level helps minimize the possibility of unintended noises triggering a transmission and 3. Press to set or to continue setup. Auto Power Off Your radio will save power by automatically turning itself off if unused after a predetermined amount of time. 1. Press until displays. The current setting (0, 30, 60 or 90) will flash. 2. Press or to set the time to 30 minutes, 60 minutes or 90 minutes. When this feature is activated, the will remain on the display. 1. Press . The current channel setting flashes. helps the radio pick up soft voices. 3. When you exit the Menu mode, the timer will begin. If a 2. Press or and select the channel. 1. Press until VOX and the level setting (1 - 3) appear on the button is pressed, or if there is an incoming signal, the timer 3. Press to save the channel setting or to continue set up. Selecting the Interference Eliminator Code This radio has 121 Interference Eliminator Code settings. When a channel is in use by 2 or more groups, this feature blocks the reception of signals that do not carry the matching tone or code. There are 121 privacy codes. 0 is the off position, no codes are enabled, and all users of that channel will be heard. display. 2. Press or to select the sensitivity level. 3. Press to set or to continue set up. 3 = High Sensitivity for quiet environments 2 = Medium Sensitivity for most environments 1 = Low Sensitivity for noisy environments will restart. 4. Press to confirm or to continue set up. Enabling Repeater Channels Use of a repeater can greatly increase the radio range and coverage area. Repeater use must be coordinated with the owner of the repeater. Be sure to understand and follow the sharing and usage rules for each repeater system. 3 MS350 Series
-
 1
1 -
 2
2 -
 3
3 -
 4
4 -
 5
5
 |
 |
