Motorola RS409-SR2000ZZR Quick Reference Guide - Page 7
Scanning Tips, Finger Strap Assembly Replacement
 |
View all Motorola RS409-SR2000ZZR manuals
Add to My Manuals
Save this manual to your list of manuals |
Page 7 highlights
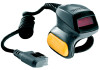
Quick Reference Guide 7 5. If the decode is successful the LED turns green. The terminal beeps if programed accordingly. Scanning Tips • For larger bar codes, hold the RS409 farther away from the bar code. • For bar codes with bars that are closer together, hold the RS409 closer to the bar code. • The optimal scanning distance varies with bar code density, but 10 to 25 cm (4 to 10 inches) generally works. Practice to determine what distances to work within. • Do not position the RS409 exactly perpendicular to the bar code being scanned. In this position, reflected light can bounce back into the exit window, and possibly prevent a successful decode. Finger Strap Assembly Replacement The finger strap assembly can be changed for each user or for replacement. To replace the finger strap assembly: 1. Press down on the finger strap assembly release tab. Release Tab 2. Slide the finger strap assembly out of the trigger assembly. 3. Align a new finger strap assembly with the slot in the trigger assembly. 4. Push the finger strap assembly into the trigger assembly until the release tab clicks into place.
-
 1
1 -
 2
2 -
 3
3 -
 4
4 -
 5
5 -
 6
6 -
 7
7 -
 8
8 -
 9
9 -
 10
10 -
 11
11 -
 12
12 -
13
-
14
-
15
-
16
 |
 |
