Motorola RS409-SR2000ZZR Quick Reference Guide - Page 8
Replacing the Trigger Assembly
 |
View all Motorola RS409-SR2000ZZR manuals
Add to My Manuals
Save this manual to your list of manuals |
Page 8 highlights
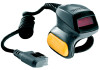
8 RS409 Ring Scanner 5. Insert your index finger through the finger strap. Tighten the strap and press the hook and pile together. 6. If required, cut excess finger strap material. Replacing the Trigger Assembly To replace the trigger assembly: 1. Remove the finger strap assembly. 2. Turn the RS409 upside-down. 3. Remove the set screw with screwdriver. 4. Turn the trigger assembly counter-clockwise until the exit window and scan trigger align. 5. Lift the trigger assembly off the scan assembly. 6. Align replacement trigger assembly with scan assembly. 7. Rotate trigger assembly 1/4 turn clockwise. 8. Tighten the set screw with screwdriver. 9. Replace finger strap assembly.
-
 1
1 -
2
-
 3
3 -
 4
4 -
 5
5 -
 6
6 -
 7
7 -
 8
8 -
 9
9 -
 10
10 -
 11
11 -
 12
12 -
 13
13 -
14
-
15
-
16
 |
 |

8
RS409 Ring Scanner
5.
Insert your index finger through the finger strap. Tighten the strap and press
the hook and pile together.
6.
If required, cut excess finger strap material.
Replacing the Trigger Assembly
To replace the trigger assembly:
1.
Remove the finger strap assembly.
2.
Turn the RS409 upside-down.
3.
Remove the set screw with screwdriver.
4.
Turn the trigger assembly counter-clockwise until the exit window and scan
trigger align.
5.
Lift the trigger assembly off the scan assembly.
6.
Align replacement trigger assembly with scan assembly.
7.
Rotate trigger assembly 1/4 turn clockwise.
8.
Tighten the set screw with screwdriver.
9.
Replace finger strap assembly.