Mr. Coffee BVMC-KNX23 User Manual - Page 6
Setting The Clock And Delay Brew Time, Preparing For Use
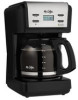 |
View all Mr. Coffee BVMC-KNX23 manuals
Add to My Manuals
Save this manual to your list of manuals |
Page 6 highlights
SETTING THE CLOCK AND DELAY BREW TIME To Set the Clock: 1. Plug the power cord into a standard electrical outlet. The clock will flash on the control panel to indicate that the time has not been set yet. 2. Press and hold the HR./MIN. button until you reach the current time. The AM and PM Figure 1 will light up on the left side of the display (Figure 1). NOTE: Pressing any button before setting the clock will cause the clock to start keeping time from 12:00 a.m. You must set the clock if you want to use the Delay Brew feature. Figure 2 To Set the Delay Brew Time: While the display is in the clock mode, simply press the SET DELAY button (Figure 2) and, while the Delay Brew Indicator LED is flashing, set the brew time by pressing the HR./MIN. button. The AM and PM will light up on the left side of the display (Figure 3). Figure 3 Press the SET DELAY button to set the time. The display will change to the current time. NOTE: To activate the DELAY BREW cycle, see the "Brewing Coffee Later" section. To check the programmed time, push the SET DELAY button. The display will show the time you have programmed the coffee to brew. If you press the SET DELAY button again or wait a few seconds , the display will switch back . 10 BVMC-KNX_16ESM1.indd 11-12 PREPARING FOR USE Selecting and Measuring Ground Coffee: For best results, use a level tablespoon for ground coffee measurement. Make sure you use medium grind coffee for a perfect brew. A. Suggested Coffee Measurement Chart: To Brew 12 Cups 10 Cups 8 Cups 6 Cups 4 Cups Ground Coffee 9 tbsp. 7.5 tbsp. 6.5 tbsp. 4.5 tbsp. 3 tbsp. 1 level tablespoon (tbsp) = 5 gr./0.17 oz. 1 cup = 5 fl. oz. of brewed coffee Use more or less coffee to suit your taste. 11 4/1/16 9:42 AM
-
 1
1 -
 2
2 -
 3
3 -
 4
4 -
 5
5 -
 6
6 -
 7
7 -
 8
8 -
 9
9 -
 10
10 -
 11
11 -
 12
12 -
13
-
14
-
15
-
16
-
17
-
18
-
19
-
20
-
21
-
22
-
23
-
24
-
25
-
26
-
27
 |
 |
