Mr. Coffee JWX27 User Manual - Page 9
Brewing Coffee Later, Cleaning And Maintaining Your Coffeemaker
 |
View all Mr. Coffee JWX27 manuals
Add to My Manuals
Save this manual to your list of manuals |
Page 9 highlights
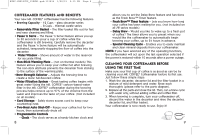
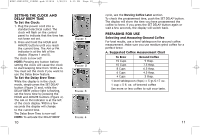
BVMC-JWX12CUP_15ESM1.qxd:133834 1/28/15 2:35 PM Page 16 Press the Fresh Brew™ Timer button once (Figure 8) and the clock time will change to show the amount of time that has passed since brewing completed. Push again to display current time. NOTE: The BREW NOW green light must be on for TIMER feature to operate. The time and delay brew time cannot be set when the fresh brew time is displayed. FIGURE 8 BREWING COFFEE LATER 1. You must first set the time for when you would like the coffeemaker to begin brewing your coffee as described in "Setting the Clock and the Delay Brew Time" section. 2. Prepare your coffeemaker as described in "Adding Water and Ground Coffee" section. 3. To activate DELAY BREW and program your coffeemaker to brew coffee at a later time, press the SELECT/OFF button twice (Figure 9). The yellow DELAY BREW light will turn on. The coffeemaker is now set to automatically brew coffee at the pre-set later time. At this time the brew strength light will turn on. You can select the strength that you desire by pressing the BREW STRENGTH button. FIGURE 9 4. At the pre-set time, the green BREW NOW light will turn on and the DELAY BREW yellow light will turn off, indicating the brewing has started in the selected brew strength. The Fresh Brew™ Timer feature will start. 16 5. The coffeemaker warmer plate will keep your coffee hot for 2 hours and then automatically turn off. Thermal models will turn off at the end of the brew cycle. NOTE: Scalding may occur if the lid is removed during brewing cycles. As a safety feature, your coffeemaker will NOT start again automatically the next day. If you want your coffee to brew at the same time the following day, simply add a new filter, coffee and water and set DELAY BREW, by repeating Steps 2 and 3 above. To cancel DELAY BREW: Press the SELECT/OFF button until all lights turn off. CLEANING AND MAINTAINING YOUR COFFEEMAKER Daily Cleaning Always turn off, unplug and allow the coffeemaker to cool before cleaning. Remove the filter basket, permanent filter (not included on all models), decanter and decanter lid and wash them in a solution of hot water and mild liquid soap. Never use abrasive cleansers, steel wool pads or other abrasive materials. Dishwasher top rack safe parts: glass decanter and lid, filter basket and permanent filter. The water filter disk and thermal decanter are not dishwasher safe. ! CAUTION! Never immerse the coffeemaker itself in water, in any other liquid or place in the dishwasher. Regular Cleaning and Maintenance Decalcifying your MR. COFFEE® Coffeemaker Minerals (calcium/limestone) found in water will leave deposits in your coffeemaker and affect its performance. It's recommended that you regularly remove these deposits by using MR. COFFEE® Cleaner or vinegar. MR. COFFEE® Cleaner is available at many retail stores or by calling the Consumer Service Department at 1-800-MR COFFEE (1-800-672-6333). 17
-
 1
1 -
2
-
3
-
 4
4 -
 5
5 -
 6
6 -
 7
7 -
 8
8 -
 9
9 -
 10
10 -
 11
11 -
 12
12 -
 13
13 -
 14
14 -
15
-
16
-
17
-
18
-
19
-
20
-
21
-
22
-
23
-
24
-
25
-
26
-
27
-
28
 |
 |
