Mr. Coffee VBX20 User Manual - Page 6
Preparing For Use
 |
View all Mr. Coffee VBX20 manuals
Add to My Manuals
Save this manual to your list of manuals |
Page 6 highlights
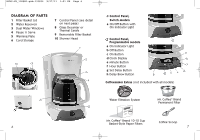
BVMC-VB_11ESM1.qxd:133834 9/27/11 1:51 PM Page 10 To Set the Delay Brew Time: After setting the clock, simply press and hold the SET DELAY button (Figure 1), and set the brew time by pressing the HOUR and MINUTE buttons. The PM indicator will display when a PM hour is shown. NOTE: To activate the DELAY BREW cycle, see the "Brewing Coffee Later" section. (Figure 1 - Set Delay) To check the programmed time, push the SET DELAY button. The display will show the time you have programmed the coffee to brew. PREPARING FOR USE Selecting and Measuring Ground Coffee For best results, use a level tablespoon for ground coffee measurement. Make sure you use medium grind coffee for a perfect brew. Suggested Coffee Measurement Chart To Brew Ground Coffee 12 Cups 9 tbsp. 10 Cups 7.5 tbsp. 8 Cups 6.5 tbsp. 6 Cups 4.5 tbsp. 4 Cups 3 tbsp. 1 level tablespoon (tbps) = 5 gr./0.17 oz. 1 cup = 5 fl. oz. of brewed coffee Use more or less coffee to suit your taste. 10 Water Filtration System (Not included. Available at your favorite retailer or on mrcoffee.com) Your coffeemaker has been designed to use the MR. COFFEE® Water Filtration System. This carbon-based water filter improves the taste of your coffee by removing up to 97% of the chlorine from the water you may use to brew your coffee. First look for the MR. COFFEE® Filtration Friendly Symbol on the bottom of your filter basket. If you do not see this symbol, please call 1-800-672-6333. Red Indicator To use the water filtration system in your MR. COFFEE® Coffeemaker, please follow these steps: 1. Align the red indicator to the letter on the frame that corresponds with the month that you are using the disk for the first time. This serves to remind you to change the disk every month (approx. 30 brewing cycles). 2. Place a MR.COFFEE® paper or Frame permanent filter in the filter basket. Place coffee grounds in Filter Disk the paper or permanent filter. NOTE: For optimum results, use the water filtration system with a Disk Cover permanent filter. 3. Place the MR. COFFEE® water filter in the filter basket, making sure that the side marked "this side up" faces you and that the water filter is level. 4. Close the filter basket lid. You are now ready to brew great tasting coffee. 11
-
 1
1 -
 2
2 -
 3
3 -
 4
4 -
 5
5 -
 6
6 -
 7
7 -
 8
8 -
 9
9 -
 10
10 -
 11
11 -
 12
12 -
13
-
14
-
15
-
16
-
17
-
18
-
19
-
20
-
21
-
22
-
23
-
24
-
25
-
26
 |
 |
