Naxa NF-503 NF-503 manual - English - Page 6
Product Diagram, Getting Started
 |
View all Naxa NF-503 manuals
Add to My Manuals
Save this manual to your list of manuals |
Page 6 highlights
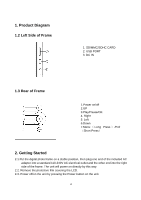
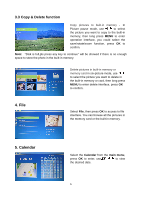
1. Product Diagram 1.2 Left Side of Frame 1. SD/MMC/SDHC CARD 2. USB PORT 3. DC IN 1.3 Rear of Frame 1.Power on/off 2.UP 3.Play/Pause/OK 4. Right 5. Left 6.Down 7.Menu ( Long Press ) /Exit (Short Press) 2. Getting Started 2.1 Put the digital photo frame on a stable position, then plug one end of the included AC adapter into a standard 110-240V AC electrical outlet and the other end into the right side of the frame. The unit will power on directly by this way. 2.2. Remove the protective film covering the LCD. 2.3. Power off/on the unit by pressing the Power button on the unit. 4
-
 1
1 -
 2
2 -
 3
3 -
 4
4 -
 5
5 -
 6
6 -
 7
7 -
 8
8 -
 9
9 -
 10
10
 |
 |

1. Product Diagram
1.2 Left Side of Frame
1.3 Rear of Frame
2. Getting Started
2.1 Put the digital photo frame on a stable position, then plug one end of the included AC
adapter into a standard 110-240V AC electrical outlet and the other end into the right
side of the frame. The unit will power on directly by this way.
2.2. Remove the protective film covering the LCD.
2.3. Power off/on the unit by pressing the Power button on the unit.
1.Power on/off
2.UP
3.Play/Pause/OK
4. Right
5. Left
6.Down
7.Menu
(
Long Press
)
/Exit
(
Short Press
)
1. SD/MMC/SDHC CARD
2. USB PORT
3. DC IN
4