Netgear A6210 Installation Guide - Page 1
Netgear A6210 Manual
 |
View all Netgear A6210 manuals
Add to My Manuals
Save this manual to your list of manuals |
Page 1 highlights
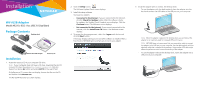
Installation WiFi USB Adapter Model A6210, 802.11ac USB 3.0 Dual Band Package Contents Desktop dock A6210 WiFi USB Adapter Resource CD Installation 1. Insert the resource CD in your computer CD drive. Note: If your computer does not have a CD drive, download the A6210 resource CD driver by visiting http://support.netgear.com. Click the Support For Home Go button and enter A6210 in the search field. If the Resource CD screen does not display, browse the files on the CD and double-click Autorun.exe. The NETGEAR Resource CD screen displays. 2. Click the Setup button. The Software Update Check screen displays. 3. Install the setup software. You have two options: • Connected to the Internet. If you are connected to the Internet, click the Check for Updates button. After the software checks for updates, the Update Check Complete screen displays. Click the Continue button. The Welcome screen displays. • Not connected to the Internet. If you are not connected to the Internet, click the Install from CD button. The Welcome screen displays. 4. To accept the license agreement, select the I agree radio button and click the Next button. A message displays asking you to wait while software is installed. After a few minutes, NETGEAR genie prompts you to insert your adapter. 5. Install the adapter with or without the desktop dock: • To use the adapter with the desktop dock, place the adapter into the dock and connect the USB cable to the USB port on your computer. Note: When the adapter is placed in the desktop dock, you can fold out the adapter to its maximum angle for increased WiFi performance. Note: NETGEAR does not recommend that you use another cable to connect the adapter to the USB port on your computer. Use the desktop dock with the attached cable that is supplied in the package. Using another USB cable might affect the performance and correct functioning of the adapter. • To use the adapter without the desktop dock, insert the adapter into a USB port on your computer.
-
 1
1 -
 2
2
 |
 |