Netgear AC1900 Installation Guide - Page 1
Netgear AC1900 Manual
 |
View all Netgear AC1900 manuals
Add to My Manuals
Save this manual to your list of manuals |
Page 1 highlights
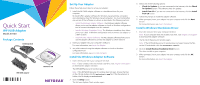
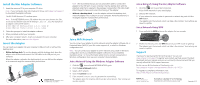
Quick Start WiFi USB Adapter Model A7000 Package Contents Desktop dock WiFi USB adapter Resource CD Set Up Your Adapter Follow these high-level steps to set up your adapter: 1. Install the NETGEAR adapter software or a standalone driver for your computer. NETGEAR offers adapter software for Windows-based and Mac computers and a standalone driver for Windows-based computers. You must install either one version of the software or a driver, as described in the following sections: • Install the Windows Adapter Software. The Windows adapter software allows you to use the adapter software or a built-in Windows configuration tool to connect the adapter to a WiFi network. • Install a Windows Standalone Driver. The Windows standalone diver allows you to use a built-in Windows configuration tool to connect the adapter to a WiFi network. • Install the Mac Adapter Software. The Mac adapter software allows you to use the adapter software to connect the adapter to a WiFi network. 2. Insert your adapter into your computer's USB port. For more information, see Insert the Adapter. 3. Join a WiFi network using the adapter software or a built-in Windows configuration tool. For more information, see Join a WiFi Network. Install the Windows Adapter Software 1. Insert the resource CD in your computer CD drive. Note: If your computer does not include a CD drive, visit netgear.com/support to download the adapter software. The NETGEAR Resource CD window opens. Note: If the NETGEAR Resource CD window does not open, browse the files on the CD and double-click the autostart.exe file. If the file extension is hidden, the file displays as autostart. 2. Click the Setup button. The Software Update Check window opens. 3. Select one of the following options: • Check for Updates. If you are connected to the Internet, click the Check for Updates button. The software check for updates. • Install from CD. If you are not connected to the Internet, click the Install from CD button. 4. Follow the prompts to install the adapter software. 5. When prompted, insert your adapter into your computer and click the Next button. For more information, see Insert the Adapter. Install a Windows Standalone Driver 1. Insert the resource CD in your computer CD drive. Note: If your computer does not include a CD drive, visit netgear.com/support to download the adapter software. The NETGEAR Resource CD window opens. Note: If the NETGEAR Resource CD window does not open, browse the files on the CD and double-click the autostart.exe file. 2. Click the Install Windows Standalone Driver button. The driver installs on your computer. 3. When prompted, insert your adapter into your computer and click the OK button. For more information, see Insert the Adapter.
-
 1
1 -
 2
2
 |
 |